Tips And Tricks For Cooking The Best Medium-Rare Steak
Cooking the perfect steak doesn't require many ingredients, but it can require a bit of skill, especially if you're aiming to reach an ideal medium-rare temperature. While many steak-lovers consider this the only temperature to eat steak, it can be hard to achieve. Too long of a cook time, and you've passed the point of no return, losing the beautiful pinkish middle to one that's gray and tough. Too little of a cook time, and you've got a hunk of red and bloodied meat on the plate. Neither makes for the most appetizing steak and the difference between these two fates is often less than a minute of cooking time, leaving a little margin for error. Fortunately, we have the best tips to foolproof your way to the perfect internal temperature, the perfect crust, and presentation.
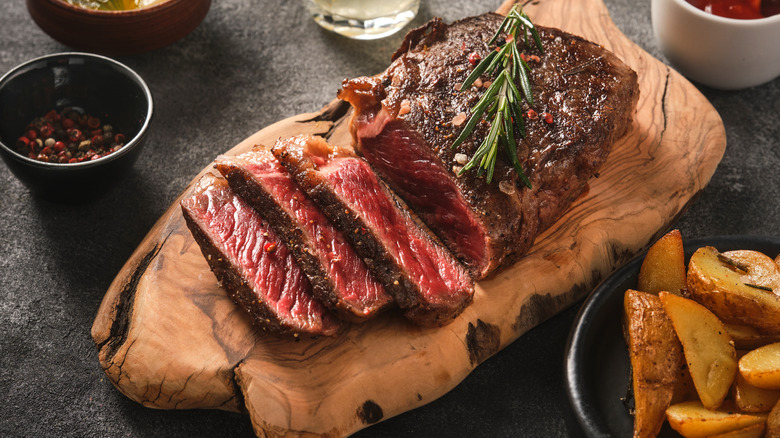
So what defines a medium-rare steak anyway? A medium-rare steak refers to the degree in which the steak reaches when cooked, according to Steak University. In this case, it's going to be in the range of 130 F – 140 F. But temperature isn't your only indicator of success. You're going to be able to visually see the meat take on a pink center. It shouldn't look red or raw in the middle if it's been cooked successfully. Finally, the taste will be juicy, tender, and the fattiness should be well distributed, giving the steak a melt-in-your-mouth kind of quality. Ready to dig in? Let's go.
Choosing the right cut
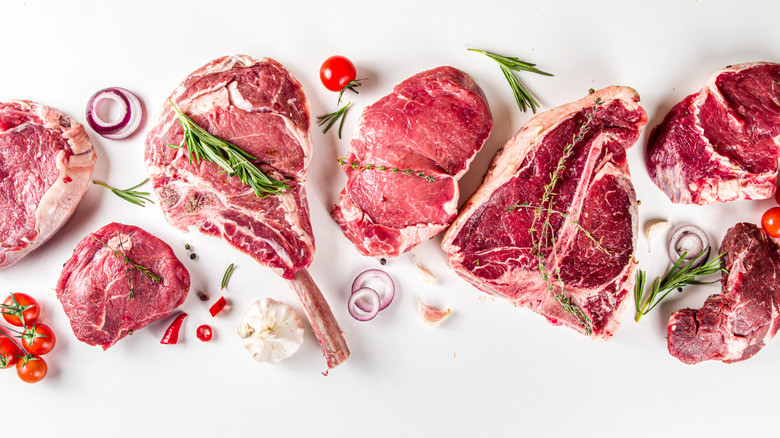
If you didn't know it before (many don't), cuts matter depending on what temperature you're aiming to cook your meat. So before you even approach your butcher, you want to have an idea in your mind of what you're doing with your meat. First, it helps to know that different cuts of steak yield different levels of tenderness and flavor. Factors such as where on the animal the meat was cut from, marbling of the fat, the aging process, and the diet of the animal all affect how your steak tastes and how tender it is. For example, as meat ages, the tissues break down, yielding more tender meat. Grass-fed and grain-fed can also play a role. As Omaha Steaks notes, grass-fed animals yield a leaner cut while grain-fed are fattier, with more marbling, and thus more tender.
According to Omaha Steaks, for medium-rare steak, you'll want to choose filet mignon, ribeye, top sirloin, or flatiron. The filet mignon when cooked medium-rare is going to yield a tender, low marbled steak with a "mild beef flavor." The ribeye is going to have much more marbling, and thus yield a rich and juicy mouthfeel. The top sirloin is known for being an affordable, "weeknight" dinner cut and it will taste beefy, rich, and lean. You don't want to overcook this cut. The flatiron, like the filet mignon, is going to be ultra-tender with a beefy flavor and succulent marbling. Now that you've got your meat picked out, it's time to prepare it.
Bringing the steak to room temperature
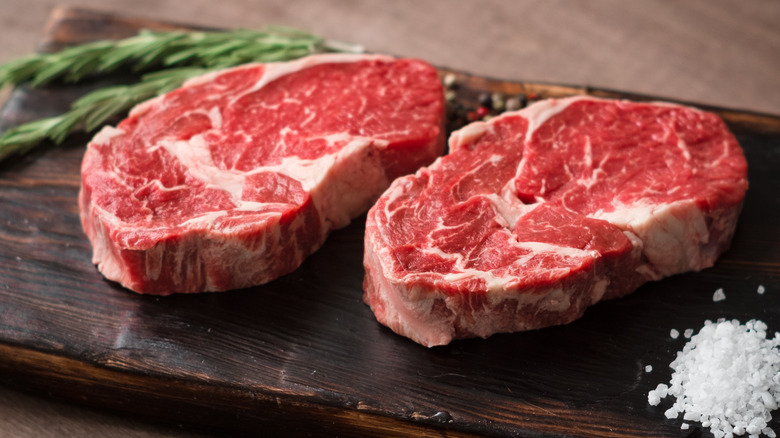
No matter which cut of meat you choose, you're likely going to want to bring it to room temperature before you cook it. Why is this important? It all has to do with ensuring an even cook. Imagine a very cold piece of meat being thrown into a hot pan. It's going to get hot and sear on the outside pretty quickly. But if the meat is cold on the inside, it's going to take much longer for it to cook all the way through, increasing your odds of an uneven cook, according to Steak School. Another theory is that this sudden and severe temperature change "can cause muscle fibres to tense up," and you probably don't want that.
Thomas Godfrey, chef and food operations manager at The Meat & Wine Co in Sydney suggests, "Get your steak out ahead of time — about 30-40 minutes is usually ample for a 500g steak. Time and patience are your best friend when cooking steak (or most meat, for that matter)."
One thing to note is that there's no need to bring the steak to room temperature if you plan to slow cook your meat. Examples of these preparations include sous vide, slow cooker, or low oven cooks. For searing and high-temperature cooking, you won't want to skip this part, however. When bringing the meat to room temp, carve out 30 to 60 minutes for this step. Then it's time to choose which method you're going to use to cook it.
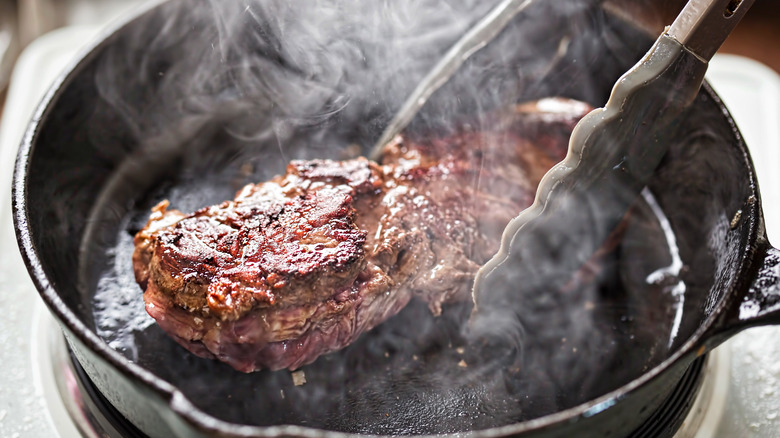
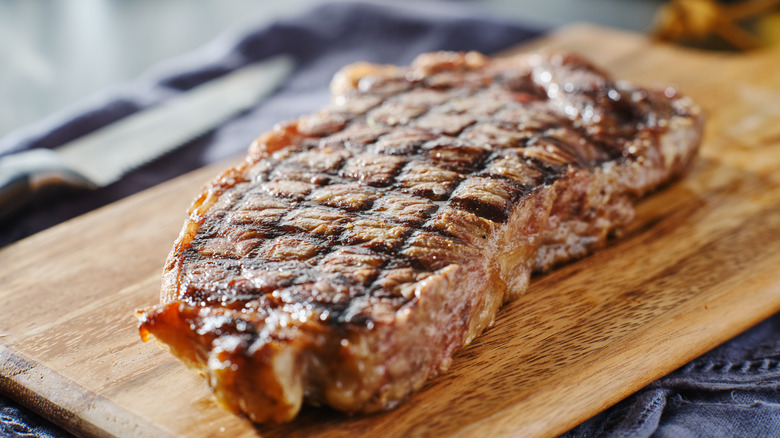
The stove-to-oven method
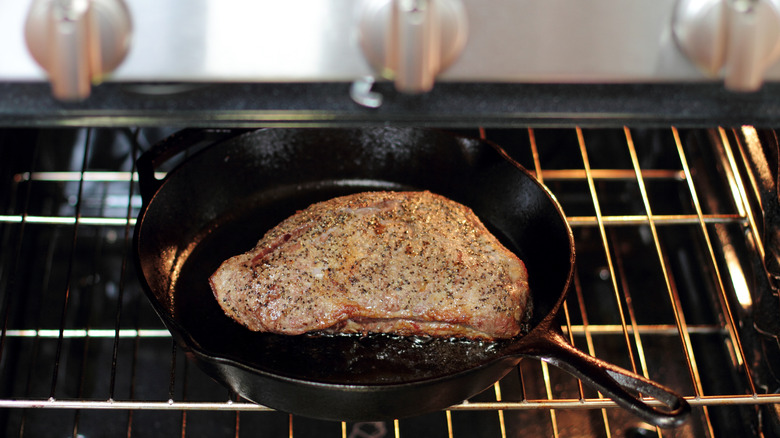
The stove-to-oven method is a classic and easy way to cook your steaks evenly. But you'll want to make sure you've got the right equipment. Because you're going to sear your steak on the stove in a pan and then transfer it to a hot oven, you need to make sure you're using an oven-proof pan. The best pan to use, hands down, is a cast-iron skillet. And Mark Bittman agrees. In an article for New York Times Cooking, the food writer points out that it's essentially the same as grilling a steak. Cast-iron is built for high heat and better distributes that heat throughout your meat, sealing in the juices along the way. His best tip for cooking steak in a cast-iron? "You don't need much in the way of seasoning; just a generous sprinkle of salt and freshly ground black pepper," he maintains. "A standard cast iron pan works great for this."
Before you start cooking your steak (and while you're letting your steak come to room temp), set your oven rack to the lowest position and preheat your oven to 500 F. Place the cast-iron skillet "over high heat, and heat until smoking," according to Bittman. Salt your pan, pat the steaks dry, and get cookin'. After the steaks hit the hot skillet, put the hot skillet in the oven (as Bittman notes, you'll want to be "wearing a thick oven mitt" for this part). Roast steaks for 4 minutes on each side for the perfect medium-rare temp.
The pan-sear method
The pan-sear method is another great technique for cooking the perfect medium-rare steak, without needing to transfer from stove to oven. It may take a little practice to master this cooking method, however, as different stoves can have hotspots and different pans may distribute heat differently. The best thing to do is practice and get to know your equipment well. But there are some general guidelines for mastering this method. As Jenn Segal, the classically trained chef who runs Once Upon a Chef, points out, "Pan-searing is a classic technique in which the surface of the food is cooked undisturbed in a very hot pan until a crisp, golden-brown, flavorful crust forms. It's the key to building flavor and texture in a dish."
Here's how she pulls it off. First, you'll want to pat your steaks dry. Remember, this is going to ensure the best browning. Next, you'll want to "generously" load up each side of the steak with whatever seasoning floats your boat. If you want to keep it simple, just use sea salt. Put your pan over medium-high heat until it's very hot. Segal also prefers the heaviness and searing ability of a cast iron. Add a bit of oil and once the oil's hot (it should be shimmering around the pan), add your steak. Segal's next tip? "Leave it alone!" After about 3 minutes, when "a deep-brown color" has been achieved, flip the steak and cook for an additional 3-4 minutes for the perfect medium-rare temperature.
The sous vide method
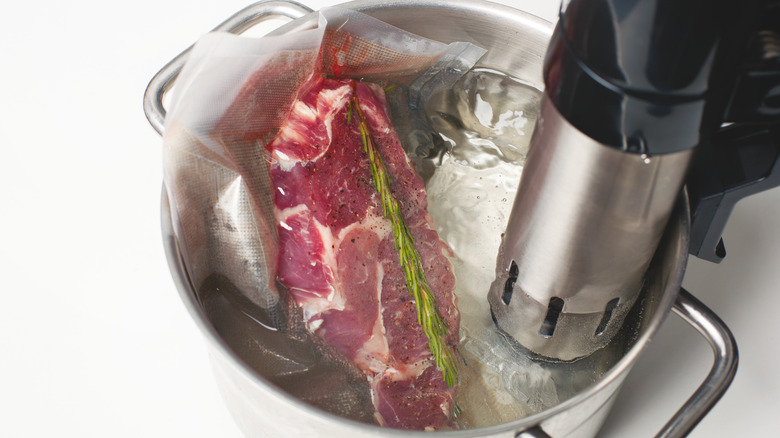
Sous vide, which is French for "under vacuum," involves sealing and immersing your steak in a pot of circulating water (per Serious Eats). All in all, it's pretty simple. For this method, you need a sous vide cooker, a device that immerses into a large pot of water that circulates and heats the water to your desired temperature.
In short, you'll want to season your meat and add it to your vacuum-sealed bag with herbs or whatever else. This will seal all those delicious flavors into the meat. Extract all the air from the bag and seal it before immersing it in the water bath. But before you do all this, remember that your sous vide cooker should already be preheated and good to go. Set the timer for at least one hour but up to 24 hours depending on how tender you want it and how much time you have (per Serious Eats). Once the sous vide part of the journey is done, pat it dry and fire up your pan over medium-high heat. Add a bit of oil to your pan, add your steak to the hot pan, and don't let it stay on one side for more than 30 seconds. You're not trying to cook your steak so this step is short and sweet.
The benefit of using this method can be summed up in one word: precision. The meat will slowly rise to the temperature of the water, ensuring a perfectly even cook throughout.
The reverse sear method
The reverse sear method is another simple way to go. Remember our stove-to-oven method where we seared the steak on the stove then baked it in the oven? Here you're reversing the process by first baking it in the oven then finishing it on the stove. As Jessica Gavin, certified culinary scientist, writes on her blog, "I'm a fan of this technique as it provides more control of the internal temperature, a stunning browned crust, and a more tender piece of beef."
This method focuses on a gentle cook in a low-temp oven (275 F) to seal in the meaty flavors and juices. One reason this works so well is that the low heat oven dries the surface of the meat without drying it out, which helps create a golden, crisp sear on the stove. Also, the slow and low cooking technique is why sous vide is successful, but here, you don't need fancy equipment.
Start by preheating your oven to 275 F. Season and bake your steak until the inside reaches about 95 F. Then heat your pan over high heat with oil added to the pan. Sear your steak for a couple minutes on each side — however long it takes to get the internal temp around 120 to 125 F. Remove from heat and set aside. The temp of your meat will continue to rise so you'll want to let the meat rest, which is one of the final steps we'll discuss shortly.
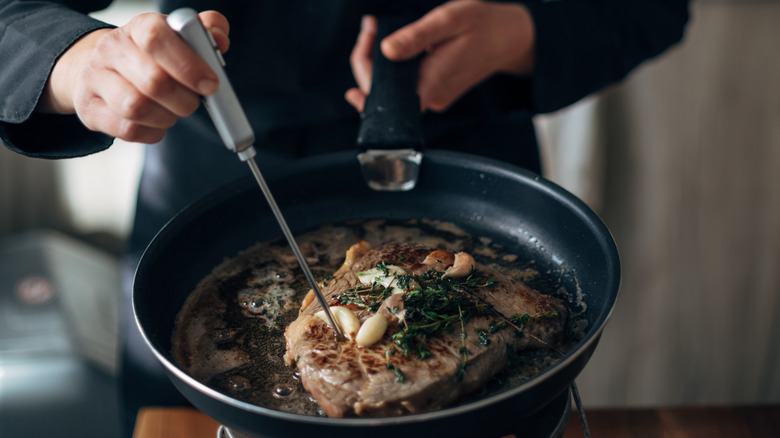
Butter basting method
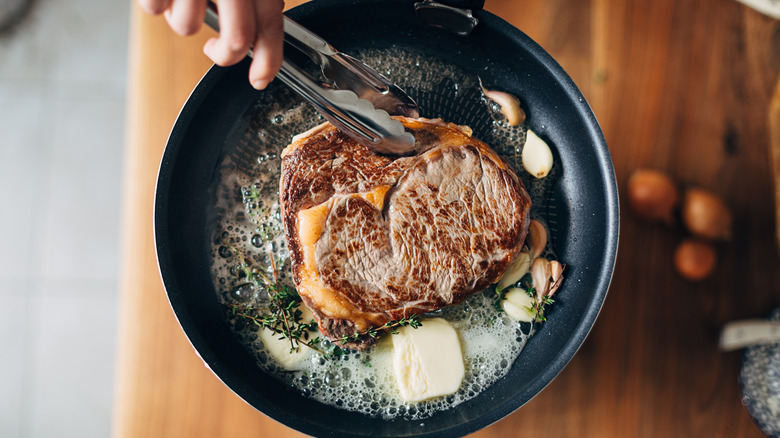
Basting is a frequently overlooked method for cooking steak, but it can up-level your steak-cooking game to a perfect 10. Although it looks fancy, it's incredibly easy to do and it offers a complexity of flavor, aromatic scents, and deep, fatty richness like none other. Serious Eats describes this method as having several important functions. First, it's a less intense way of cooking because while you're "spooning hot fat" over the top of the steak, the underside cooks "more gently" in the fat simultaneously. Second, it's your ticket to the most gorgeous-looking steaks. That's because you can literally baste the hot fat over any parts of the steak that look undercooked. Last, it gives you the opportunity to get creative with aromatics like garlic and herbs. You can add a handful of aromatics to the hot oil or butter, which will infuse all those flavors into your oil. As you spoon the fat over the meat, it's evenly working in all those incredible flavors.
How to do it? Add your steak to the hot pan, flipping to sear both sides. Tilt the pan so hot butter pools at the bottom corner and then drizzle that butter over the top of the steak. You won't be sorry. As Bon Appétit writes, "[Butter is] the secret to pretty much all the great steakhouse dinners you've ever had."
Continue flipping and basting until it's reached the perfect medium-rare temperature. Which actually brings us to our next topic: thermometers.
Gauging the temperature
By now you know that getting the perfect temperature for your steak is both critical and challenging. For those who are newer to cooking steak, it can be helpful to use thermometers, and we'll discuss the two most common types: probe and digital.
A probe thermometer works just the way you'd imagine. During the cooking process, simply stick the metal end of the thermometer into the center of the meat and wait until it hits at least 130 F, according to Steak University. While it sounds easy, the outlet notes the method isn't totally perfect. For one thing, by poking your steak, you're "creating an escape path for vital juices." This means you may be compromising serious moisture you'd rather retain inside the meat. Second, it may not always be the most convenient method, particularly if you're finishing your meat in the oven which can make it hard to read the temperature without constantly opening the oven door.
But fortunately, this isn't the only tool for reading temps. A second solution is a digital thermometer which uses infrared technology to gauge the temperature. But it's not nearly as accurate at gauging internal temps of your meat as it is for the surface temp. However, it can prevent serious moisture loss compared to the probe thermometer. In this case your next best bet may be to master the touch technique.
The touch technique
The touch technique will probably require a little bit of practice to get it down, but once you do, you'll know you're a steak-cooking master. The idea here is that you'll be able to press the meat with your finger and know if the steak is cooked to medium-rare perfection based solely on how it feels. So what are the key indicators of a medium-rare steak? According to Steak University, "When it comes to execution, a medium-rare steak will have some squish or give when lightly pressed on with your finger. If a steak is rare, it will be all squish and will hold an indent from where it's been pressed. A medium steak, or one cooked even longer, won't give at all, or only minimally."
Another way to tell if the meat is cooked properly is to compare it to the firmness of your palm. As Butcher Boy explains in their handy-dandy guide, you bring your thumb and middle finger together and, using your other hand, press the area of your palm right under your thumb. That area of palm should feel like medium-rare steak. So when the feel of the actual steak matches your palm steak, you're set. Obviously, you don't want to burn your fingers, and again, this is a more advanced technique. But once you get the feel for your steak's doneness, you may never use a thermometer ever again.
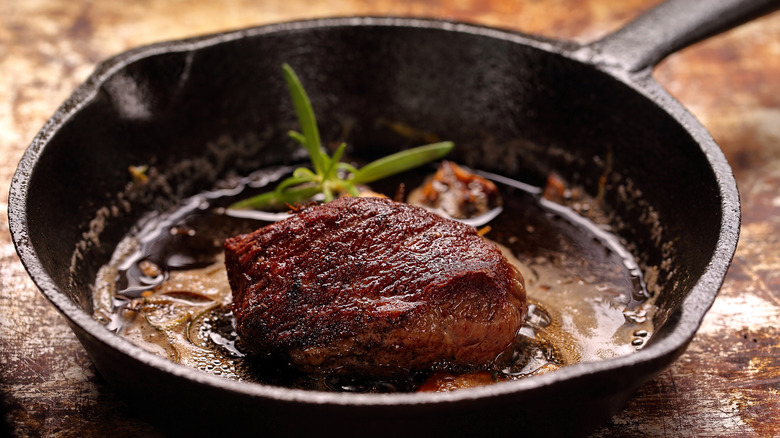
Let it rest
Now that the cooking part of your steak journey is complete, we arrive at one of the most critical aspects of perfecting your steak — letting it rest. It can defy all our human instincts to not immediately begin slicing open our steak and stuffing the savory goodness into our mouths. And yet, it's imperative to let your steak chill out for a sec. Bearded Butchers suggests that letting your steak rest is the number one "secret to a juicy steak." Why? Because when you remove your steak from the heat, the internal temp continues to rise, which means the juices are at their most liquid state. As the meat cools, the juices distribute evenly throughout the meat and toward the outer edges of the steak. If you cut into the meat too soon, the juices will run out of the steak, leaving the meat dry and tough. As Serious Eats puts it, it's sort of "like slitting the side of a soda bottle." A soda bottle full of meat juice, that is.
As a general rule of thumb, you're going to rest your steak "one minute for every 100 grams" of meat (per Bearded Butchers). There are 28 grams per ounce, so do with that what you will. As for location, you can use "the kitchen counter, on the stove top, or even in your oven" for meat resting purposes. The oven and stove shouldn't be on, but they can provide a little extra warmth to prevent them from getting cold.
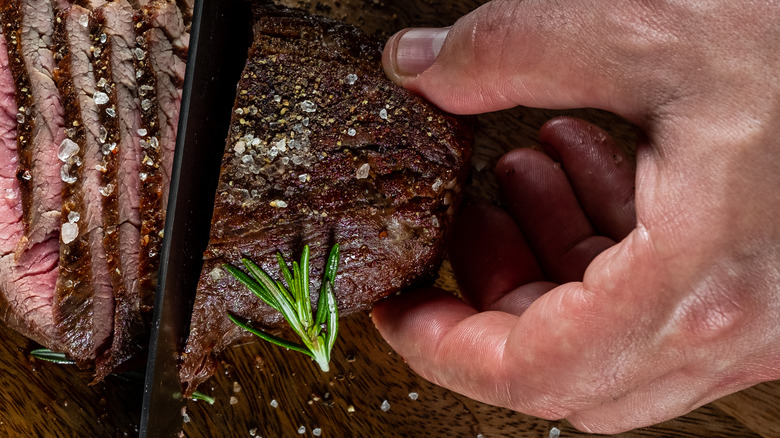
Cut the meat
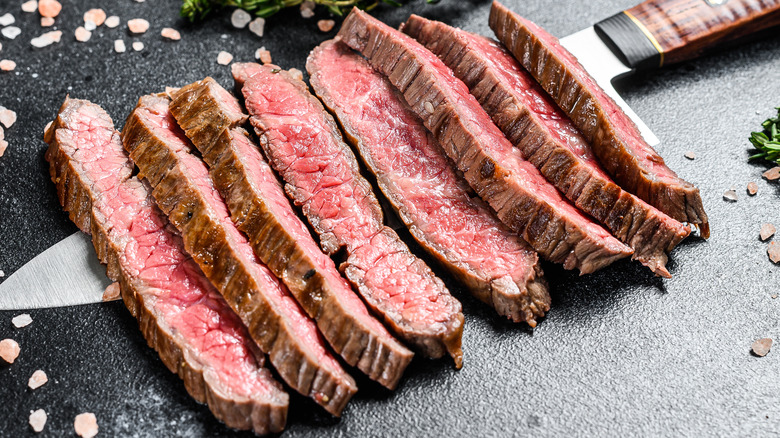
Now that your steak is cooked to perfection and has gotten plenty of rest, you're going to want to finish all your hard work off by cutting your steak perfectly. Of course, you can always serve your steaks whole, but cutting them can lend to family-style eating, or just add an extra fancy touch. Interestingly, there are right and wrong ways to cut your steak. By slicing steak the wrong way, it can actually spell disaster for all the hard work you put into cooking it. In fact, Taste of Home states that this step "is just as important" as getting the temperature correct. But don't be intimidated. By the time we're done, you'll be ready to go. So what's the main thing you need to know? Go against the grain. In other words, you're going to be paying attention to "the direction of the meat's muscle fibers." If you look closely at your meat, you're going to see a whole bunch of lines running across it. These are the fibers, aka the grain, aka the thing you want to cut against.
Once you've found the grain, you'll want to slice it perpendicular to the grain. By doing this, you're actually cutting into the fibers and making them shorter. "The shorter fibers are much easier to chew, resulting in a perfectly tender steak," Taste of Home promises. "If you sliced parallel to the grain, each piece of meat would contain long, fibrous strands that are harder for your teeth to get through."