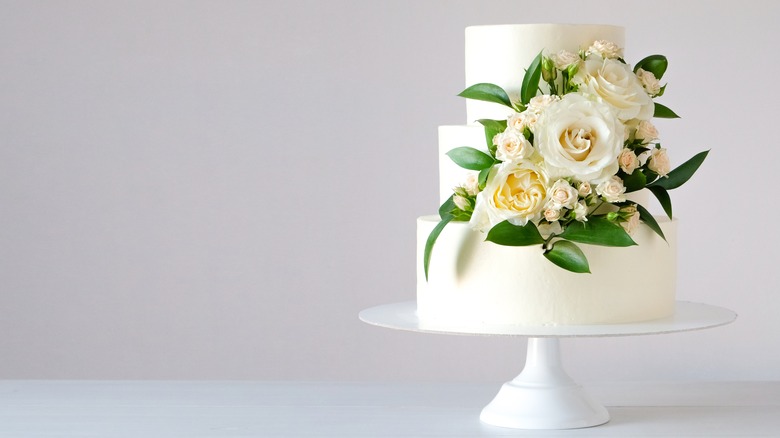
11 Cake Decorating Hacks You Need To Try
You've baked a (hopefully) delicious cake and now's the time to decorate it. You want it to look great, but you're overwhelmed by the decorating process and the tools you need to do a good job. You're not alone in this feeling. The precision, finesse, and array of specialized tools at the disposal of seasoned decorators can seem daunting to the casual baker. Many people don't have piping bags, fondant smoothers, or offset spatulas, and wonder how they will decorate a cake without these gadgets.
That's where these cake-decorating hacks come into play. We've got tips to make the cake-decorating process quicker and simpler. From making your own piping bag and piping tips to keeping wet fillings from dripping out with the help of a frosting dam, some of these tricks will save you time and effort, while others will help you get a great-looking cake without special equipment.
Whether you're just getting into baking, you love baking but don't have the right equipment, or you reluctantly bake cakes a few times a year for birthdays and special occasions, this article has your back. Here are 11 cake-decorating hacks you need to try.
Fill your piping bag over a glass
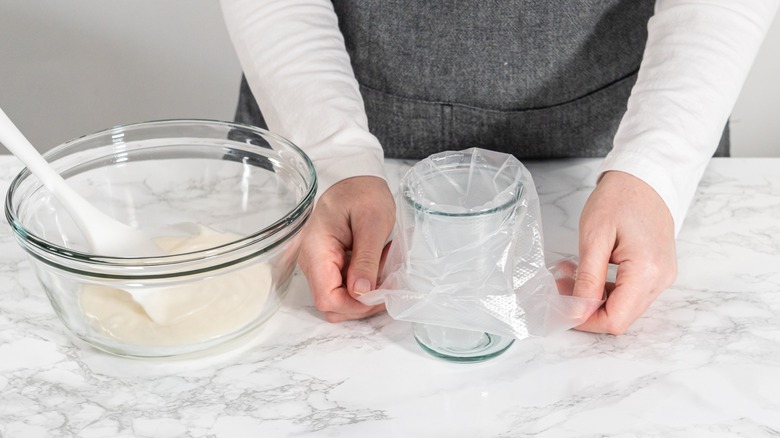
Filling your piping bag is just the first step to getting frosting on your cake, but it can be awkward and messy enough to make you want to give up and drive to a bakery. Luckily, there's a simple hack to help you out. Using a glass to help fill a piping bag with frosting is the trick you need to make the process easier and less messy.
First, prepare your piping bag. If you've got a plastic, disposable piping bag, start by cutting off the tip. If you have a reusable bag, you can skip this step. Then, if you're using a piping tip, fit it onto the end of your piping bag and make sure it's securely attached.
Next, choose a tall, sturdy glass that is wide enough to accommodate the bottom third or so of your piping bag. A pint glass or a similar size should work. Place the piping bag in the glass with the tip of the bag pointing down into the bottom of the glass. Fold the top edges of the piping bag over the rim of the glass. This helps keep the bag open so you can easily fill it. Finally, it's time to fill the bag with frosting. Spoon or scoop your frosting into the piping bag, making sure not to overfill it, then lift it out and twist the top end to seal it shut. You're now ready to pipe.
Cut your cake into layers using dental floss

If you're making a layer cake and you only have one cake pan, you'll need to bake one large cake and split it into two or more layers to fill it. When you do this, it's easy to make wonky, uneven layers — especially if your knives are dull or you don't have a knife with a blade longer than the diameter of the cake. So, how do you divide your cake into perfectly even layers? Using dental floss results in clean and even cuts without the need for a knife.
First, make sure your cake has cooled completely before cutting it. If it's still warm, it'll lack structural integrity and may end up falling apart. Once you're ready to get started, unwind a length of dental floss that's longer than the diameter of your cake. Make sure to use unflavored floss, so it doesn't leave behind a minty taste. Next, decide where you want to cut your cake to create layers.
Now comes the cutting part. Wrap the floss around the cake horizontally, making sure it's properly lined up, sitting where you want the cut, and even (not crooked). With steady, even pressure, pull the ends of the dental floss away from each other, slicing through the cake as you go. The dental floss will cut through the cake smoothly, creating clean and even layers.
Make your own piping bag using a freezer bag

While you can decorate a cake without piping, a piping bag makes life easier. Even if you're ultimately going to smooth out the frosting with a spatula, piping it onto the cake first helps keep it even. It's also way quicker and easier to pipe circles of frosting between layers rather than just slathering it on. Plus, piping keeps the frosting between layers even so you don't end up with a wonky cake.
The problem is that not everyone has a piping bag and you might not want to buy one, especially if you only bake occasionally. Or, perhaps, you usually use piping bags but you've run out and don't want to go to the store. Luckily, you can easily make a piping bag out of a regular freezer bag simply by snipping off one corner. Snip more or less off the corner of the bag depending on how much frosting you want to come out. You can even add a piping tip like you would with a conventional piping bag. Once you've snipped off the corner, simply fill it like you would an ordinary piping bag.
This hack lets you create beautiful piped decorations or apply frosting smoothly onto your cake without needing a traditional piping bag. It's a quick and easy alternative when you're in a pinch or don't have specialized tools on hand.
Use frosting to keep cake from sliding around
When decorating your cake, the last thing you want is for it to slide around on the board whenever you apply pressure to smooth the frosting or pipe patterns. Using a dollop of frosting between the bottom layer of your cake and the board or platter is a quick, simple hack to stabilize the cake. By doing so, you prevent it from sliding around while you're decorating it. Or, worse — from sliding off the platter when you're serving it.
When you put some frosting on the cake board or platter, then place the bottom layer of sponge on top, the frosting acts as glue to hold it in place. Having the cake firmly anchored in place makes it easier to work with while decorating. You can focus on adding intricate designs or details without having to worry about the cake moving around unexpectedly.
It also means that your finished cake isn't going to slide right off the board while you transport it — even if you're only moving it from the kitchen to the dining table. This hack only takes a second but it creates a stable foundation for the whole decorating process.
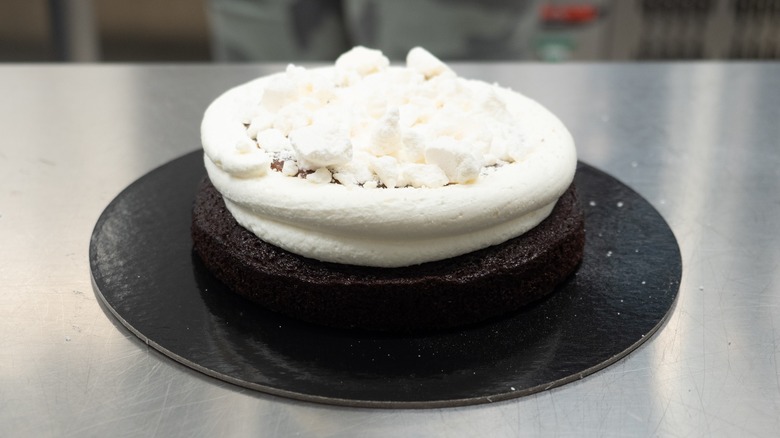
Turn cake scraps into a crumb topping
Not sure what to use to decorate your cake? One cool method is to use cake scraps to create a crumb topping that you can sprinkle over or press into frosting. If you've made a dome-shaped cake and trimmed your sponges to make the layers more even, you already have what you need to decorate in a way that both tastes great and looks good.
Instead of throwing away the scraps from leveling or trimming your cake, repurposing them into a delicious crumb topping is the way to go. This reduces food waste and means you don't have to buy separate ingredients to decorate with. And while some decorations (such as sprinkles) look good but don't add much flavor, cake crumbs are super tasty. By incorporating scraps from the same cake you're decorating, you ensure that the flavors complement each other perfectly.
All you need to do is crumble up any cake scraps into a mixing bowl until they reach a fine crumb consistency. Then you can use this mix to decorate the top of the sides of the cake. You can even use a stencil to make patterns with the crumb coating. It's simple, prevents food waste, and it's a decorating hack you'll want to remember.
Make a dam of frosting to keep fillings inside
Sometimes you want to fill a cake with something a bit looser or thinner than your average buttercream frosting, such as jelly or caramel. While these kinds of fillings can taste great, their consistency means it's easy for them to run out from between the layers. If this happens, not only do you lose the filling, but you also make a mess. Rather than the perfectly decorated cake you were envisioning, you're left with a dripping monstrosity that's pretty much dry in the middle.
An easy hack to keep the filling in place (and keep your cake looking neat) is to make a dam of frosting and put the filling inside it. You'll need a piping bag for this — or a makeshift one, at least. Start by setting down your first layer of sponge. Then, pipe a single circle of buttercream around the top edge. Pour or spread your filling inside the circle and place the next layer of cake on top. The buttercream will keep the filling where it should be. If you have any more layers, repeat this step until you get to the top layer, and then frost the outside of your cake as usual.
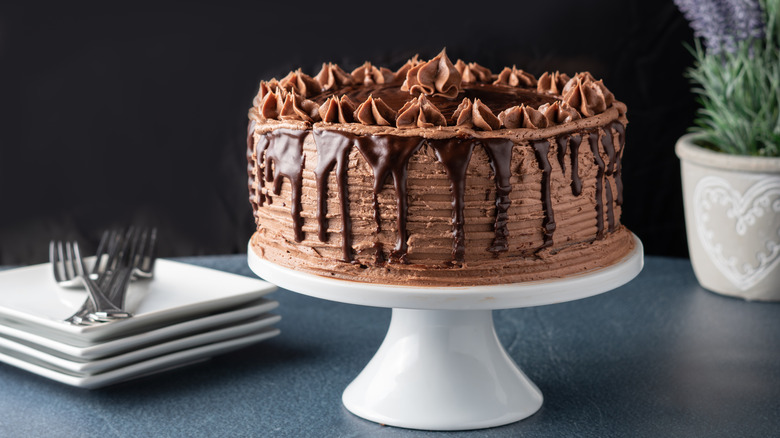
Try a squeeze bottle for neater drip decorations
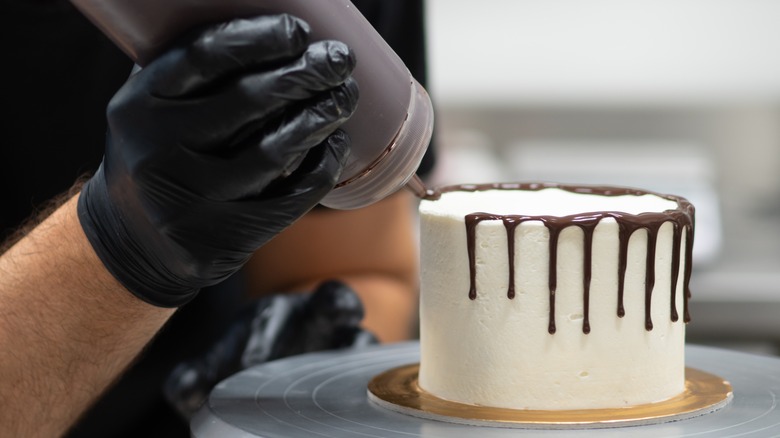
A ganache drip is a popular cake decoration that looks cool and brings an extra layer of flavor to a cake. However, achieving those perfect drips can be a messy endeavor. If you've tried it the conventional way and failed, you might want to try using a squeeze bottle, instead. This simple hack allows for greater precision and control, so you get neat, professional-looking results.
Start by making your ganache according to your recipe of choice. It should be cooled before use so that It's pourable but not too liquid. If it's too runny, the drips will slide right off the cake; not runny enough and it'll be too thick to form drips. Once your ganache has reached the desired consistency, carefully pour it into a clean squeeze bottle.
Begin by squeezing a small amount of ganache onto the edge of the cake where you want the drips to start. Slowly squeeze the bottle while moving around the edge of the cake, letting the ganache drip down the sides. Use gentle pressure on the squeeze bottle to control the size and length of the drips. For longer drips, squeeze the bottle a little harder, and for shorter drips, release the pressure slightly. Once you've made drips around the entire edge of the cake, use the squeeze bottle to fill in the top of the cake with a smooth layer of ganache. You can spread it evenly with an offset spatula if needed.
Use parchment paper to get neat borders on your cake
One way to decorate a cake is to make a border around the edge using sprinkles, crumbs, edible glitter, or other fine decorations. This can look amazing if pulled off correctly. Neat edges give you a professional look that will wow the lucky cake recipient. However, when this is done unevenly or haphazardly, you end up with something that shows a good effort but is far from impressive.
Using parchment paper to create perfect borders on your cake is an easy hack to give you the precision you desire. To pull this off, first gather your sprinkles, crumbs, or any other fine decorations you plan to use for the border. Next, cut a piece of parchment paper that's long enough to wrap around your cake. Position the parchment paper around your cake, leaving a gap at the bottom the width you want your border to be. The parchment paper will act as a barrier, preventing the decorations from sticking to the rest of the cake surface.
Gently press your decorations onto the exposed frosting. You can use your fingers or a small spoon to apply the decorations evenly along the edge of the cake. Once you've applied the decorations, carefully peel away the parchment paper strips from around the cake. Be gentle to avoid disturbing the border you've created. This will give you a border with a clean, neat edge.
Make your own grass tip from a disposable piping bag
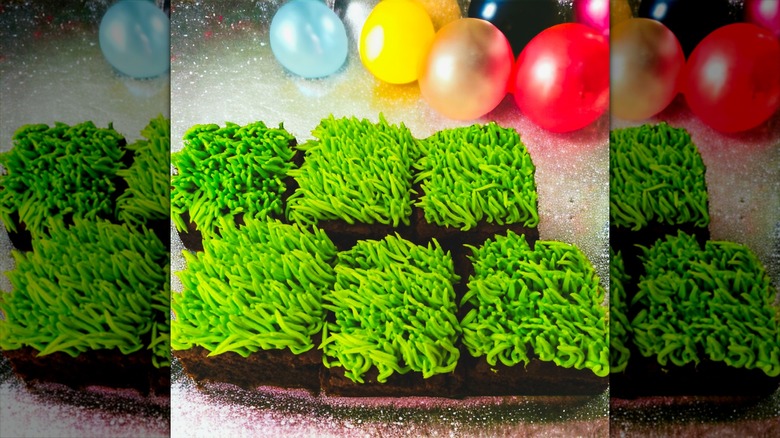
A grass tip is a specialized piping tip used to create realistic grass or fur effects on cakes. It's great if you want to make a cake version of your favorite pet, create an outdoor scene with grass, or just make a fun shag-effect cake. Sounds great, but what if you don't have a grass tip? Well, it's easy to make your own.
This piping tip features multiple small holes arranged in rows or clusters, so it's quite simple to replicate. You'll need a disposable frosting bag and a toothpick or skewer stick. Take the disposable frosting bag and poke a series of small holes in it using your weapon of choice. Space the holes evenly and arrange them in rows or clusters.
Once you've created the holes, fill the frosting bag with frosting. Twist the top of the bag to seal it shut. Before decorating your cake, do a test squeeze on a piece of parchment paper or a plate to ensure that the frosting flows smoothly through the holes and that you're pleased with the results. If you're happy, you can use it the way you would a regular grass tip. If not, try adding more holes.
Craft DIY fondant from marshmallows
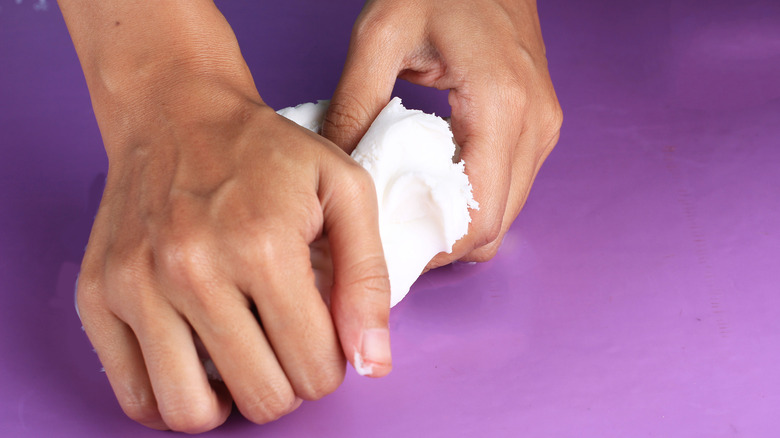
Fondant icing is a cake-decorating staple, but it can get expensive. Or, maybe you can't get it from your nearest grocery store. Well, we have the hack for you — it's possible to make DIY fondant icing from marshmallows. The resulting homemade fondant is pliable, smooth, and perfect for covering cakes, creating decorations, or sculpting intricate designs.
To make fondant out of marshmallows, you need marshmallows, water, powdered sugar, and vegetable shortening or butter. These are ingredients you can find at most small grocery stores — or ones you might already have at home. The exact directions can vary between recipes (of which you'll find plenty online), but generally, you start by melting the marshmallows with water before adding powdered sugar and kneading the mixture with greased hands. Keep kneading and eventually, it'll reach a suitably smooth and elastic constituency, losing its initial stickiness. You can then use it just the same way you'd use store-bought fondant, creating a perfectly smooth covering for your cake.
Use paper towels to smooth your frosting
Ever wondered how to achieve that perfectly smooth frosting you've seen on Instagram accounts and Pinterest boards? You probably assume you need specialist tools, such as cake scrapers and offset spatulas. But, while these don't hurt, all you really need for smooth frosting is a paper towel – smooth rather than textured or embellished. This is crucial because, if you use a textured paper towel, you'll end up with indentations from the towel on the surface of your frosting.
Before you get started with the paper towel, you need to frost your cake with a thick layer of icing. It's fine to frost your cake roughly, as long as you keep it relatively even — the smoothing part comes later. You need to use a crusting frosting. This is one that develops a thin crust after around 10 to 20 minutes of sitting out in the open. Standard American buttercream should crust, but meringue buttercream, whipped cream, or ganache don't crust and therefore aren't suitable for this technique.
Once the crust has developed, lay a paper towel flat on the cake. Gently rub the paper towel with your fingertips or a bench scraper to smooth the frosting below. Work your way around the sides to start and then move to the top of the cake. When you lift the towel off, you'll find the frosting smooth underneath.