Dutch Oven Vs Air Fryer: Which Makes Crispier Copycat KFC Chicken?
There's something about cracking the code of KFC's notorious 11 herbs and spices that makes a cook want to see if they can replicate the famous recipe — a task that recipe developer Lindsay D. Mattison tackled for Mashed to bring us all an Easy Copycat KFC Chicken Recipe to recreate at home. Now, there are a few things we just can't pull off in a home kitchen. Most importantly, unlike KFC, we're not using a pressure fryer at home (nor should you even consider trying this recipe in your pressure cooker — it's not safe). And even though we have a good idea of what the 11 herbs and spices are now, including the ratio of spices, we don't exactly know how everything comes together behind the scenes.
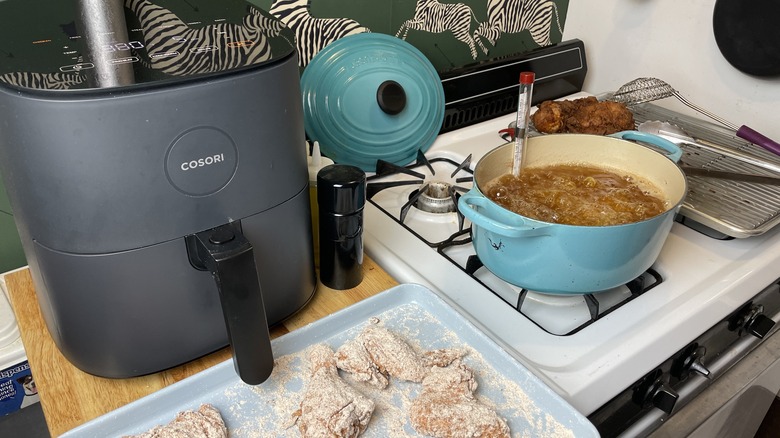
Nevertheless, after successfully creating an appetizing copycat KFC recipe by frying the chicken in a Dutch oven filled with hot oil on the stovetop, it seemed natural to want to know whether the same recipe would also work in an air fryer. And that's just what I set out to do. Using Mashed's copycat recipe as a guide, I tested both cooking methods side by side and compared the results to each other — as well as to KFC's Original Recipe fried chicken — to see how close I could get. Here's everything you need to know about making fried chicken in an air fryer and a Dutch oven, the pros and cons of each, and which method comes out on top.
The Dutch oven
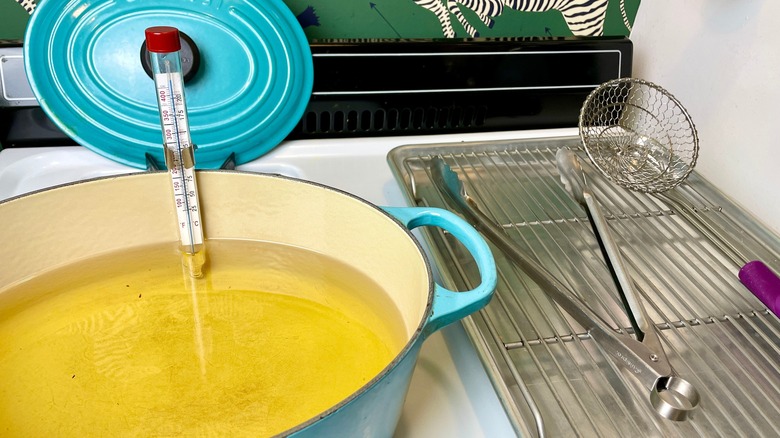
In the name of science, I followed the Easy Copycat KFC Chicken Recipe from Mashed exactly when preparing the ingredients and the chicken so they could be tested using both cooking methods. I also followed the recipe's directions for frying the chicken with the Dutch oven method. The Dutch oven method requires a heavy-bottomed cast iron pot, although it's not necessary to have a lid on it for this recipe. My Dutch oven has a 6-quart capacity, and I filled it with about 2 quarts of canola oil for frying. I used a clip-on frying thermometer to keep track of how hot the oil was and grabbed my instant digital probe thermometer to make sure each piece of chicken was cooked to 165 degrees Fahrenheit.
In addition to cooking the chicken in the Dutch oven, you might want to consider preheating your oven. You can set it at 350 degrees Fahrenheit if you plan on cooking lighter-colored fried chicken on the stovetop and then finishing the cooking in the oven. Or you can follow the recipe, setting the oven for 175 degrees Fahrenheit and letting the fried chicken rest there for 20 minutes before serving.
The air fryer
I have a 5-quart square-shaped air fryer that I also used to test the copycat KFC fried chicken recipe alongside the stovetop Dutch oven method. The air fryer has a preheat function as well as a chicken cooking function that I decided to use for this test since the pre-programmed functions have the same time and temperatures as many of the instructions I found elsewhere when preparing the recipe.
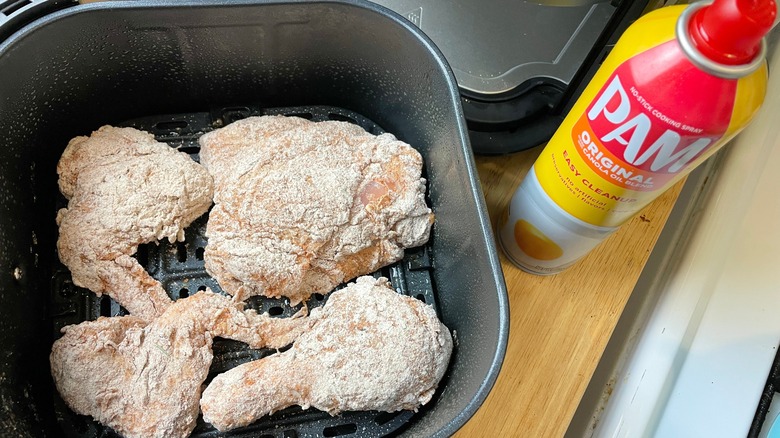
Just because this method doesn't require submerging your chicken in a pot of wildly hot oil doesn't mean you won't need any oil at all. You will, in fact, need some kind of sprayable oil to help cook and release your fried chicken in the air fryer. If you plan on spraying oil directly into your air fryer basket, consider using a neutral oil with emulsifiers. If using non-stick cooking spray, you'll spray the chicken directly instead of spraying into the fryer basket. Otherwise, this cooking method doesn't require much else.
Other tools you'll need
Other than a Dutch oven or air fryer, you'll need some additional tools to help cook your fried chicken. For both methods you'll need to have a probe thermometer, equipped to take the temperature of your chicken, and a pair of tongs to handle the hot chicken while it's cooking. If opting for the air fryer method, you might choose to also use aluminum foil or a parchment paper air fryer liner to reduce the amount of cleanup needed when you're finished cooking, although it's not necessary. Some cooks argue that a liner cuts down on the air flow while your food is cooking.
If frying in oil with a Dutch oven, you'll also want somewhere to rest and drain your chicken once it comes out of the oil. A half-sheet tray fitted with a cooling rack does the trick, and it can also be transferred to the oven if finishing your chicken in the oven. A slotted spoon or smaller strainer is also helpful for picking up chicken while cooking or for pulling out pieces of breading that may have detached and are floating in your hot oil.
Preheating differences
It came as no surprise that it takes less time to preheat an air fryer than it does to bring 2 quarts of oil up to temperature on the stovetop. I used my air fryer's preheat function, which runs at 400 degrees Fahrenheit for 4 minutes. On the stovetop, I heated 2 quarts of canola oil in my 6-quart Dutch oven over medium-high heat on a gas stove, which took about 12 minutes to reach the 350-degree-Fahrenheit mark. Different ranges and Dutch ovens will likely take different amounts of time to heat the oil, depending on whether you're using an electric, gas, or induction cooktop.
While the air fryer certainly heats faster, the 12-minute preheating time for the oil wasn't particularly a burden, nor did it slow down my overall cooking process since I used that time to prepare for the next step. While the air fryer and oil came up to temperature, I was able to scale and mix the flour, herbs, and spices, remove the chicken pieces from the buttermilk bath, and dredge all of the pieces in the flour mixture to prepare for frying.
Preparing the chicken and oil
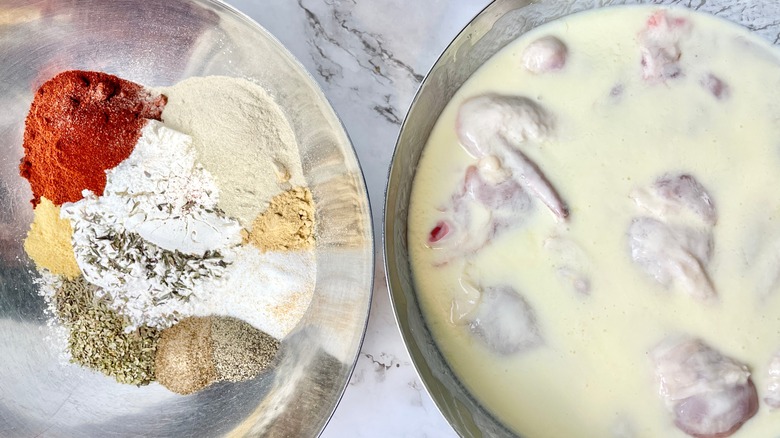
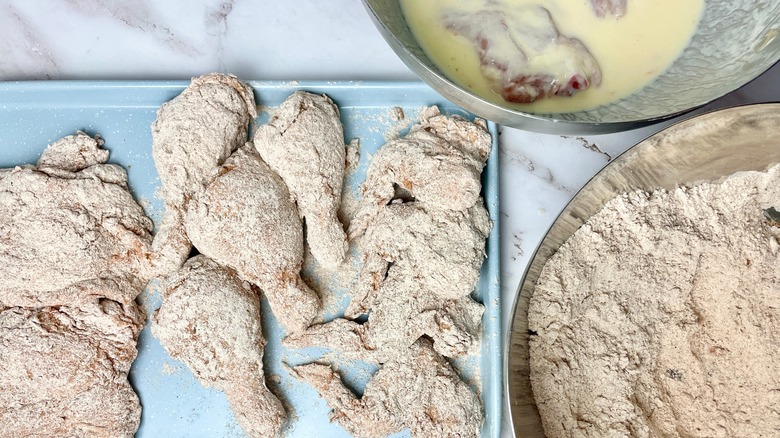
There is no difference in the copycat recipe's ingredients when preparing the chicken for frying with either the air fryer or the Dutch oven. In both cases you'll marinate your chicken in buttermilk, which I left for about 2 hours before starting to preheat my equipment. Then you'll remove the chicken pieces from the buttermilk, gently drain them, and dredge them in the flour and spice mixture before frying, regardless of which way you cook them next.
The only thing that changes from there is the oil and what you do with it. I opted to use canola oil for frying in the Dutch oven, which obviously just goes straight into the pot. But for air frying, you should take care when using nonstick cooking spray oils inside your fryer basket to avoid excessive oil buildup inside the machine. So instead, I sprayed each piece of breaded chicken directly, outside of the air fryer, before adding it to the basket to cook. Not only does this move cut down on how much of your fried chicken sticks to the inside of the air fryer basket, but the slight addition of oil helps to moisten the chicken's breading just enough to really get it "frying." Without it, you risk having chicken pieces that stick, and worse, having dry, floury breading that never fully cooks (which I found out the hard way with the first few pieces I cooked). Don't hesitate to spray your chicken pieces generously.
Cooking process differences
Whether you're cooking your chicken in the air fryer or on the stovetop, the process is the same. Put the chicken in, turn it while cooking, take the temperature when you think it's done, and then take it out. But there are a few things to keep in mind with each method.
I used the "chicken" function on my air fryer, which cooks at 380 degrees Fahrenheit for 20 minutes. At the 10-minute mark I paused the machine, picked up each chicken piece with the tongs, gave each piece a light spritz of cooking oil on the side that was going to be flipped onto the basket, and restarted the air fryer.
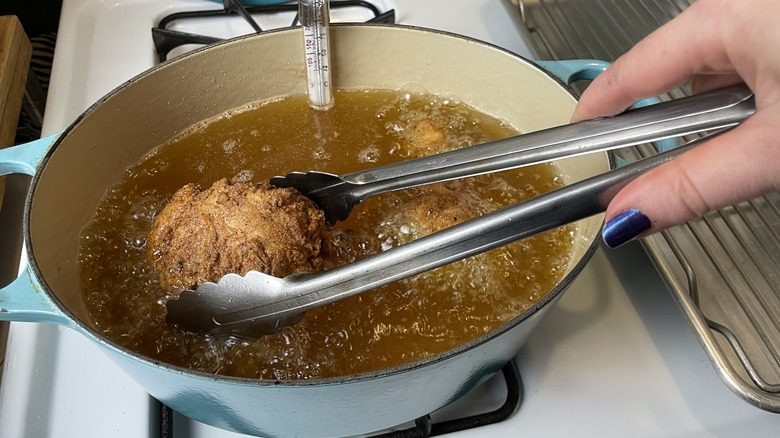
When frying your chicken in the Dutch oven, you'll need to be a little bit more attentive to the chicken while it's cooking. When you first drop the chicken into the oil, it'll fry at a rapid boil, then start to simmer down once the chicken begins to cook and the oil temperature begins to drop. With either your tongs or a long-handled slotted spoon, turn the chicken every few minutes to keep it from sitting on the bottom of the pot and overcooking or burning one side of the chicken. Once the chicken is finished cooking, you should allow the oil temperature to rise back up to 350 degrees Fahrenheit before frying the next batch. That's also a good time to skim out any pieces of breading or chicken that may have come loose.
Cooking time and volume differences
The copycat KFC fried chicken that I cooked in the air fryer took the full 20 minutes to cook and reached the 165-degree Fahrenheit point without issue each time. My particular air-fryer basket comfortably fits up to four pieces of various sizes, including a bone-in thigh, drumstick, and two wings during the first round of cooking. During the second round, the basket easily accommodated the final thigh and drumstick, and both batches cooked the chicken consistently and thoroughly using the pre-programmed chicken setting. It wouldn't have been possible to cook all six pieces of chicken at once, so two batches of cooking took about 40 minutes.
In comparison, the chicken cooked in the oil in the Dutch oven took about 10 minutes to thoroughly cook per batch. For oil frying, it's best to cook pieces that are relatively the same size, so they cook at about the same pace. So I ended up cooking three batches, the first with two bone-in thighs, the second with two drumsticks, and the third with two wings — although there was enough space to comfortably cook both the drumsticks and the wings at the same time if I had needed to shave off a few minutes of cooking time. Overall, the Dutch oven method took about 30 minutes to cook the same amount of chicken.
Outside similarities and differences
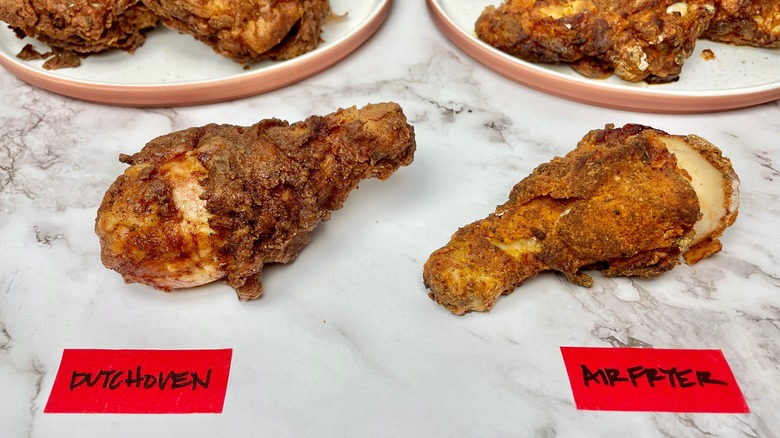
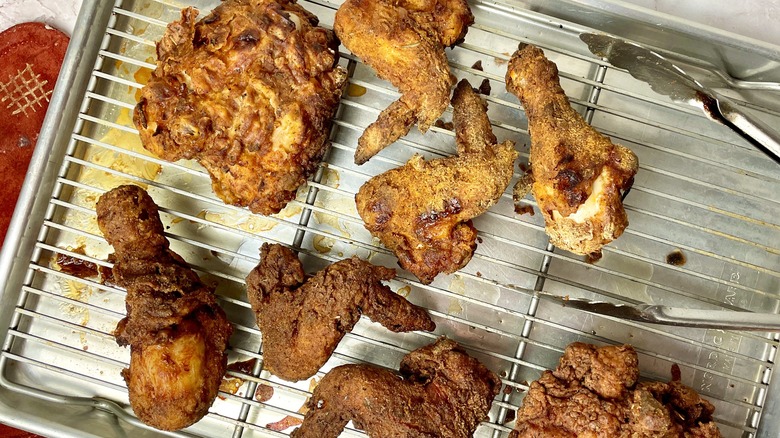
I was impressed by how authentically fried the air fryer chicken looked coming out of the machine. Instead of simply looking like breaded and baked chicken, the battered skin had a nice bubbly and textured crust. I was also impressed by how little effort it took to achieve a dark golden color that looked both appealing and thoroughly cooked.
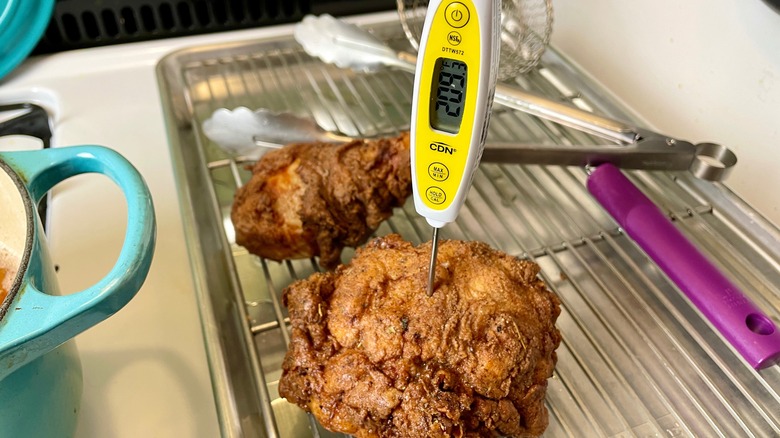
The chicken cooked on the stovetop in the Dutch oven also had a great texture on the outside, visibly crunchy and dark golden, although it turned out slightly darker than the air fryer chicken. It would have been possible to reduce the temperature of the oil, below 350 degrees Fahrenheit, to potentially have a lighter colored chicken, but it would also probably take longer to cook or need to finish cooking in the oven once the skin reached the lighter color. So I opted to cook the chicken at the regular temperature until it reached 165 degrees Fahrenheit and enjoy the crunchy finish.
The major difference between the outside of the two fried chickens is that under the crispy breaded exterior, the air fryer chicken skin wasn't nearly as crispy as the skin that the chicken fried in hot oil produced. It was thoroughly cooked, but it had the softer skin texture of chicken grilled with the skin still on, which was an unexpected texture change next to the crunchy breading on the outside of the skin.
Inside similarities and differences
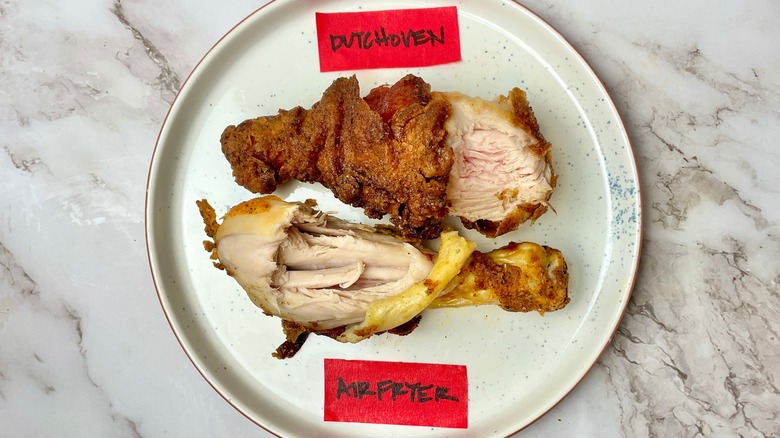
I bit into the Dutch oven fried chicken first. That became the standard by which to judge the air fryer chicken, since the first method more closely resembles the KFC method. As expected, the meat inside was fully cooked and incredibly juicy with a noticeable (but not off-putting) addition of oil from the frying process. The air fryer chicken was also fully cooked and juicy but ever-so-slightly less so than the Dutch oven method. With that said, I was perfectly satisfied with the results of the insides of the air fryer chicken.
On top of how hands-off the cooking process was for the air fryer chicken, I was curious to see if the different sizes of the chicken pieces would be over- or under-cooked when all were done at the same time and temperature. I was pleasantly surprised to find that all of the different sizes, including the wings, cooked up to about the same level of doneness and tenderness, which is much less consistent when frying chicken in the Dutch oven.
The best copycat KFC fried chicken is worth the effort
There are pretty clear pros and cons to each cooking method. On one hand, the air fryer chicken takes next to no effort to cook and produces consistent, juicy chicken with a good color that's easy to like. On the other hand, it takes longer to cook several batches in the air fryer, which might make it difficult to get food on the table in a reasonable amount of time if you're cooking for more than two or three people. Also, the less-than-crispy skin was a big turn-off for me personally, when imagining the crispy flaky chicken skin from KFC.
The Dutch oven method yielded juicy chicken with much crispier skin and breading in half the time per batch as the air fryer. But the cooking process was more hands-on and took a little more guesswork to judge whether the chicken was ready to come out of the oil and get its temperature checked. The darker brown of the crispy skin might be an aesthetic turnoff for some, but I preferred the extra-crispy chicken and considered it an upgrade.
Since the ingredients used to prepare the chicken were exactly the same for both cooking methods, the flavor of the chicken did not noticeably vary. And with all of that in mind, I'd choose the Dutch oven fried chicken as the winner due to its crispier skin and shorter cook time, even though it required a little more work to make.
Copycats that stand up to the original
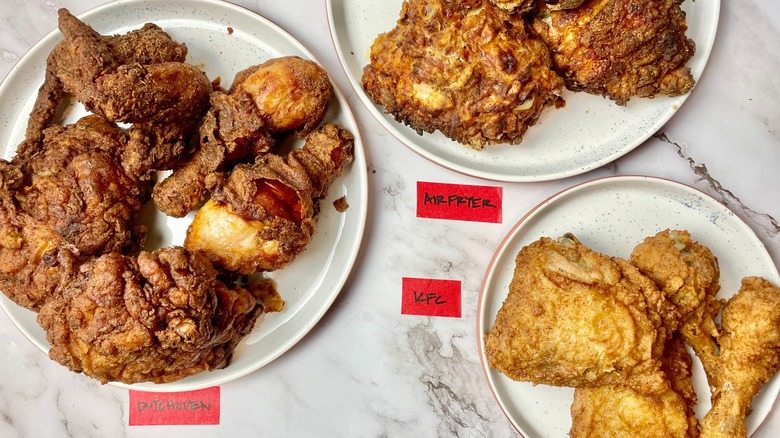
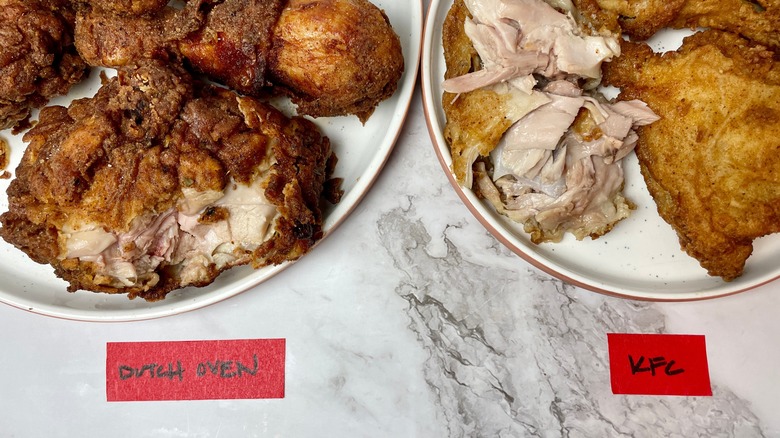
To complete the comparison, it only seemed fitting to compare the two copycat fried chicken methods not only to each other but also to some actual KFC Original Recipe fried chicken. The most noticeable differences are the color and texture of the breading, which is much lighter on the KFC pieces than both of the copycat methods — a difference which could be due to the lower temperature of the pressure cookers used in the restaurants. The KFC skin and breading are also less bubbly and textured than the copycat recipes. But when it comes to the tender meat inside, both of the copycat methods hold their own next to their inspiration.
From a cost standpoint, you might have to fork over a good chunk of change to purchase all 11 herbs and spices (plus flour) used for this recipe. But if you're planning on making fried chicken at home on a regular basis, it's an up-front cost that will pay for itself within two or three orders from KFC. At my location, a three-piece Chicken Combo cost a little over $10, which only serves one person. It's not hard to see how the costs might add up quickly after a few orders. But there's something to be said for convenience, which is probably the most important factor when you're hungry, you're in a hurry, and you just want to skip ahead to enjoying it.