20-Minute Shrimp Pad Thai
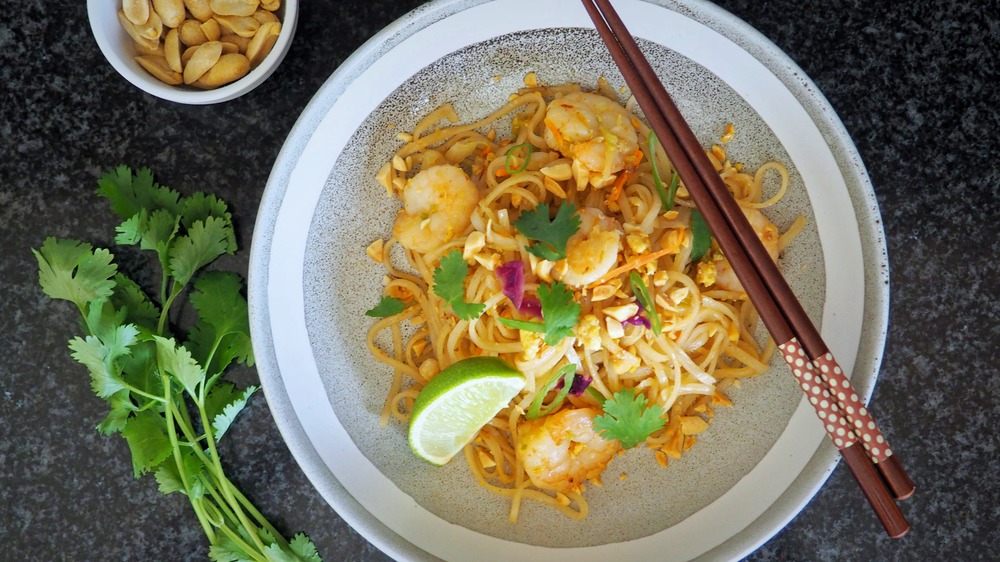
It's hard to pass up pad Thai when you see it on a restaurant menu. This stir-fried Thai noodle dish is all about balance, hitting all the flavor notes along the way. The sauce is simultaneously sweet, sour, and spicy, while the meat brings a savory flavor. The textures are perfectly balanced, too: The noodles are soft and chewy, but the peanuts on top give it a crunch.
It turns out that you don't have to wait to go out to eat to enjoy pad Thai. It's easy to make at home, and it only requires a handful of ingredients. We made a few ingredient swaps in our 20-minute shrimp pad Thai recipe to make it easier to make with a handful of pantry staples too. As a bonus, our recipe can be finished in less than 20 minutes — including prep time! Once you get the hang of the base recipe, you can modify it to meet your tastes and change up the ingredients so it never gets boring. If you're cooking for anyone with dietary restrictions, our recipe can easily become gluten-free by using tamari and a gluten-free fish sauce brand.
Gather the ingredients to make this 20-minute shrimp pad Thai
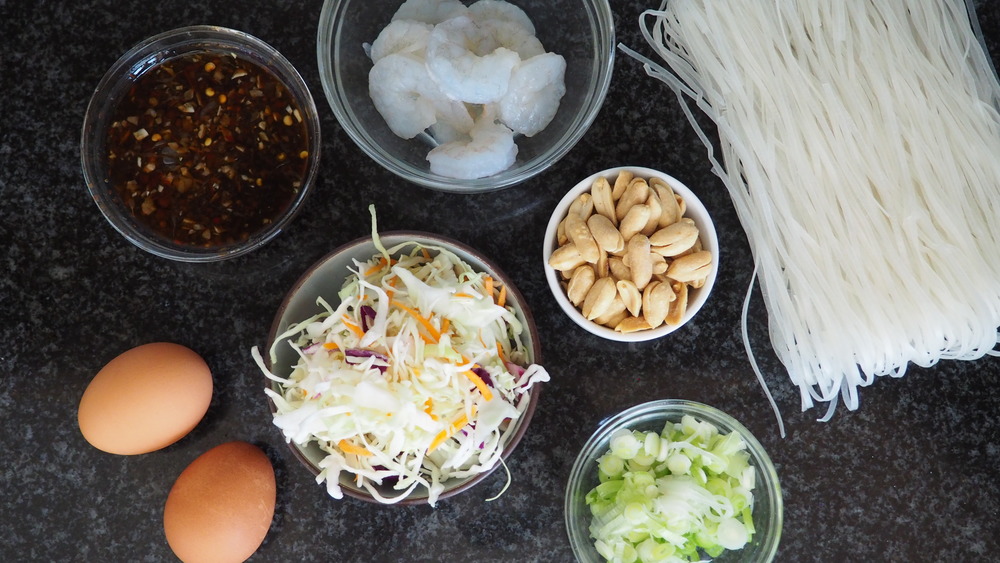
This 20-minute shrimp pad Thai dish comes together super quickly, so it's best to be fully prepped before you get started. You won't want the shrimp to burn or the sauce to evaporate while you're waiting for your noodles to soften. This dish can be broken down into three major components: soaking the noodles, making the sauce, and bringing it together as a stir-fry dish.
We'll discuss the sauce in more depth in a minute, but you'll want to pick up some rice vinegar, granulated white sugar, soy sauce, fish sauce, chili paste, lime juice, and garlic cloves. To ensure the garlic brings the right flavor, you'll want to mash the cloves into a paste before adding it to the sauce. You can use a mortar and pestle to do this, or you can use the side of your knife to make a paste by dragging the minced pieces along the cutting board.
For the stir fry, you'll need uncooked rice noodles, green onions, and eggs. We use one pound of peeled and deveined shrimp in this recipe. You could swap that out for a pound of sliced chicken, pork, or tofu. We also add a few cups of coleslaw mix (the kind that has carrots and green and purple cabbage) to our pad Thai. It gives the dish a gorgeous color and a little crunch. Finally, we finish our pad Thai with chopped, salted peanuts, cilantro, and bean sprouts.
What kind of noodles are used in a 20-minute shrimp pad Thai?
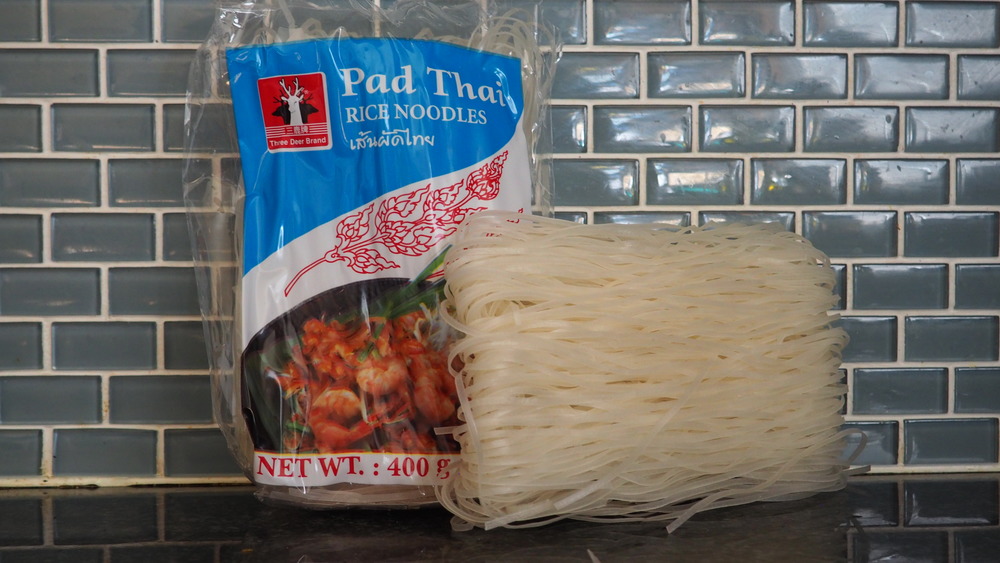
For an authentic 20-minute shrimp pad Thai, you'll want to pick up rice noodles that are roughly the size of linguine noodles. They're often labeled as "pad Thai noodles," which makes them easier to identify. Any noodles labeled as "pho noodles" will also work well here, as they're almost exactly the same shape. Some rice noodles are labeled as rice sticks, rice threads, or rice vermicelli. These noodles are much thinner and are sized somewhere between spaghetti and angel hair. They will work for pad Thai, but these smaller noodles will make the texture of the dish a little bit softer.
Rice noodles are best because they're chewy and have a springy texture, and they absorb just the right amount of sauce to make them ultra flavorful. If you can't find any rice noodles, you could use another noodle — like udon, ramen, linguine, or even zucchini noodles. Just keep in mind that these substitutes won't provide the right texture, so your pad Thai won't taste like the original.
How do you make the sauce for a 20-minute shrimp pad Thai?
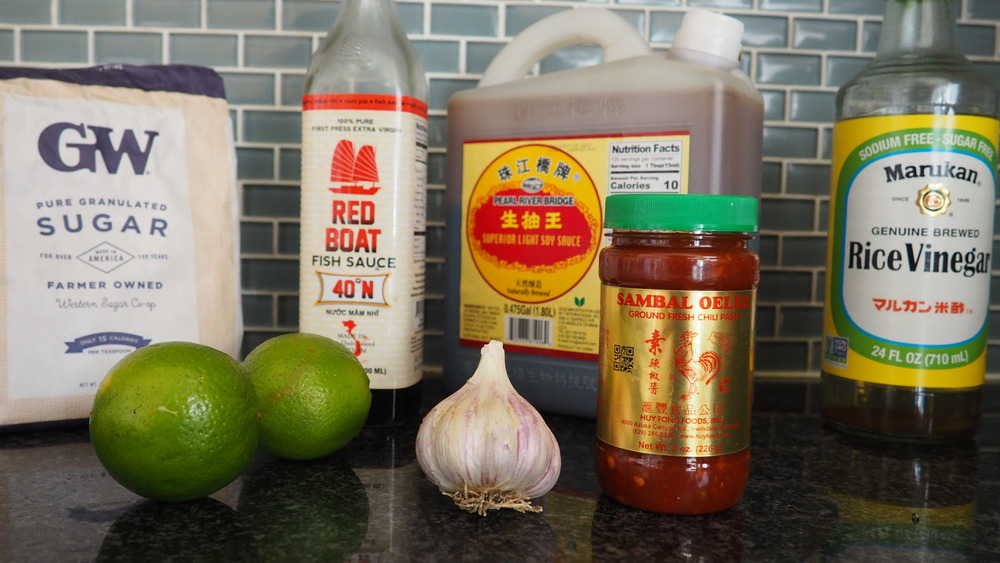
Traditional pad Thai recipes use tamarind paste in the sauce. According to Healthline, tamarind is a tree that grows in Africa, India, and other tropical areas. It produces pods filled with a sweet and sour-flavored pulp, which is turned into a paste for cooking. Depending on where you live, tamarind paste may be hard to find, and it's difficult to find uses for an entire jar. So, we decided to make a less-authentic recipe and use other ingredients to mimic that sweet-sour flavor for our 20-minute shrimp pad Thai. The combination of rice vinegar, lime juice, and sugar seemed to do the trick.
Another important ingredient in pad Thai sauce is fish sauce. Bon Appetit explains that it's made by fermenting fish for anywhere between several months and to years, which helps it to develop a unique flavor profile. It's salty, with a pungent fishy flavor and aroma, but it's also earthy, umami, and almost sweet. You can skip it if you find the flavor or aroma off-putting, but it goes a long way in adding depth to pad Thai sauce.
From there, we use soy sauce to add salty flavor, chili paste for spice, and a few garlic cloves (mashed into a paste) for pungency. It all comes together to create an unforgettable taste.
Use the green onions twice in this 20-minute shrimp pad Thai recipe

When you're chopping the green onions for this 20-minute shrimp pad Thai recipe, pay attention to the color as you go. These onions are white near the bottom and slowly become dark green near the tips. The different segments of these onions can be used in two different ways: One part is best for cooking, and the other makes a better garnish.
Wash the green onions and remove any wilted pieces before getting started. Then, remove the bottom eighth of an inch and discard the stem. We'll use the white and light green parts in our stir-fry, so slice those as thinly as possible. When you get to the point where the green onion becomes very flimsy and the color is a darker green, position the knife at a 45-degree angle to the onion. Thinly slice to create hollow diamond-shaped slices. These dark green pieces will burn easily when cooked, but they have a light crunch and an onion-forward flavor, making them perfect as a garnish to the finished dish.
Rehydrate the noodles to start this 20-minute shrimp pad Thai
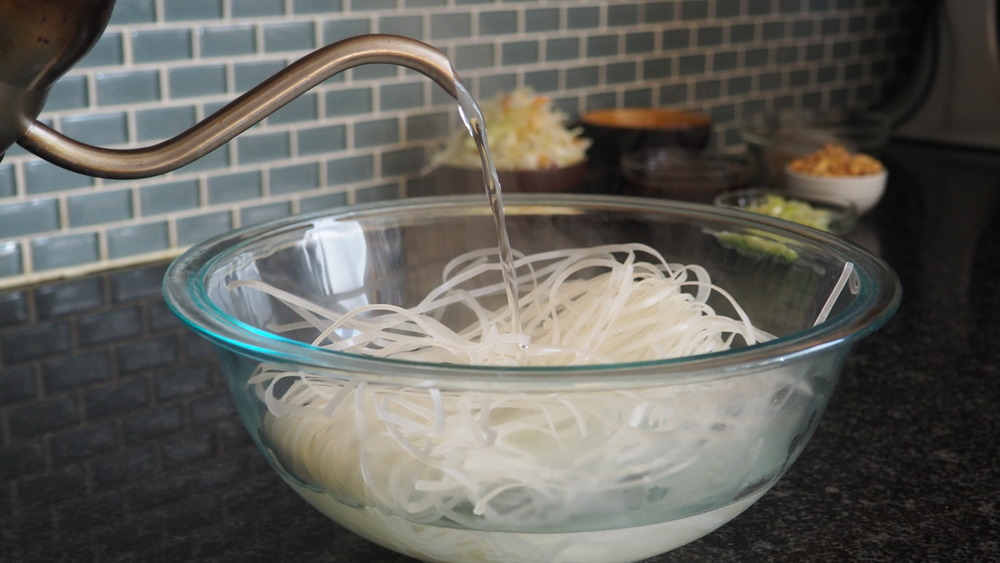
Rice noodles for 20-minute shrimp pad Thai might be hard and brittle in their dried form, but they're more delicate than wheat-based noodles. If they're overcooked, they'll easily turn to mush, so it's important to treat them properly. Luckily, it's a pretty easy process. All you need is boiling water and a timer.
Instead of cooking the noodles directly in boiling water, we'll pour the water over the noodles and let them sit instead. Place the noodles in a heat-proof bowl and add boiling water until they're covered. Let them stand for five to ten minutes, stirring after a few minutes to break up the noodles. The timing really depends on the brand and thickness of noodles, so give the noodles a taste after five minutes. They shouldn't be hard, but they shouldn't be soft, either. You're looking for a nice al dente level.
When the noodles are to your liking, drain and discard the water. If you're not using them immediately, toss them with a little oil to keep them from sticking together.
Cook the shrimp and egg for this 20-minute shrimp pad Thai
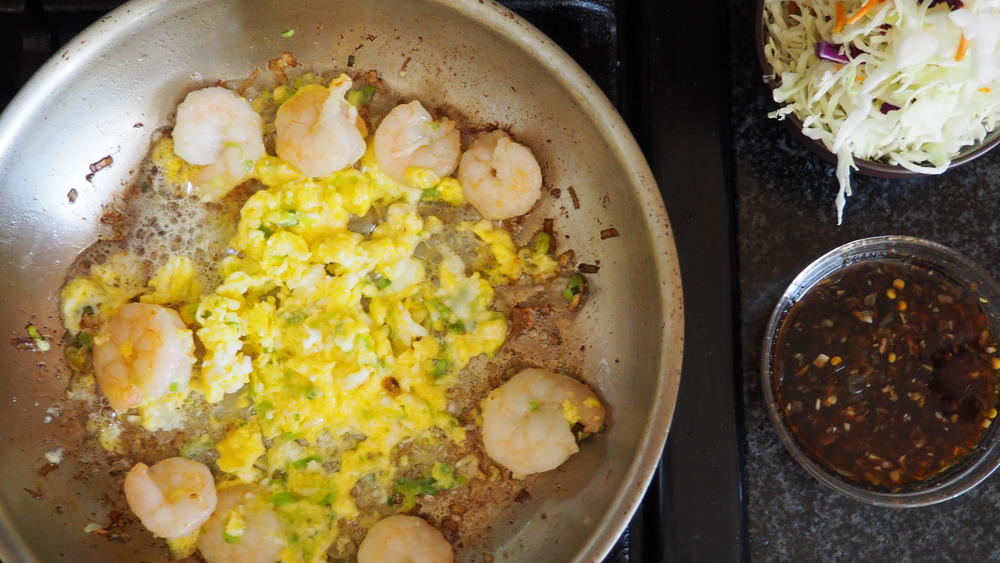
The first step in making 20-minute shrimp pad Thai is to cook the protein. If your shrimp are frozen and you forgot to thaw them overnight in the refrigerator, Southern Living suggests placing them in a bowl of cold water for 20 to 30 minutes. We suggest buying peeled and deveined shrimp for ease, but you can use unpeeled shrimp and remove the skins before cooking.
Heat a few teaspoons of canola oil in a large frying pan over medium-high heat. When the oil is shimmering, add the shrimp and sliced green onions and cook for about five minutes, stirring frequently until the shrimp are pink on both sides. Push the onions and shrimp to the sides of the pan and add two lightly beaten eggs to the well. Stir frequently to break up the eggs. They should be fully scrambled in about two minutes.
Add the noodles and sauce to finish this 20-minute shrimp pad Thai
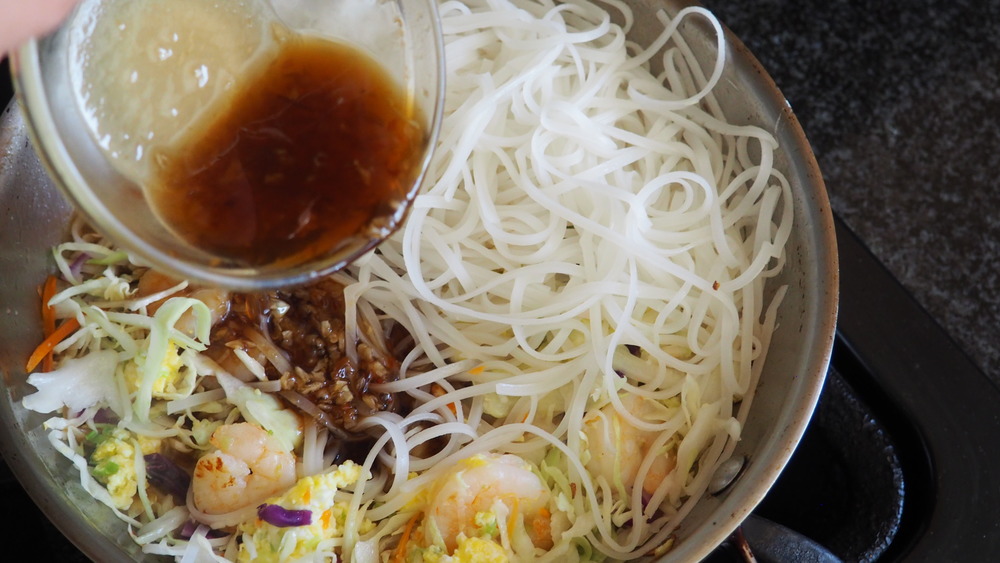
From here, we're super close to finishing our 20-minute shrimp pad Thai recipe. Add the coleslaw mix to the pan along with the drained noodles and the sauce we made earlier. Let the mixture simmer for three to five minutes until the noodles have soaked up all the sauce. Remove the pan from the heat and portion the noodles into four bowls.
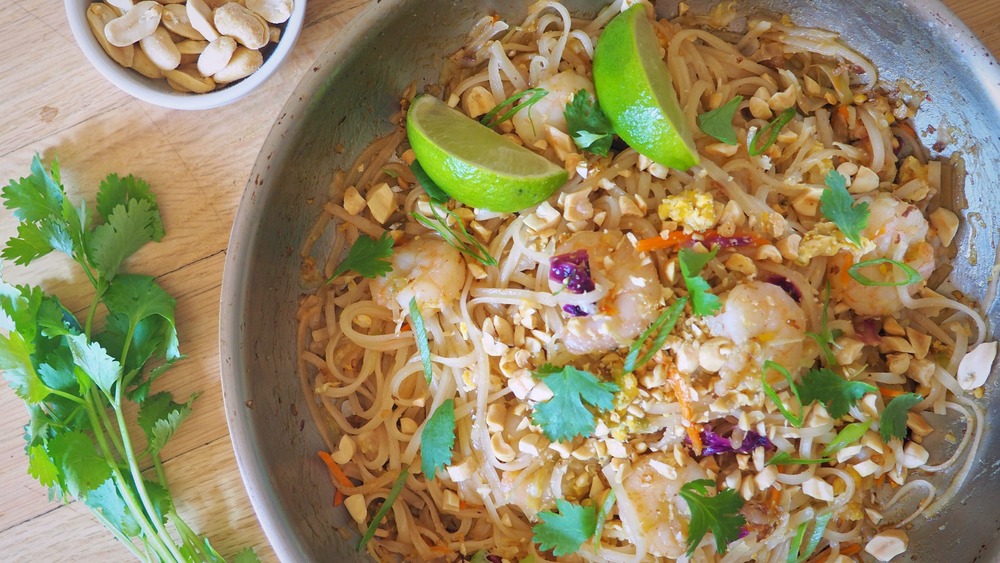
The shrimp pad Thai tastes great on its own, but a few extra garnishes really take it to the next level. Sprinkle the sliced dark green onion tops from earlier onto each bowl, along with fresh cilantro and crunchy bean sprouts. Finish each bowl with chopped salted peanuts to give the dish added texture and a deeply savory flavor. If you have a peanut allergy, feel free to use chopped almonds, cashews, or toasted walnuts instead. Serve the dish with lime wedges on the side, as some people like to add a little extra acidity and tanginess to their pad Thai.
How did our 20-minute shrimp pad Thai turn out?
It's not the most authentic recipe out there, but our 20-minute shrimp pad Thai tastes fantastic, and it couldn't be easier to make. It only took us about five minutes to prep the dish (including making the sauce), and the pad Thai itself cooked in less than 15 minutes. It cooked in a single pot — making cleanup a breeze — and using pre-chopped coleslaw mix kept our knife work to a minimum. We were pretty surprised at the depth of flavor in the dish, too. It usually takes hours of simmering or marinating time to create the flavor we experienced in this quick-cooking dish.
The other thing we love about this recipe is how easy it is to make it your own. Feel free to play around with the sauce, adding more or less of each ingredient depending on your taste. We can't wait to make this recipe again with different proteins. Thinly sliced beef or ground pork are definitely on our to-do list, as both will taste great with this sauce. It's also easy to turn it into a vegetarian dish — simply omit the shrimp (and eggs, if you don't eat eggs) and use tofu or chopped vegetables instead.
20-minute shrimp pad Thai directions
It turns out that you don't have to wait to go out to eat to enjoy pad Thai. It's easy to make at home, and it only requires a handful of ingredients.
Ingredients
- 8 ounces uncooked rice noodles
- 1/3 cup rice vinegar
- 1/4 cup granulated white sugar
- 3 tablespoons soy sauce
- 2 tablespoons fish sauce
- 1 tablespoon lime juice
- 1 teaspoon chili paste
- 2 cloves garlic, mashed into a paste
- 2 teaspoons canola oil
- 1/2 pound peeled and deveined medium shrimp
- 1/2 cup thinly sliced green onions, plus extra for garnish
- 2 large eggs, lightly beaten
- 3 cups coleslaw mix
- 2 tablespoons chopped salted peanuts
- Chopped fresh cilantro leaves, fresh bean sprouts, and lime wedges
Directions
- Prepare the noodles according to the package directions. If there are no directions, place the noodles in a medium heat-proof bowl. Add boiling water to cover the noodles and let them stand for 5 to 10 minutes (depending on the brand). After a few minutes, stir the noodles to help them break apart. Taste the noodles after 5 minutes. They should be al dente but not hard. Drain the noodles and set aside. If you're not using the noodles immediately, toss them with a little canola oil to keep them from sticking.
- Meanwhile, in a small bowl, combine the rice vinegar, sugar, soy sauce, fish sauce, lime juice, chili paste, and garlic. Set aside.
- Heat the oil in a large frying pan over medium-high heat. Add the shrimp and green onions and cook, stirring frequently, until the shrimp are pink on both sides, about 5 minutes.
- Push the shrimp and onions to the sides of the pan and add the beaten eggs to the middle. Cook until the eggs are scrambled, about 2 minutes.
- Add the coleslaw mix, drained noodles, and prepared sauce. Cook for 3 to 5 minutes, until the sauce is absorbed.
- Remove the pan from the heat and top the pad Thai with the peanuts, cilantro, and bean sprouts. Serve with the lime wedges on the side.
Nutrition
| Calories per Serving | 625 |
| Total Fat | 22.2 g |
| Saturated Fat | 3.8 g |
| Trans Fat | 0.1 g |
| Cholesterol | 170.2 mg |
| Total Carbohydrates | 86.4 g |
| Dietary Fiber | 5.3 g |
| Total Sugars | 31.5 g |
| Sodium | 2,140.2 mg |
| Protein | 18.7 g |