Mistakes Everyone Makes With These Classic Thanksgiving Dishes
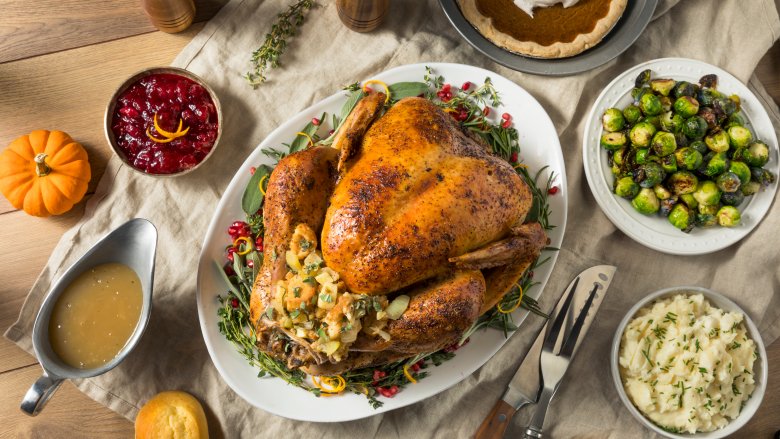
It's every host's worst nightmare: The family is seated around the table anxiously awaiting a delicious Thanksgiving feast, but much to your dismay you pull an overcooked turkey out of the oven, your mashed potatoes resemble a pot of glue, your stuffing is soggy, your gravy is lumpy, and to top it all off, you burn the rolls.
Okay, so maybe that's a worst case scenario... Most of us don't experience every single disaster during a single holiday dinner, but chances are good that you'll experience at least one of these Thanksgiving cooking fails at some point. It's almost inevitable when you're juggling a massive bird, several side dishes, sauces, and dessert. Add in a meddling mother-in-law and one too many glasses of wine, and well, it's game over.
The good news is that it's easy to avoid the most common Thanksgiving dinner mistakes, or, worst come to worst, fix them. And don't worry... even if you have one of the biggest "oops" moments, like forgetting to defrost the turkey, it doesn't necessarily mean you're destined for takeout.
Still frozen turkey
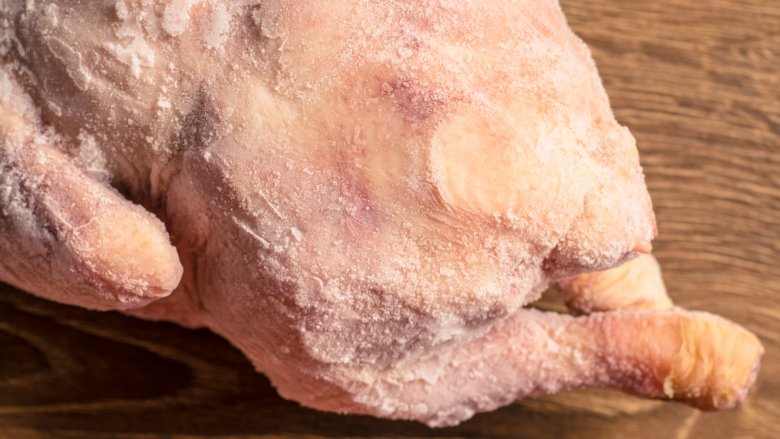
Suddenly it's Thanksgiving morning and you realize that your turkey is still frozen. Is there any hope?
In a perfect world, you would have taken the turkey out of the freezer and placed it in the refrigerator to thaw at its own pace, which according to Butterball is about one day for every 4 pounds. Even if you missed that mark, you still would have had a chance to thaw it in cold water, at a rate of 30 minutes per pound, changing the water every half hour. But you did neither, and that's okay... Surprisingly, you can still roast that bad boy straight from the freezer.
It's going to take a bit longer — about 5 hours for frozen versus 3 hours for thawed for a 12-pounder — but it can be done, and Williams Sonoma says so (though they do note that this method probably isn't going to result in your best-ever turkey). To roast that frozen bird, put it in a shallow roasting pan in a 325 degree oven and let it cook for 2 hours before seasoning with butter, salt, and pepper. Be sure to check at this point for the plastic bag of giblets in the cavity. If there is one, you absolutely need to remove it before it starts to melt. Keep basting and checking the temperature, and at about 5 hours the breast should read 165 degrees. Let it rest before carving, and fingers crossed, you've averted a Thanksgiving disaster.
Undercooked turkey
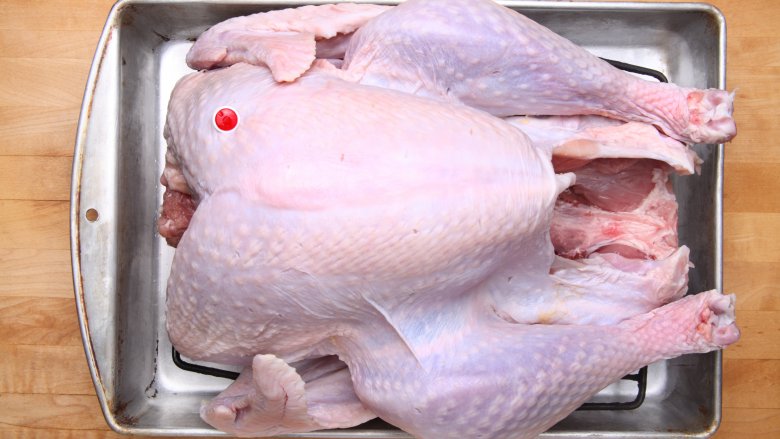
Maybe the pop-up timer malfunctioned, or maybe you're just really impatient. Either way, you've started carving your roasted turkey and you realize that it's woefully undercooked. You can't possibly serve this to guests without risking a foodborne illness situation, so what do you do? Thankfully, you can remedy this turkey fail fairly easily, and if you weren't carving in front of the family, they'll be none the wiser.
Southern Living recommends that you slice just as much meat as needed to serve immediately, and place it on a sheet pan in a 375 degree oven until cooked through. Once that's done, place the remaining whole turkey back in its roasting pan, cover it in foil, and finish cooking. Remember, you're looking for 165 degrees here, and your best bet is to rely on good meat thermometer. With any luck, by the time everyone is ready for seconds, that bird will be fully cooked.
Overcooked turkey
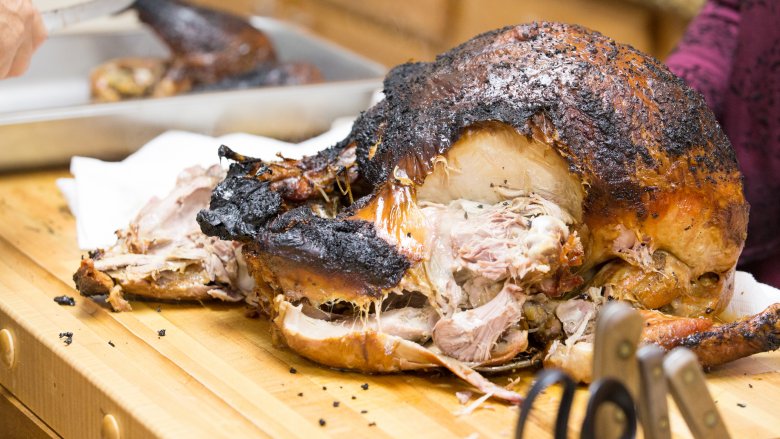
There's a fine line between a fully cooked turkey and totally overcooked breast meat, and oftentimes we go screaming way past that line and land in turkey jerky territory. Unfortunately, there's not a whole lot you can do to salvage things at this point, but you can definitely prevent it from happening again.
If you're already staring down at a dried out bird, your best bet is to camouflage it (and maybe pour the table another glass of wine). Epicurious recommends ladling turkey broth, gravy, or a combination of both over the sliced white meat to reintroduce some moisture, fat, and flavor. Just don't be overzealous — you're not looking to make turkey soup here.
To avoid needing a gravy camouflage in the future, think about cooking the turkey parts separately. No, you don't get the wow factor of carving a whole bird, but you'll eliminate the likelihood of overcooked breast meat ruining your Thanksgiving dinner. Serious Eats says your best bet is to break down your turkey and roast the pieces in a 300 degree oven. Breasts are done at 145 degrees, while thighs, legs, and wings will need a bit longer to hit 165 degrees. Each piece will be cooked to perfection, no gravy required (but probably wanted all the same).
Stuffing the turkey
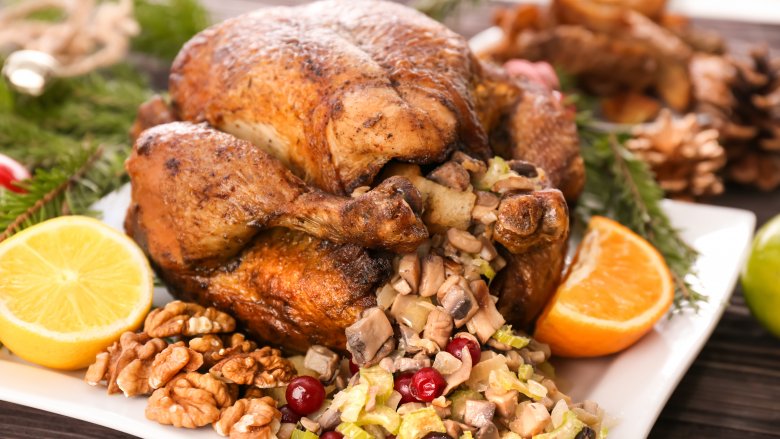
Are you still stuffing your turkey? Listen, just because Grandma did it doesn't mean you should follow suit. In fact, stuffing your turkey almost guarantees that your bird will be overcooked. And if it's not overcooked, then your chances of food poisoning just skyrocketed.
The problem is that when you cram a bunch of dense stuffing into the turkey's cavity, it's going to take a lot longer for the middle of that mass to reach the recommended safe-to-eat temperature of 165 degrees. In the meantime, the meat will have gone well past that optimal temperature, and will dry out more and more as you wait for the stuffing to cook. But since the stuffing can contain harmful bacteria from the raw turkey, pulling it out early isn't an option. See? It's a vicious cycle.
Rather than risk dried out meat or foodborne illness, take the safe bet and cook your stuffing in a separate pan. Or, do what Alton Brown does and spoon the separately cooked stuffing into the turkey after it's cooked. Genius.
Soggy stuffing
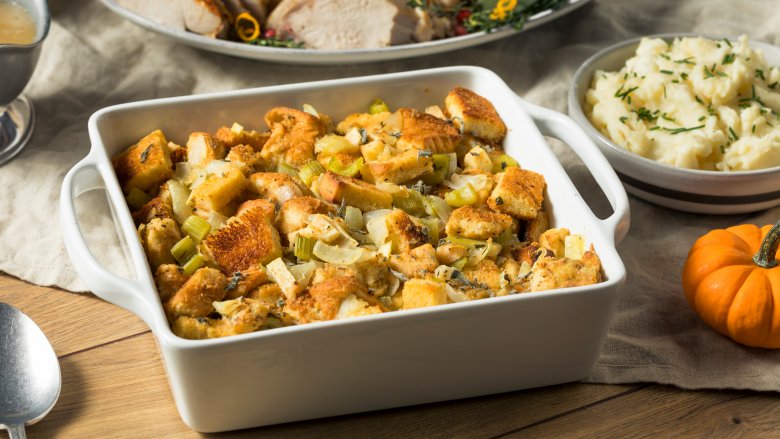
Now you know that you shouldn't put stuffing inside the turkey, but that's not the only potential stuffing fail to be avoided. Soggy, mushy stuffing can ruin your Thanksgiving dinner as fast as sSalmonella-laden stuffing. Okay, almost as fast. And since stuffing happens to be one of the best things about a holiday feast, we want to make sure it gets the attention it needs to shine.
To get that crisp-on-the-outside, tender-on-the-inside stuffing we all love, you've got to start with the right bread. You want your bread cubes to be nice and dry, ready to soak up all that liquid but still maintain some texture. Expert Rick Rodgers, author of 50 Best Stuffings and Dressings, tells MyRecipes that the key is to start with very crisp bread cubes, which can be achieved by leaving them out at room temperature for one to two days, or drying them in a 300 degree oven for 20 minutes.
If you do go hog-wild with the broth and your stuffing comes out soggy, just do what chef Curtis Stone does: Spread it out on a large baking sheet and put it back into the oven to dry out and crisp up. Problem solved.
Gluey mashed potatoes
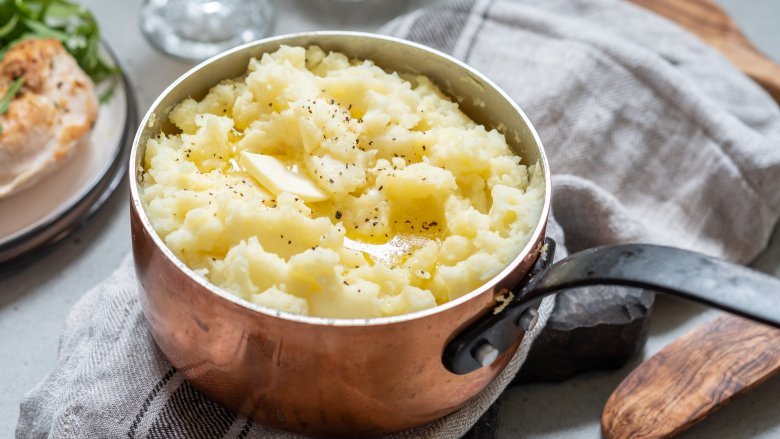
We get it — Thanksgiving is a stressful holiday, and you're going to take whatever shortcuts you can take to get dinner on the table faster. Canned cranberry sauce? Fine. Store-bought rolls? Absolutely. But please, do not be tempted to mash the potatoes with a food processor or an electric mixer in an effort to speed up the job.
Why not? Utilizing a small appliance is a surefire way to end up with a pot of gluey, gummy mashed potatoes. This is because the machines cause the cells in the potato to break down, and when that happens, starch gets released. Too much starch means a pasty consistency, and unfortunately, once you're there, there's no going back. For best results, use a gentler method, like a hand masher or a ricer, and remember that no matter what method you use, it's best to avoid overworking the spuds.
Need to salvage a pot of gluey potatoes? PopSugar recommends turning them into an impromptu gratin. Just spread them out in a casserole dish, load up the top with butter, cheese, and bread crumbs, and bake until brown and crisp. Nobody will ever know.
Lumpy gravy
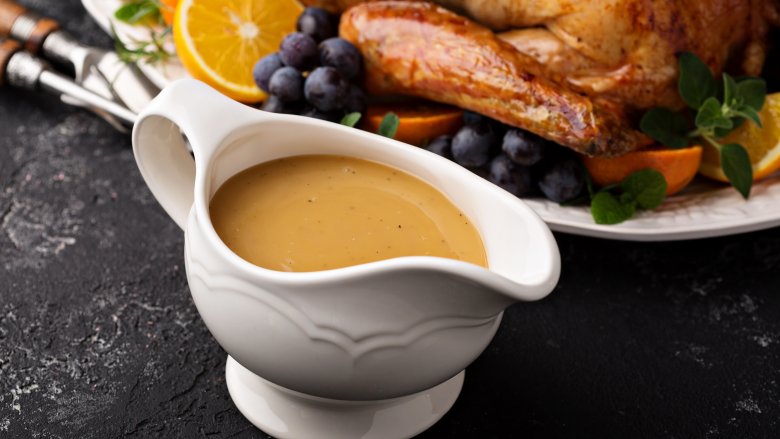
Gravy, when it's good, is like manna from the gods, and drinking it straight out of the boat seems like a completely reasonable thing to do. But lumpy gravy? You might as well use it to season the garbage can.
Lumpy gravy is most likely the result of a hurried preparation, so while it's easy to avoid, you do need to make sure you have the time to make it properly. The key to smooth gravy is a whole lot of whisking. When you're making the roux, you'll need to whisk constantly as you mix the flour into the fat. Then, you'll want to continue whisking as you slowly add the liquid into the roux. (Pouring all the liquid in at once is another surefire way to ruin your gravy.) The roux-liquid mixture might look a little funky at first, but keep whisking and eventually you'll end up with a glorious, velvety sauce.
Bitter, runny cranberry sauce
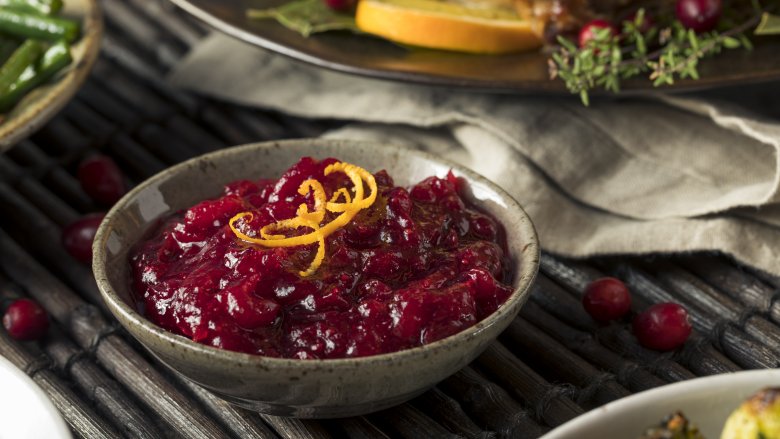
There are two kinds of families: Those who insist on a rustic, homemade cranberry sauce adorning their Thanksgiving tables, and those who want nothing more than a can-shaped sauce they can cut into gelatinous slices. If you fall into the canned camp, you have no worries of a cranberry sauce fail. Those of us whipping up a home-cooked batch aren't so lucky. Bitter, runny, and even grainy are some of the descriptors you might use when your cranberry sauce goes wrong. So how do you avoid reaching for the can opener?
If the sauce is bitter, chances are good that you're overcooking the cranberries. Once they pop, you're done. Keep cooking too long and risk a bitter taste that you won't be able to fix. If the sauce just won't firm up, you may have skimped on the sugar. While it might seem like a lot, the large amount of sugar that's called for is needed to help everything gel. You also need to be sure to cook the cranberries long enough to release their pectin (but not too long!). Finally, grainy sauce may be a result of last-minute sweetening. If you feel you need an extra dose of sugar to combat tartness, go for honey or agave, as undissolved sugar can lead to an unappealing texture.
Burnt rolls
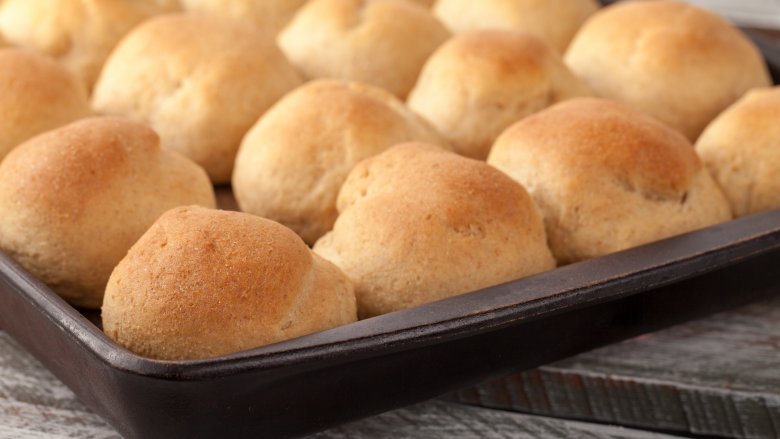
Burning the rolls has got to be the most common mistake made on Thanksgiving. By the time you've put them in the oven to warm, things are more than a little hectic in the kitchen, and even if you do remember to set a timer, chances are good that when it dings you'll have no idea why it's dinging. It's not until that telltale smell that you finally remember, and by then it's too late.
The good news is that blackened bottoms is a fixable problem. Just do what you do when you burn your toast: Scrape the charred surface off to reveal the virgin bread underneath. Southern Living suggests using a microplane to make quick work of a big batch. If you're dealing with burnt biscuits, use chef Carla Hall's approach: Cut the bottoms off with a knife, then toss the cut sides in a hot pan with melted butter. The result is a crispy fried bottom, which honestly sounds better than the plain ol' oven-warmed biscuits anyway.
Wet pumpkin pie

It's the cherry on top of your Thanksgiving feast: A gorgeous homemade pumpkin pie. Or at least it would be gorgeous if the pumpkin filling wasn't weepy and the crust wasn't burned to a crisp. Before you throw in the towel and grab a pie from the supermarket, take these pro tips from the experts so your next pie will be your best pie.
The burnt crust is easy to combat. All you need to do is create a foil shield (basically a ring of foil) to place around the perimeter of the pie, and put it in place once the crust has achieved the desired color.
As for the wet and weepy filling, there are two explanations. One, you overcooked it. Chowhound cites Wayne Gisslen, who explains in Professional Baking that "an overbaked custard becomes watery because the moisture separates from the toughened protein." The solution? Blind bake your crust, then bake the whole pie at a lower temperature — as low as 300 degrees — until done. The other weepy pie culprit is homemade puree. According to Bon Appétit, it turns out that the from-scratch version is much more watery than the pre-made stuff, so if you're whipping it up yourself, you'll want to be sure to reduce the mixture to rid it of excess moisture. Sounds like a good reason to reach for the can, no?