Red Velvet Cake Recipe
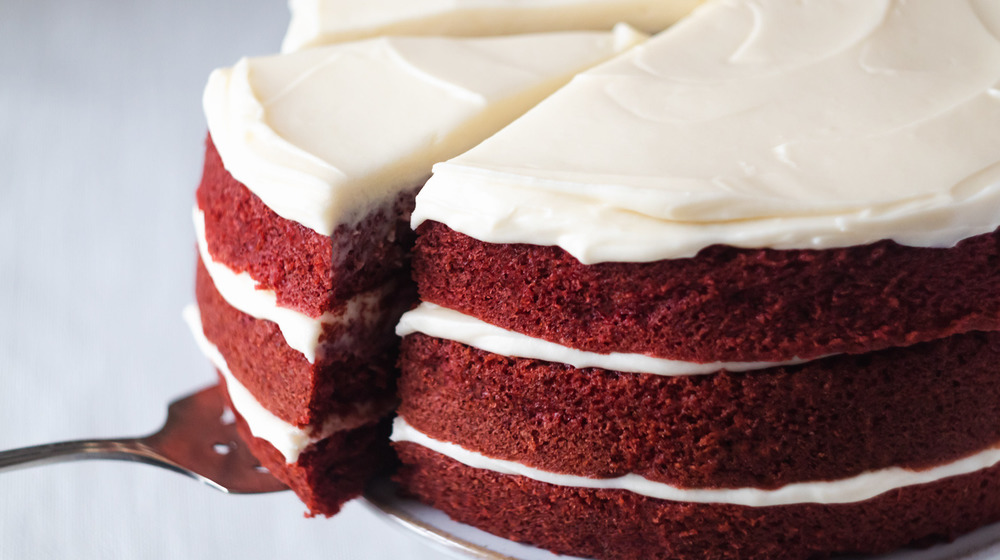
While the exact origins of red velvet cake are somewhat murky (contrary to popular belief, this popular confection was not originally created in the South), there's no doubt as to its uniqueness and straight-up deliciousness. When done right, the flavor of the cake itself is very distinct, but when you combine a mouthful of the cake with just the right amount of cream cheese frosting, it's actual heaven. Don't let that fancy red hue fool you, though — this cake isn't too fancy to bake in your own kitchen, even if you're not typically a baker.
You can thank world traveler, professional baker, and sweets enthusiast Mark Beahm of the Sunday Baker blog for this red velvet cake recipe. This is a three-layer cake, which sounds intimidating, but if you follow the directions carefully (baking isn't conducive to improvising), we promise you can manage to successfully stack this dessert and ice it to perfection too.
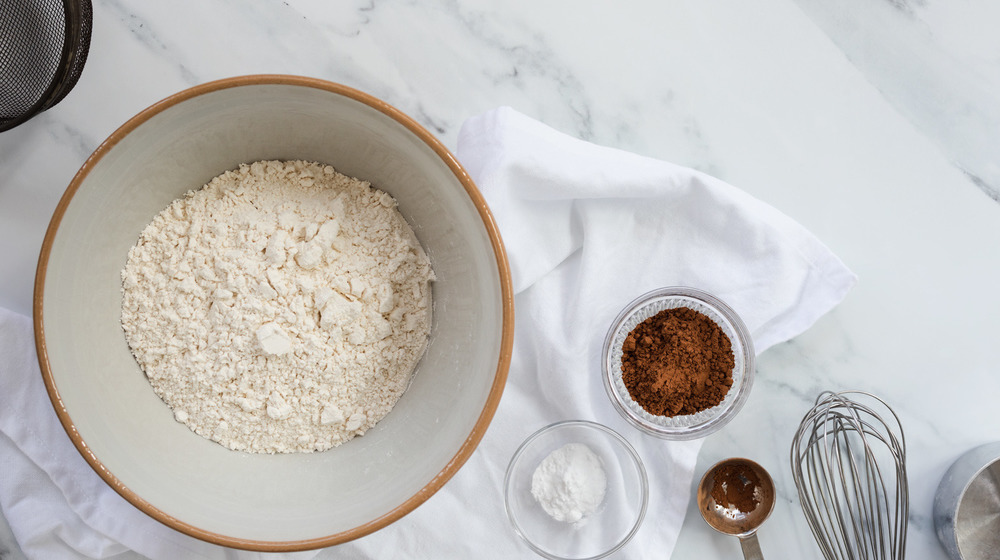
Sift together the flour, cocoa powder, baking soda, and salt for this red velvet cake recipe
Before you get started combining some of the core dry ingredients for this red velvet cake recipe, pre-heat the oven to 350 degrees Fahrenheit and lightly grease (with butter apart from what the recipe calls for) and sprinkle flour over three 8- or 9-inch round cake pans. You want these to be ready to go when you finish mixing the batter.
You will need to sift and combine the cake flour and the cocoa powder. Per Beahm, "these ingredients are so fine that they tend to clump and really benefit from being sifted so you don't end up with a lumpy batter." Then, whisk in the remaining dry ingredients.
Before you even ask, yes, it's gotta be cake flour. Why? According to Beahm, "Cake flour is ground finer than all-purpose flour and has less protein, making it produce less gluten. This makes your cakes lighter and more tender." You gotta love a tender cake.
Make your buttermilk mixture for this red velvet cake recipe
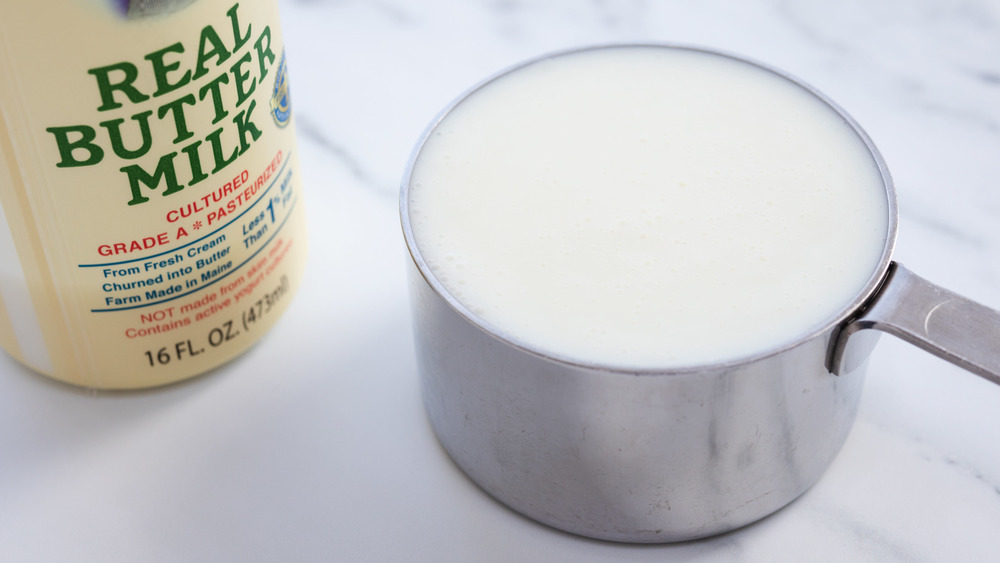
Set aside the flour mixture for this red velvet cake recipe. Next, you'll combine the buttermilk, distilled white vinegar, just two teaspoons of the vanilla extract, and the red food coloring.
Fun side note: While the combination of cocoa powder, vinegar, and baking soda is what originally led to red velvet cake's redness, it became more of a reddish-brown color when the makers of cocoa powder started adding an alkalizing agent, which in turn affected the color-changing reactions when it was combined with baking soda and vinegar. So, over the years, the addition of red food coloring has helped restore red velvet cake to its original (bright red) roots.
If you're wondering what to look for in a food coloring, Beahm says, "You can use either liquid or gel food coloring. A gel food coloring might mix in better, but the difference tends to be more important in frostings and glazes."
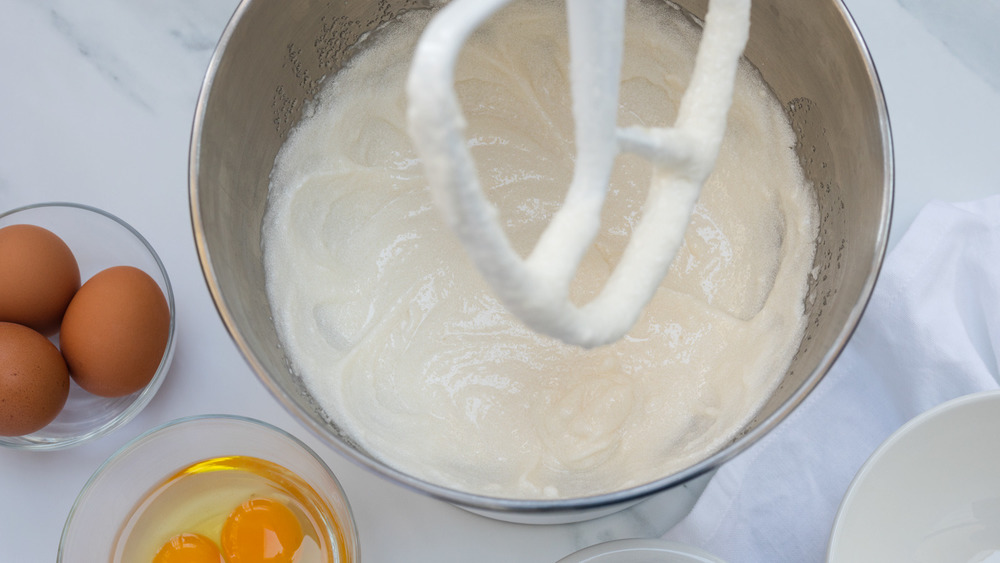
Beat together vegetable oil, granulated sugar, and one stick of the butter for this red velvet cake recipe
You've done all you can do for this red velvet cake recipe sans mixer at this point, so it's time to bust out the big guns. If you don't have a standing mixer, you can still make this cake! Hand mixers work just as effectively to whip up the red batter. The standing mixer is just a little less leg (or arm) work on your end.
You're going to combine one stick of the softened butter (the butter should be room temp and not straight out the fridge), the vegetable oil, and the granulated sugar (regular ol' white, not the powdered kind) in the standing mixer or by hand. Beat these ingredients together until they are smooth and fluffy-looking. That usually takes about two minutes, but don't be afraid to go for a little longer (you know, if the batter isn't looking smooth and fluffy yet).
Gradually add eggs to the red velvet cake recipe
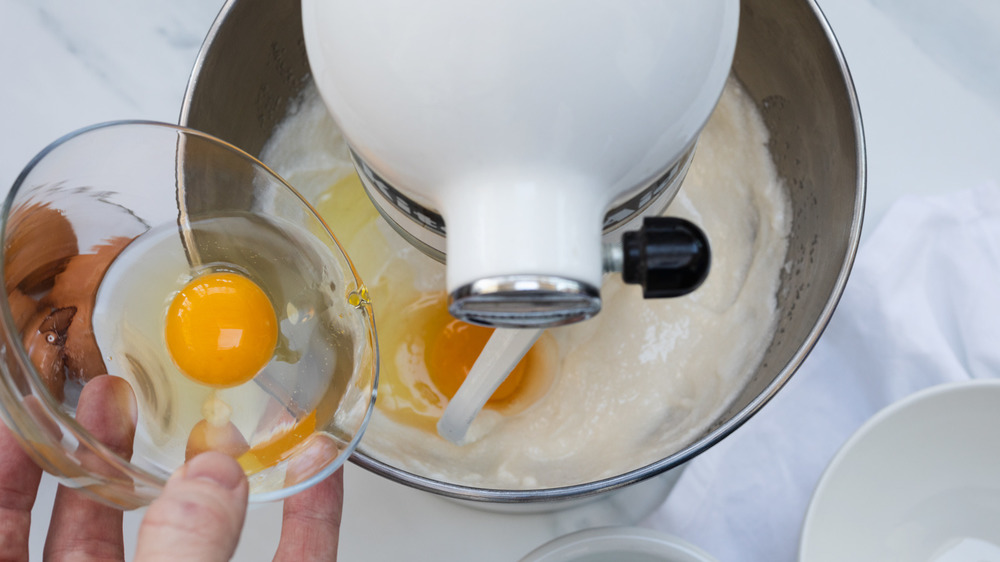
After the butter, vegetable oil, and sugar are mixed to fluffy, smooth status, you'll introduce the two large eggs into the red velvet cake recipe. This is always a good question to ask when baking: Should eggs be room temperature? "Yes, the eggs and buttermilk should be at room temperature. If the ingredients are all at a similar temperature, they emulsify better," explains Beahm.
Crack each egg into its own small bowl. This way, if there are any shell pieces, you can easily fish them out before adding it to the batter (because egg shells are never a welcome addition to red velvet cake). Then, add each egg one by one, mixing after each addition until the egg is fully incorporated. You shouldn't see streaks of yolk in the batter. If you do, your eggs are not, in fact, fully incorporated yet.
Beat in the flour mixture, alternating with the red velvet cake recipe buttermilk mixture
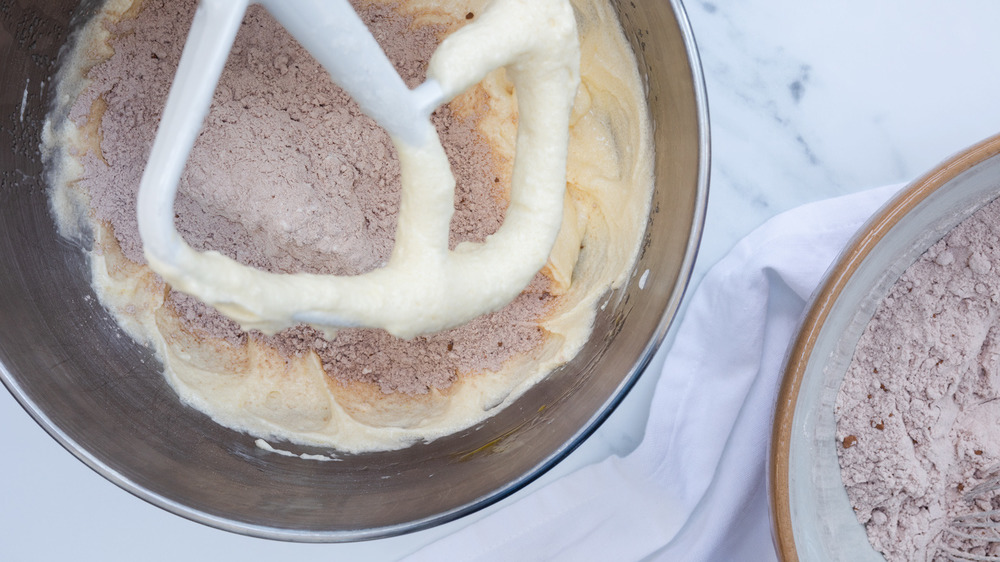
The flour and butter milk mixtures you sifted and combined for this red velvet cake recipe at the beginning of this excursion? It's time to toss them into the fun. Once the eggs in the previous step have been fully incorporated, start to beat in the flour mixture, alternating with the buttermilk mixture. Use a rubber spatula to scrape down the sides of the bowl in between additions to ensure the batter mixes evenly. You should be able to get all the flour mixture added in about two to three additions.
It's important to follow this step very deliberately. Beahm breaks it down: "If you add all of the liquid at once before adding the flour, the batter may separate because it can't hold all the liquid. If you add all of the flour at once before adding the buttermilk, the batter will get too thick, and you'll end up over-mixing and developing too much gluten when adding in the buttermilk. If you add them both at the same time, the mixture will clump. By alternating them, you ensure that the batter combines evenly."
Again, with baking, it's always best to try and follow the recipe exactly.
Divide the red velvet cake batter between pans
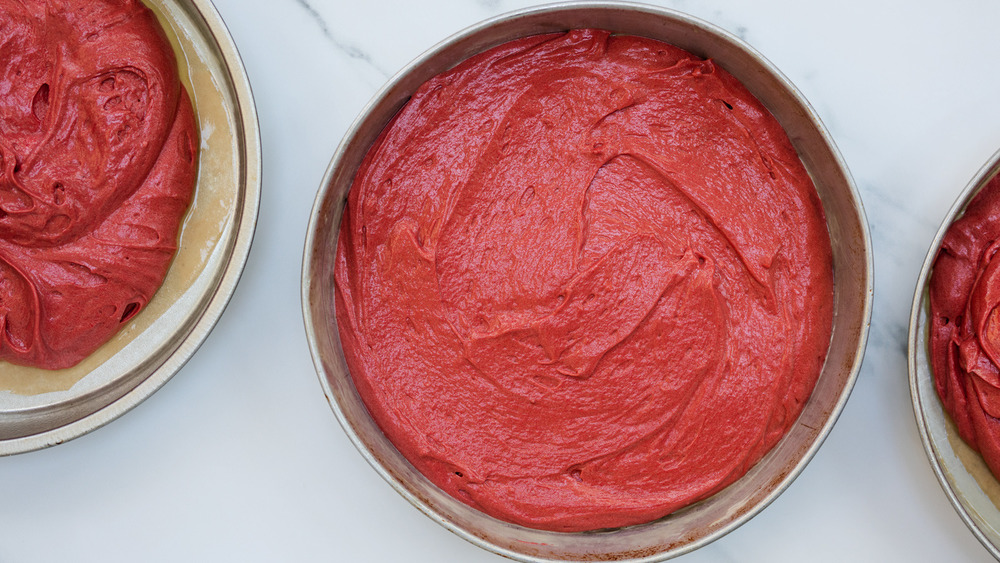
When the beautiful, bright, red cake batter for this red velvet cake recipe is ready to go, you'll divide it evenly between the three cake pans you prepped earlier. Use a spatula to smooth the surface of the batter, but don't stress too much about getting a perfectly even layer. Once the cakes go into the oven, unless something is jarringly lopsided, the heat tends to distribute the batter pretty evenly within the pan.
Are you a "go parchment paper or go home" kind of baker? If so, you're in a safe space here. "Lining the bottom of the cake pans with parchment paper will make it easier to release the cakes from the pans," Beahm confirms. "Oftentimes, greasing your pans with butter and flour or non-stick baking spray is all you need. And some cake pans are already non-stick. But if you want the extra assurance, especially in pans that aren't non-stick, line your cake pans with parchment paper."
Bake this red velvet cake recipe
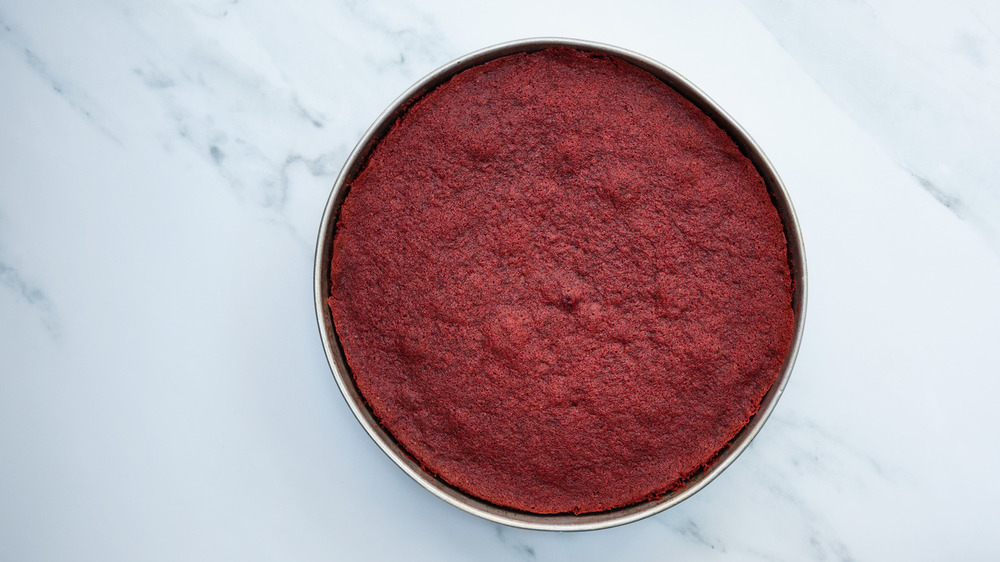
Bake the red velvet cake recipe layers in the oven for 25 to 30 minutes, or until a wooden toothpick inserted near the center comes out clean.
Does oven rack location matter? "I was able to fit three 8-inch cakes on the same shelf in my oven," claims Beahm, "but if your oven is smaller or you use 9-inch cake pans, you may need to use another shelf. Place two of the layers spaced out on the bottom rack and the remaining layer on the top rack. You'll need to rotate the cakes twice during baking so they cook evenly."
When the cakes are done baking, cool them in the pans for 15 minutes, then turn out onto a wire rack and let cool completely before frosting. This keeps the bottom part of the cake layer from continuing to cook in the hot pan.
Gather and prepare the cream cheese frosting ingredients for this red velvet cake recipe
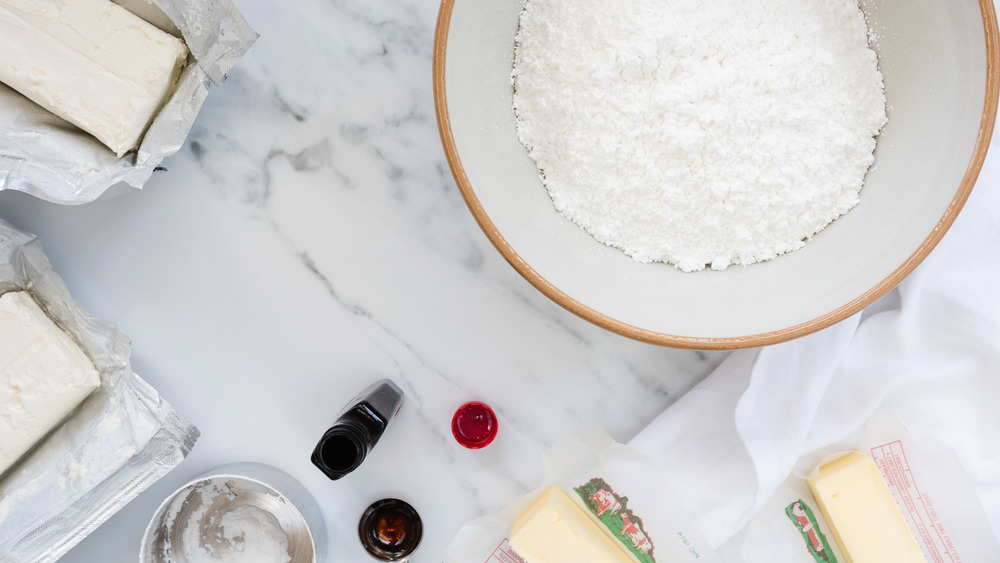
While the cakes are cooling, you can start prepping the cream cheese frosting for this red velvet cake recipe. You'll need two 8-ounce packages of cream cheese, and they should be softened by the time you start to make the frosting. Also, ready the remaining two sticks of butter (which should also still be softened), two teaspoons of vanilla extract, 1/8 of a teaspoon of salt, and five ups of confectioners' sugar. It's time to sift again, too. Beahm instructs, "Generally, confectioners' sugar benefits from being sifted. Since it's so fine, there are usually lumps."
Oh, and the bowl and paddle of that standing mixer you were using earlier for the red velvet cake batter? They're sitting in a sink full of water right now, aren't they? You better get to scrubbing and drying because you're going to need those tools again to make this cream cheese frosting.
Whip up the frosting for this red velvet cake recipe
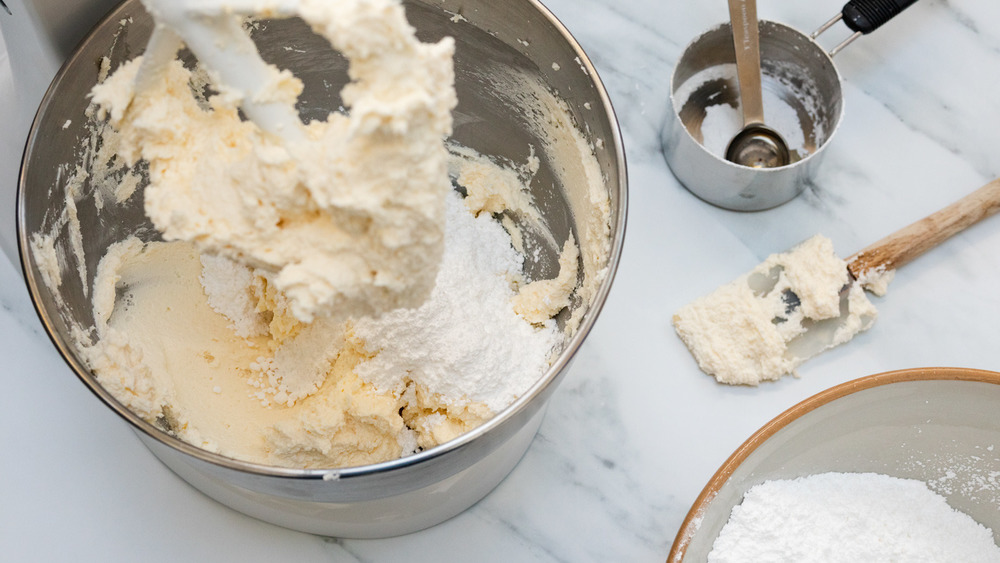
In a stand mixer with the paddle attachment (or a hand mixer, if that's all you got — it will work for the frosting too), beat the cream cheese, the remaining cup (two sticks) of butter, the remaining two teaspoons of vanilla extract, and the remaining 1/8 teaspoon of salt until smooth, about two minutes. Add the confectioners' sugar and mix on low speed until combined, then increase to medium-high speed and beat until smooth and creamy, which should also take about two minutes.
If you want to make the frosting for this red velvet cake recipe in advance, Beahm says, "Cream cheese frosting will keep up to three days in the refrigerator. When it's cold, the frosting may be too stiff to frost the cake. Bring it to room temperature and beat it with an electric mixer or a whisk until it's smooth and light again."
Assemble the red velvet cake recipe
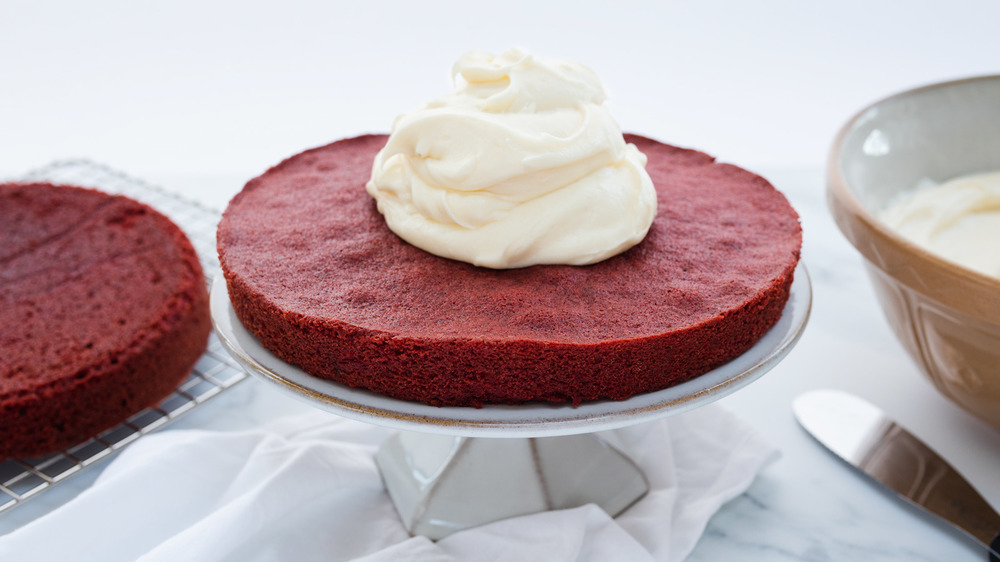
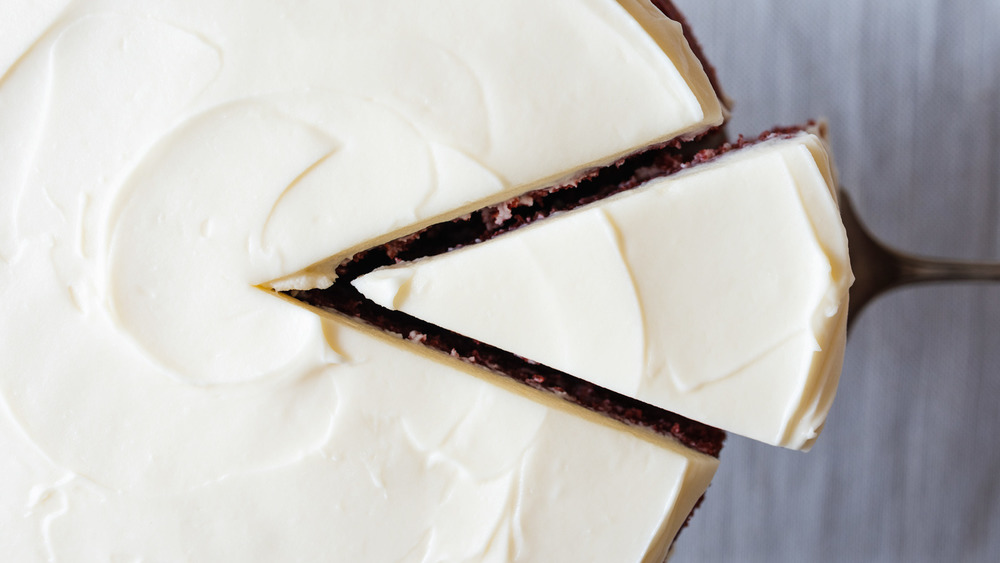
Make sure the red velvet cake recipe layers are 100 percent, fully cooled before you get to icing. Place the first layer on a cake stand or serving platter. Spread roughly one-third (about a cup and a half) of the frosting evenly over the top of the layer. Don't frost the sides, or you'll find yourself fresh outta frosting by the time you get to the top layer. Repeat with the remaining two layers and frosting.
A note about frosting: "Freezing the cake layers before frosting will make it easier to frost. The cake will definitely hold the weight of the frosting and is less likely to crumble. I don't do it for all cakes, especially when I leave the sides unfrosted," Beahm tells us. He went on to say, "For certain types of cakes, like red velvet, I tend to only frost between the cake layers and not the outside of the cake. I love showcasing the red layers." Those red layers are really pretty, we must say, but if you do want to frost the sides too, there should be enough left over to do so.
Serve this red velvet cake recipe
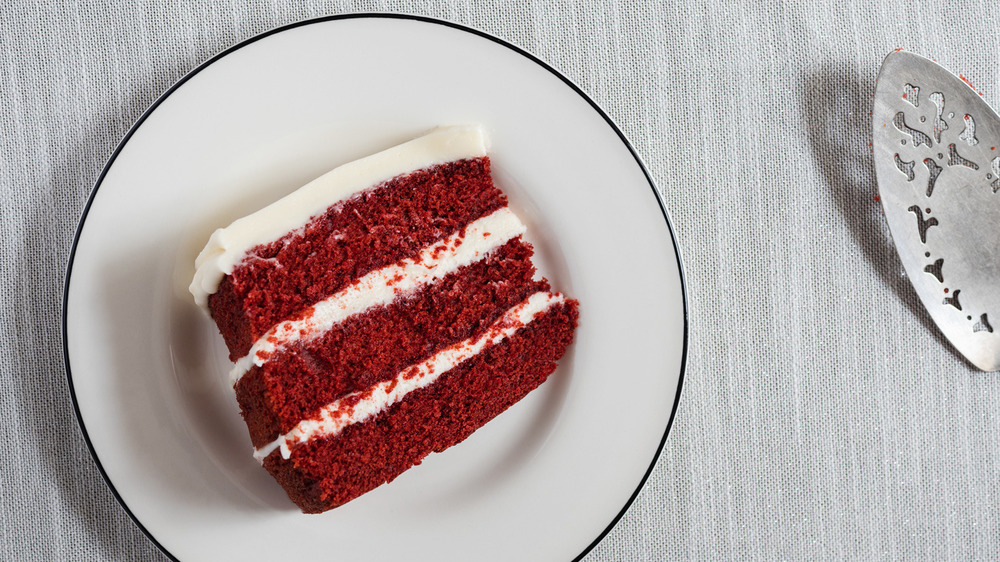
Your cake is ready to serve once it's frosted, but if you froze the cake layers, you might want to be mindful of how long it's been out of the freezer before serving it.
As far as the shelf life and storage goes, be mindful of one of the cake's primary ingredients: cream cheese. Cream cheese isn't well-suited for a room-temp situation, as tempting as it may be to want to keep that pretty cake displayed on the counter. Beahm directs, "Red velvet cake will stay fresh for about three days and has to be refrigerated because of the cream cheese frosting." We would recommend using an airtight container, and also, keep it moisture-sealed in by putting wax paper alongside the cut side of your cake.
Red velvet cake recipe directions
If you follow the directions to this red velvet cake recipe carefully, you can manage to successfully stack this dessert and ice it to perfection too.
Ingredients
- 2-2/3 cups cake flour
- 3 tablespoons unsweetened cocoa powder
- 1 teaspoon baking soda
- 1/2 plus 1/8 teaspoon salt, divided
- 1 cup buttermilk
- 1 tablespoon distilled white vinegar
- 4 teaspoons vanilla extract, divided
- 1 tablespoon red gel food coloring
- 1-1/2 cups (3 sticks) softened unsalted butter, divided
- 3/4 cup vegetable oil
- 1-1/2 cups granulated sugar
- 2 large eggs
- 2 (8-ounce) packages cream cheese, softened
- 5 cups confectioners' sugar
Directions
- Preheat the oven to 350 degrees Fahrenheit. Lightly grease and flour three 8- or 9-inch round cake pans.
- Sift together the flour, cocoa powder, baking soda, and 1/2 teaspoon of the salt.
- Combine the buttermilk, vinegar, 2 teaspoons of the vanilla extract, and the red food coloring.
- In a stand mixer with the paddle attachment, beat together 1/2 cup (1 stick) of the butter, the vegetable oil, and the granulated sugar on medium-high speed, until smooth and fluffy, about 2 minutes.
- Add the eggs, one a time, beating until fully combined after each addition.
- With the mixer on low speed, beat in the flour mixture in two to three additions, alternating with the buttermilk mixture. Use a rubber spatula to scrape down the sides of the bowl in between additions to ensure the batter mixes evenly.
- Divide the batter evenly among the prepared cake pans. Bake for 25 to 30 minutes or until a wooden toothpick inserted near the center comes out clean.
- Cool in the pans for 15 minutes, then turn out onto a wire rack and let cool completely before frosting.
- Make the cream cheese frosting. In a stand mixer with the paddle attachment, beat the cream cheese, the remaining cup (2 sticks) of butter, the remaining 2 teaspoons of vanilla extract, and the remaining 1/8 teaspoon of salt until smooth, about 2 minutes. Add the confectioners' sugar and mix on low speed until combined, then increase to medium-high speed and beat until smooth and creamy, about 2 minutes.
- When the cake layers have cooled, frost the cake. Place the first layer on a cake stand or serving platter. Spread roughly one-third (about 1-1/2 cups) of the frosting evenly over the top of the layer (not the sides). Repeat with the remaining two layers and frosting.
Nutrition
| Calories per Serving | 664 |
| Total Fat | 38.5 g |
| Saturated Fat | 17.5 g |
| Trans Fat | 0.8 g |
| Cholesterol | 100.8 mg |
| Total Carbohydrates | 76.6 g |
| Dietary Fiber | 0.8 g |
| Total Sugars | 57.3 g |
| Sodium | 296.9 mg |
| Protein | 5.2 g |