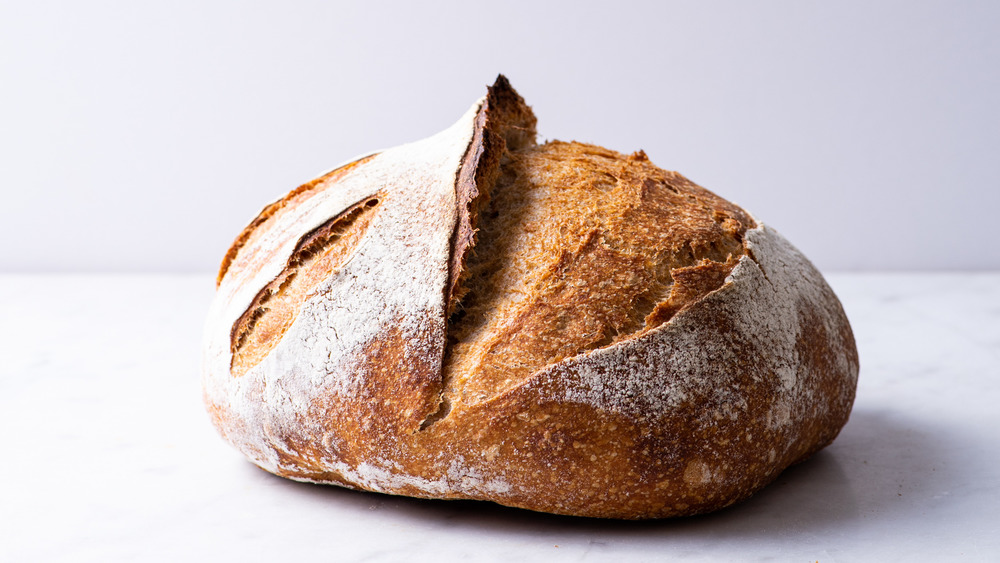
Rustic Sourdough Bread
Learning to make sourdough bread from scratch is not easy, to be honest. Neither is it something that happens overnight. But, ultimately, it's a process totally worth embarking on if you love and appreciate good-quality homemade bread.
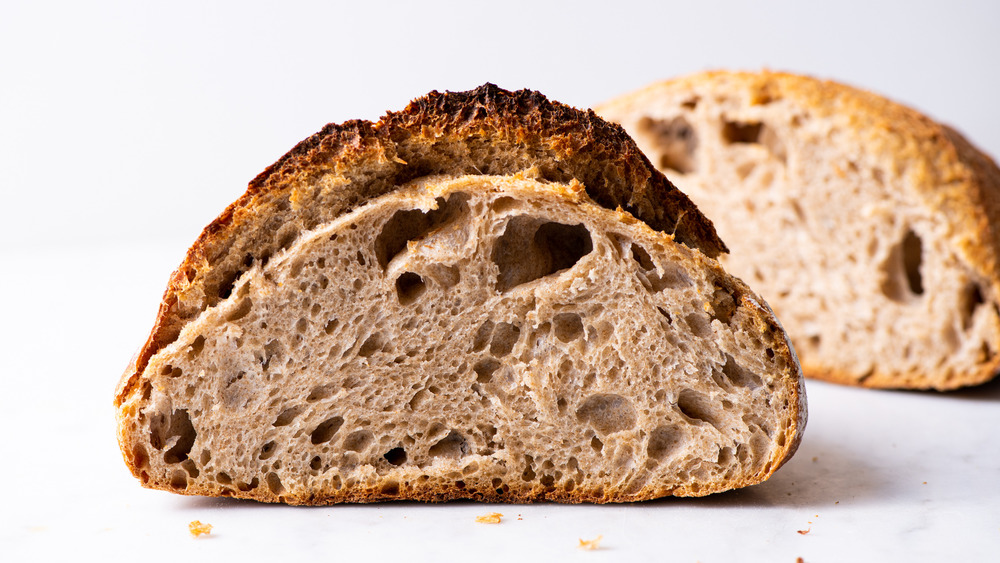
Let's start at the beginning: what is sourdough bread? Sourdough is an ancient technique of making bread using wild yeast instead of commercial yeast. This fermented bread made with just three ingredients: flour, water, and salt. It can take up to three days to bake just one batch. (Sourdough is an exercise in patience, friends!) The good news is that most of the time is inactive and there's very little actual work involved. More good news: fresh homemade sourdough is the best-tasting bread you'll ever eat. Sourdough bread has a toothsome, hearty exterior, and a chewy, tangy crumb.
Sourdough bread begins with something called a "starter" – a fermented mixture of a particular kind of flour and water. A starter is an active culture of wild yeast that has to be fed with water and flour on a regular basis to keep the good bacteria alive. Making your own starter is actually pretty easy. That's the first step to delicious sourdough bread via this recipe from Alexandra Shytsman of The New Baguette!
Prepare to make your rustic sourdough bread
Baking sourdough bread can take up to three days, so it's key to plan ahead. The night before you plan to build the dough, you have to make the "leaven", a small amount of active starter plus flour and water. The leaven ferments overnight and the following day is when most of the action happens – that is, when you begin to build the dough.
After the dough is assembled, it has to ferment for at least 3 hours. That means, if you started mixing your dough early that morning, you can conceivably bake bread that same night. However, sometimes it's easier to bake the following morning, in which case you can slow down the fermentation process by placing the dough in the fridge for up to 14 hours.
Funnily enough, fitting the process into your schedule can be one of the most challenging parts of baking bread! Don't worry too much, though, as all it takes is a touch of planning to set you right.
As for ingredients, you'll need just a few to make excellent sourdough. These are 1 tablespoon active sourdough starter, lukewarm water, 425 grams all-purpose flour, divided, 350 grams whole wheat flour, and 1 tablespoon fine grain salt.
Make the leaven for your sourdough
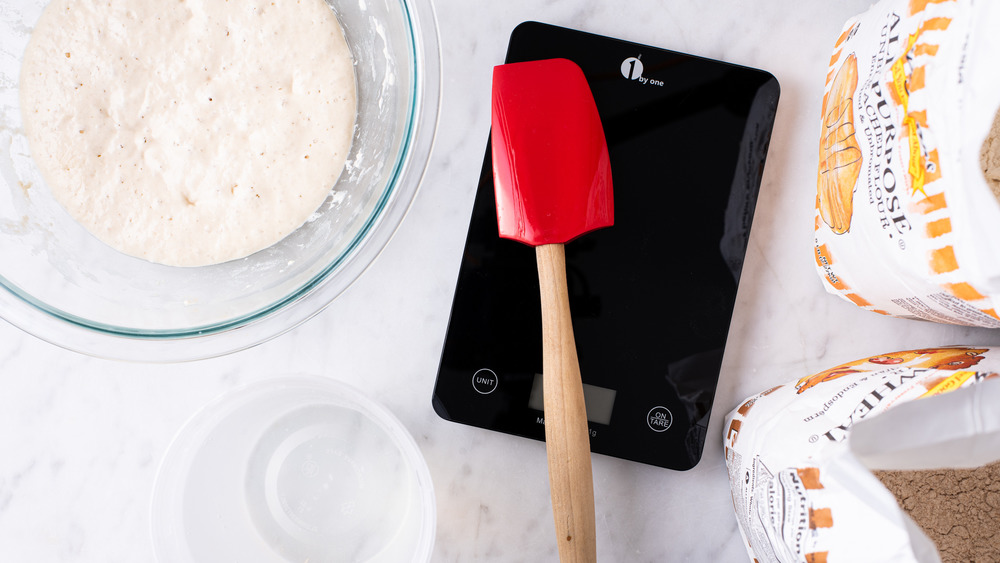
The night before you plan to build your dough, gather the active starter, flour, and water. You will need a kitchen scale that can measure in grams and a large bowl, preferably made out of glass.
Precision is key with any kind of baking and especially with sourdough. Using a scale to measure your ingredients is standard practice with bread and an important way to ensure good results. Flour is especially prone to issues when measured by volume, so scales really make a big difference here. You can get a digital scale at any kitchen supply store or online for an affordable price and will definitely be able to use it in a wide variety of other baked goods. If you don't have one, now is an excellent time for this small investment.
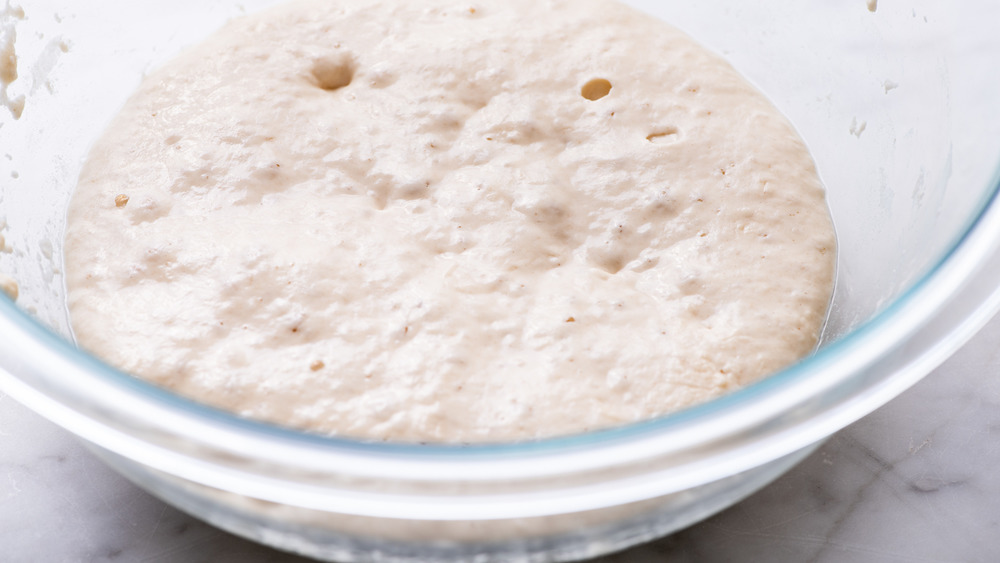
To make the leaven, combine a bit of starter with 75 grams each of water and flour in a glass bowl. Stir together to make a thick paste. Cover with plastic wrap and let stand overnight at room temperature.
Build the rustic sourdough bread dough
In the morning, the leaven should be about double its original size and very bubbly. However, you should make sure it's ready by performing the "float test". To do that, fill a small bowl with water and drop about 1/4 teaspoon of the leaven into the bowl. If it floats, it's ready! If it sinks within a few seconds, it's not. If that happens, let the leaven stand for another hour and perform the test again. If the leaven is not bubbly at all and doesn't pass the float test, it's likely that your starter wasn't strong enough and you should start the entire process over.
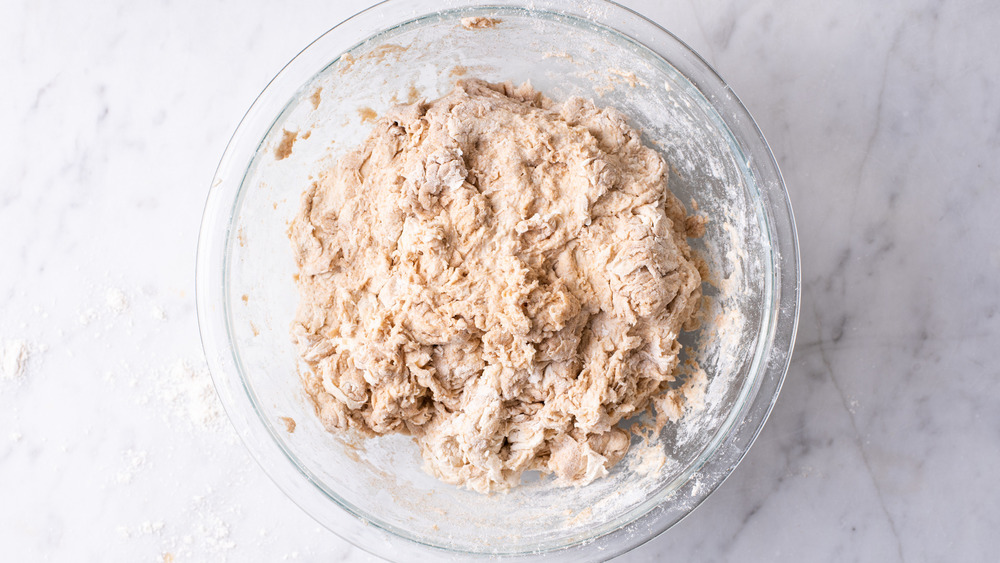
When ready, mix up the dough by adding 475 grams of lukewarm water and 350 grams of whole wheat flour to the leaven. To check the temperature of your water, simply dip a finger into the container. You'll know it's lukewarm when you can't feel a temperature difference between your skin and the water.
Once you've mixed the water, flour, and leaven, the dough will look very shaggy. Cover the bowl and let it rest for 1 hour. This is called the "autolysis" stage, where the flour is getting fully hydrated. You don't want to make the mistake of skipping it. Meanwhile, in a small bowl, combine 1 tablespoon salt with 50 grams of hot water and stir to dissolve.
Start folding the sourdough bread dough
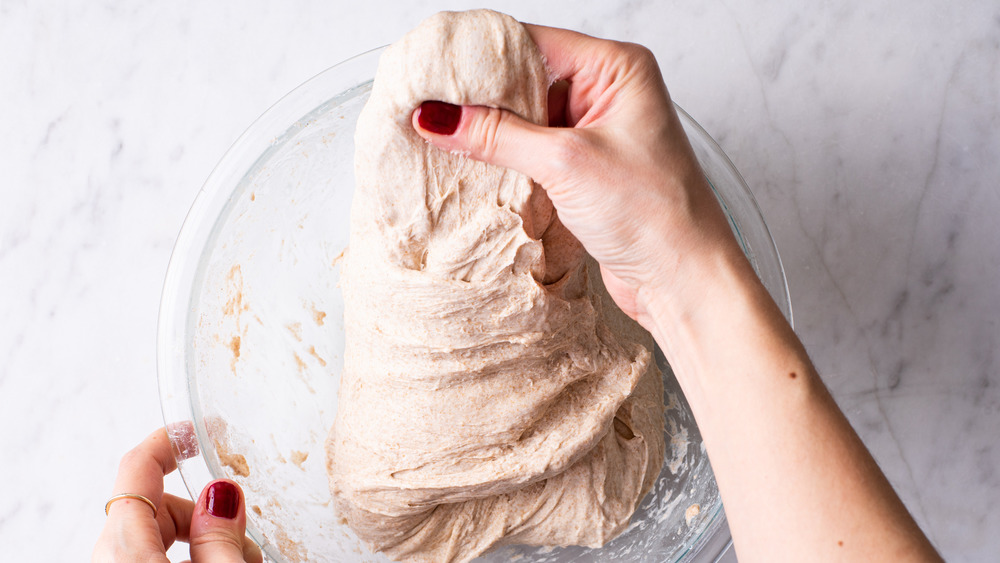
After the dough is hydrated, mix in the salt and water solution and incorporate by pinching and squeezing the dough. The dough should feel gummy at this point.
Then, begin "folding" the dough in the bowl. This step develops gluten, giving the bread structure. To fold, simply grab the dough at one side, lift and stretch it up, and fold it over itself. Give the bowl a quarter turn and fold again, folding the dough a total of four times. Cover the bowl and rest the dough for 30 minutes, then repeat the folds. Do this 6 times, about every 30 minutes, for 2 1/2 hours.
After the folds, rest the dough for 30 to 60 minutes, or until it looks pillowy. If your bowl is see-through, look at the dough from the side of the bowl. When you see small and large bubbles, you're ready to move on.
Pre-shape the rustic sourdough bread dough
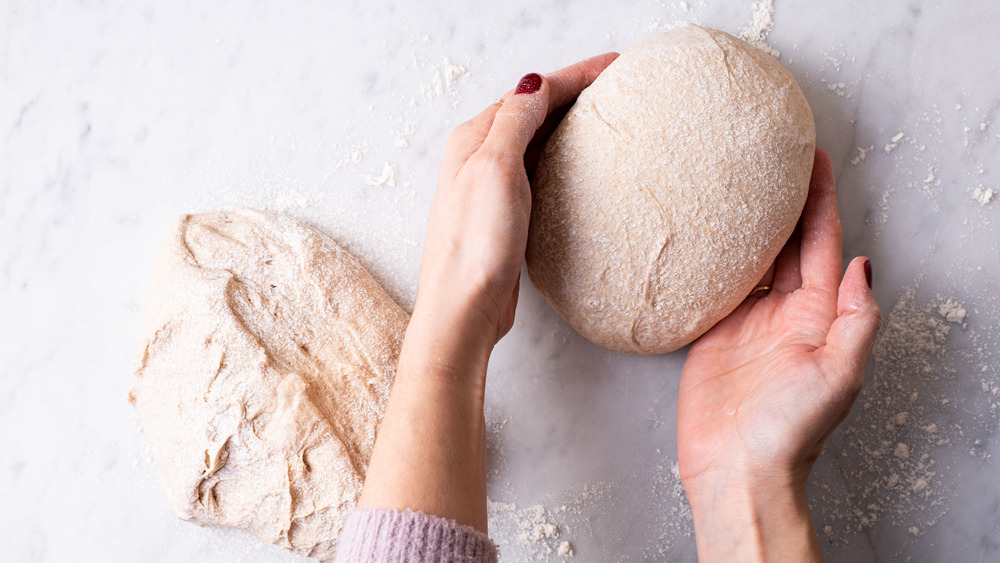
Next, transfer the dough to a floured surface. Be gentle here, as you don't want to deflate it. Cut it in half, using a metal bench scraper or sharp knife. Working with one piece at a time, shape the dough into rounds. Tuck the edges of the dough under by slipping the bench scraper under it and scraping counterclockwise. When the edges are tucked, continue shaping by cupping the dough with your hands and gently stretching the dough under, while simultaneously rotating the dough. This is called "pre-shaping". Drape a kitchen towel over the rounds and rest for 20 to 30 minutes.
Shaping the dough in this way builds surface tension and helps develop that chewy crust later on, so take a few minutes to make sure your loaves are pre-shaped properly.
Shape and proof the sourdough loaves
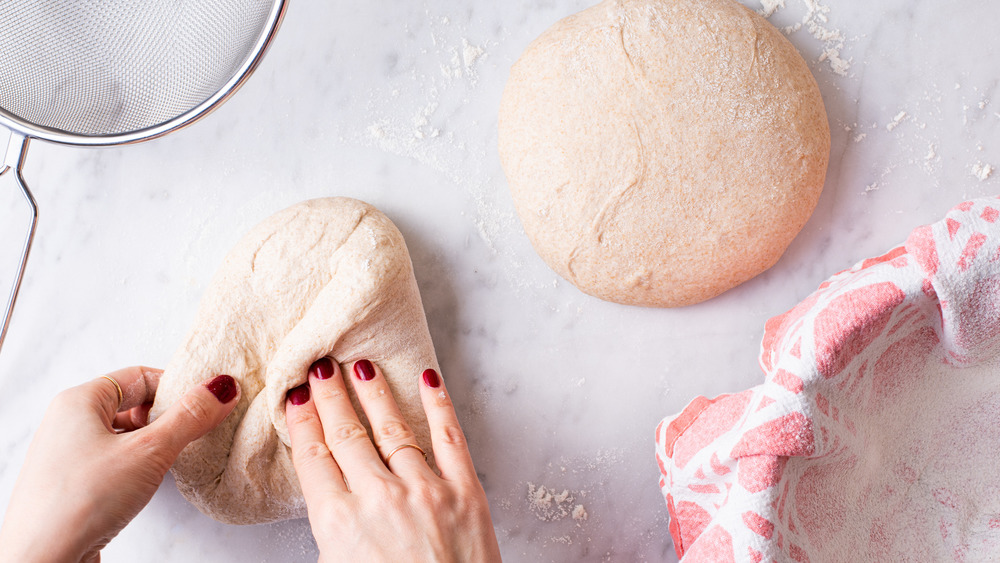
Last but not least, it's time to give the loaves their final shape and leave them to proof (also known as the rise).
Line 2 proofing baskets or colanders with clean kitchen towels. Dust them heavily with flour until the surface is coated in a thin layer. Working with one piece at a time, dust the dough with flour. Using the bench scraper, flip it over so the un-floured side faces up. Shape the dough by folding it as you folded it before: grab the bottom edge, gently pull it up, and fold it over the center. Repeat with the right and left sides, then the top edge. Cup the dough with your hands again and rotate it a few times to round it out. Dust the top generously with flour. Using the bench scraper, transfer it to the proofing basket seam-side up and gently fold the towel on top. Repeat with the second piece of dough.
Sourdough has to proof for about 3 hours at room temperature, or up to 14 if left overnight in the fridge. Whatever vessel you use for proofing, be sure to flour it really well, since you do not want the dough to stick.
Finally, bake your rustic sourdough bread
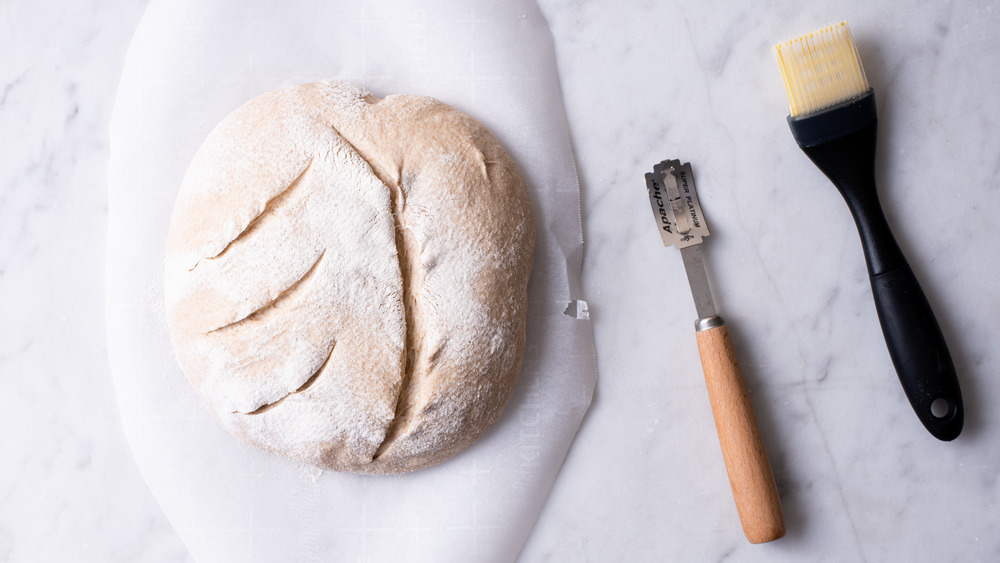
When you're ready to bake, place a Dutch oven and its lid in the oven and preheat to 500 degrees Fahrenheit for at least 30 minutes.
Working with one piece of dough at a time, turn it out seam-side down onto a piece of parchment the size of the Dutch oven. Before baking, the loaves need to be "scored". Scoring refers to making a slash across the top, which is essential for the dough to release steam and rise properly. There are many scoring patterns you can make, from a basic single slash to intricate floral patterns. You can use a specialized cutting tool called a "lame", or you can use a sharp chef's knife to score your loaf.
Transfer the dough with the parchment into the hot Dutch oven and cover tightly with the lid. Bake for 10 minutes, then reduce the oven temperature to 450 degrees Fahrenheit and continue baking for 20 more minutes. Finally, uncover the Dutch oven. At this point, the dough should have "sprung" up. Continue baking for 12-15 minutes, until the dough is deeply browned. Remove the loaf from the pot and set it aside to cool. Bake the second loaf in the same way.
Sourdough needs a very hot and humid environment in order to "spring" up while baking, which is why a Dutch oven with a lid is key.
Cool the rustic sourdough bread loaves

It's certainly tempting to slice into a hot steamy loaf as soon as it comes out of the oven, but we really advise against it. Allow the loaves to cool for at least an hour before slicing. Bread firms up after it cools, which gives the interior its final structure and makes it easier to cut into nice, even slices.
Sourdough will keep well at room temperature, covered tightly in plastic, for up to 3 days. If you plan to keep it for longer, store it in the fridge for up to 2 weeks.
Rustic sourdough bread
Making sourdough bread may be an advanced baking technique, but it's worth the time and effort for the tangy, chewy, rustic loaves you can make with this recipe
Ingredients
- 1 tablespoon active sourdough starter
- Lukewarm water
- 425 grams all-purpose flour, divided
- 350 grams whole wheat flour
- 1 tablespoon fine grain salt
Directions
- First, make the leaven. The night before you plan to build the dough, place 1 tablespoon active starter in a large bowl. Add 75 grams lukewarm water and stir to dissolve the starter. Then add 75 grams of all-purpose flour and stir into a thick paste. Cover tightly with plastic and let stand at room temperature overnight, about 12 hours. By the next morning, the leaven should be doubled and bubbly.
- Add 475 grams of lukewarm water to the leaven and stir to dissolve. Then add 350 grams whole wheat flour and the remaining 350 grams of all-purpose flour. Stir until all the flour is incorporated. Cover the bowl and rest for 1 hour.
- Meanwhile, in a small bowl, combine 1 tablespoon salt with 50 grams of hot water and stir to dissolve.
- After resting the dough, pour the salt solution over the dough and incorporate it by pinching and squeezing. The dough should feel gummy at this point.
- Grab the dough at one side, lift, stretch, and fold it over itself. Give the bowl a quarter turn and fold again, folding the dough four times. Cover and rest for 30 minutes, then repeat the folds. Do this 5 more times, every 30 minutes, for 2 1/2 hours.
- After the folds, let the dough rise for 30 to 60 minutes until it looks slightly pillowy.
- Turn the dough out onto a floured surface. Divide the dough in half. Sprinkle a little flour over each piece.
- Working with one piece at a time, shape the dough into rounds. Tuck the edges of the dough under by slipping the bench scraper under it and scraping counterclockwise. When the edges are tucked, continue shaping by cupping the dough with your hands and gently stretching the dough under, while simultaneously rotating the dough. Drape a kitchen towel over the rounds and rest for 20 to 30 minutes.
- Line 2 proofing baskets or colanders with clean kitchen towels. Dust them heavily with flour.
- After the rest, dust the dough with flour. Using the bench scraper, flip it over so the un-floured side faces up. Shape the dough by folding four times, starting with the bottom edge gently folded to the center, followed by the right, the left, and the top, for a total of four folds. Gently flip the dough seam side down. Cup the dough with your hands again and rotate to round it out. Dust the top generously with flour. Using the bench scraper, transfer it to the proofing basket seam-side up. Fold the towel edges over the dough. Repeat with the second piece.
- Rest the dough at room temperature for 3 to 4 hours. Alternately, rest it overnight in the fridge.
- When ready to bake, place a Dutch oven and its lid in the oven and preheat to 500 degrees Fahrenheit.
- Working with one piece of dough at a time, turn it out seam-side down onto a piece of parchment the size of the Dutch oven. Using a sharp knife, slash the surface of the dough from top to bottom.
- Transfer the dough with the parchment into the hot Dutch oven. Cover tightly with the lid and bake for 10 minutes.
- Reduce the oven temperature to 450 degrees Fahrenheit and continue baking for 20 more minutes.
- Uncover the Dutch oven. Continue baking for 12-15 minutes, until the dough is deeply browned. Remove the loaf from the pot and set it aside to cool. Bake the second loaf in the same way.