Viennetta Cake
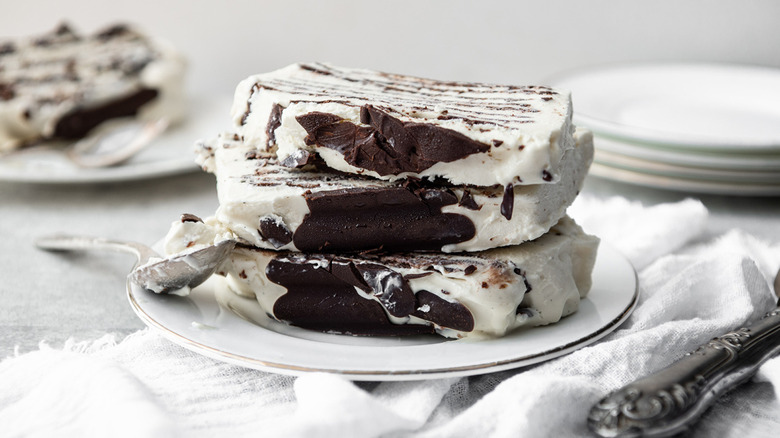
Ice cream lovers looking to up the ante from eating out of a carton with a spoon should give this delicious recipe for Viennetta cake from developer Jennine Bryant a try. Not only does it have an air of elegance and a fanciful look, it tastes absolutely scrumptious, too! Any guests you serve this to won't believe you made it, and if they do, they'll think you spent hours toiling in the kitchen preparing this whimsical dessert.
Thankfully, it takes just 10 minutes to fix! Keep in mind that the Viennetta cake must solidify in the freezer for 24 hours, so if you're preparing this for guests and not just an indulgent treat for the family, you'll need to plan ahead to make this sophisticated dessert.
Bryant said it used to be considered a "special occasion" dessert that shone in the spotlight. But thanks to a surge in popularity, "homemade retro bakes" are the latest trend. She expects to see more of these types of desserts becoming a centerpiece at casual dinners among friends and family.
"A homemade Viennetta is a bit of a labor of love," she says. "Creamy rich vanilla ice cream with crackling layers of chocolate is delicious and it feels so decadent and grand. It's also totally possible to make with different ice cream flavors or different types of chocolate, so it's a fun dessert to experiment with depending on your favorite ice cream flavors."
Gather up the ingredients
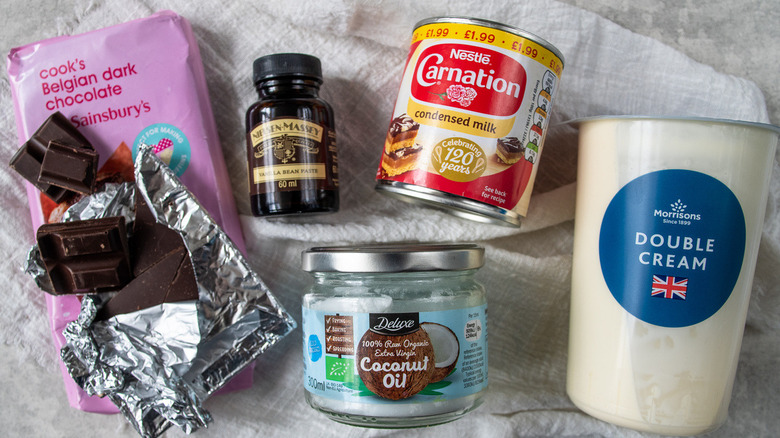
Despite its sheer elegance and beautiful marbled appearance, Viennetta cake isn't hard to make, nor does it require a long list of hard-to-find ingredients. It's really quite simple to assemble. You'll need to have a 14-ounce can of condensed milk, two and half cups of whipping cream, one teaspoon of vanilla extract, two cups of dark chocolate, and two tablespoons coconut oil. (Bryant prefers 70 percent dark chocolate for this recipe.)
"Dark and rich, but still sweet," she says.
The type of coconut oil you use doesn't matter as much for this recipe, as its role is to help with the chocolate-melting process.
Make the Viennetta cake creamier
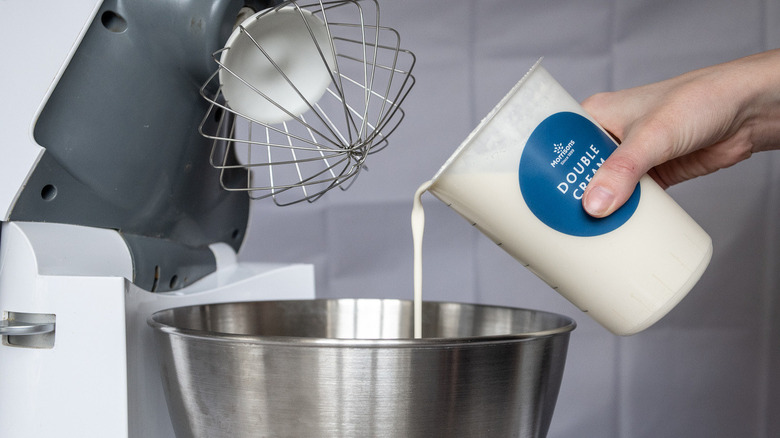
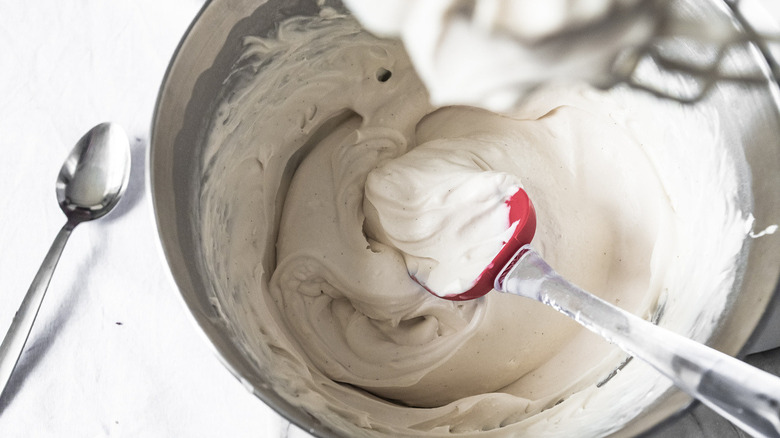
While traditional ice cream is amazing straight out of the carton and spooned into a bowl with whipping cream and a cherry on top, this recipe calls for making a similar frozen dessert that's even tastier. Scrape the whipping cream into a bowl and use a stand mixer or hand mixer to whip it until it becomes just stiff. Add in one teaspoon of vanilla extract and the 14-ounce can of condensed milk. Blend the new ingredients in with the whipping cream until it becomes thick and is able to hold its shape. Set it to the side and grab the chocolate.
Beautiful effect of chocolate swirls
Break up the two cups of the dark chocolate bar, and set it in a microwave-safe bowl. Add in the two tablespoons of coconut oil and microwave it, pausing the microwave every 15 to 20 seconds to stir the chocolate and ensure it doesn't burn.
"I think it should take one and a half to two minutes for the chocolate to melt in the microwave if the microwave is on high. It is important to check it and stir frequently so that the chocolate doesn't burn," Bryant says.
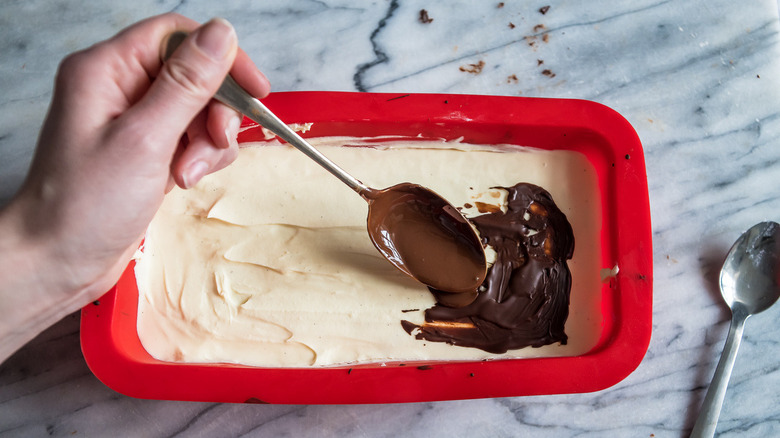
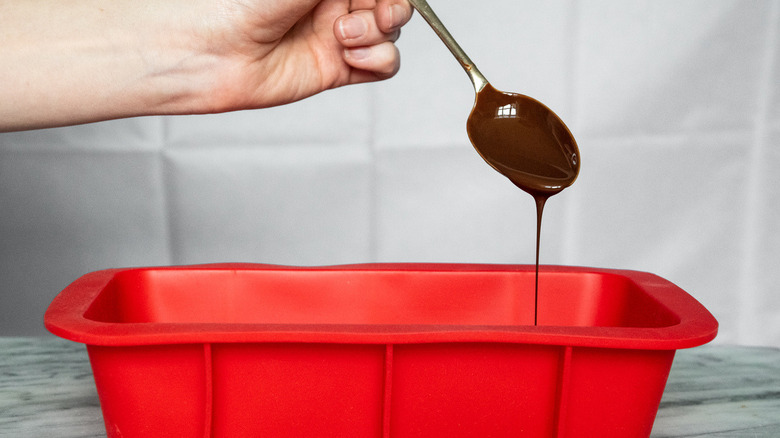
Once the chocolate and coconut oil are thoroughly melted together, stir the combination. Then, using a spoon, drizzle a little of the chocolate down the middle of the bottom of the loaf tin. Put this in the refrigerator for 10 minutes to harden.
Assemble the Viennetta cake
Use a spatula or a spoon and add some of the cream mixture to the loaf tin and smooth down the top, then freeze for an hour. Keep the cream mixture in the refrigerator during this time to keep it "cool and fresh."
After an hour has passed, place the bowl with the dark chocolate back in the microwave to melt again.
"When remelting the chocolate, it shouldn't take too long, a to a minute and a half, stopping regularly to stir the chocolate again. It depends a little on the microwave. If it's a little warm, I just leave it to stand for a few minutes and cool. Luckily, when the chocolate comes into contact with the frozen ice cream, it tends to solidify very quickly," Bryant says.
Once the chocolate is ready, spread a layer of the melted chocolate across the top of the ice cream in the loaf tin, avoiding the edges.
Continue working with the layers
Since the melted chocolate will harden quickly, go ahead and take the cream mixture from the refrigerator and spread another layer across the top of the chocolate. Slide the loaf tin into the freezer for an hour to harden further.
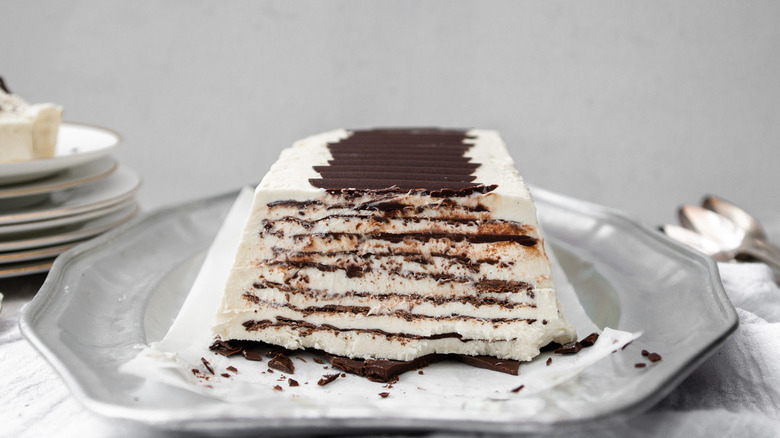
Continue to alternate layering the chocolate and cream mixture until the tin is full and the ingredients are used up. Put it in the freezer to chill until ready to eat.
"I don't layer the chocolate all the way to the edge. I leave an edge of about an inch of ice cream when doing the chocolate layers, until the very last layer, which I cover completely with chocolate," Bryant says.
Time to serve this scrumptious dessert
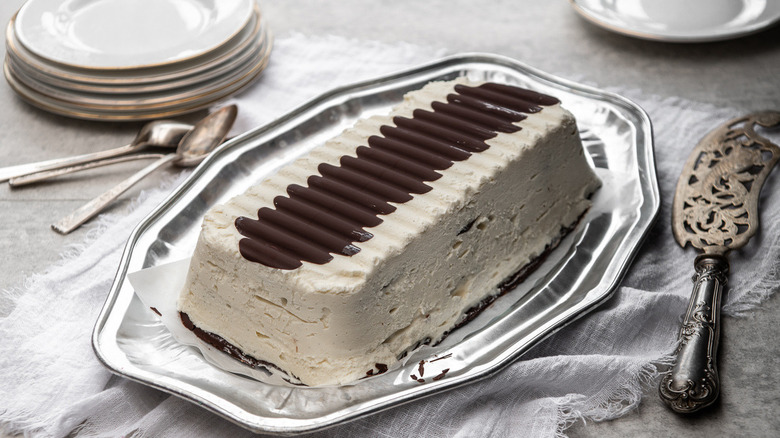
When it's time to scoop up a spoonful of this amazing dessert, take the Viennetta cake out of the freezer. Place a square of parchment paper on the bottom of a serving platter. Gently peel back the loaf tin from the Viennetta cake, place it on the serving platter, and slice it with a warm knife.
"It's definitely easier to use a silicone loaf pan, although probably not impossible to use a metal one. The silicone means you can gently pull it off without having to warm the sides of the Viennetta so it slides out. It's definitely a good piece of equipment," Bryant says. "Eat quickly before it melts!"
Viennetta cake directions
Ice cream lovers looking to up the ante from eating out of a carton with a spoon should give this delicious recipe for Viennetta cake a try.
Ingredients
- 2 1/2 cups (20 ounces) whipping cream
- 1 teaspoon vanilla extract
- 1 tin condensed milk (roughly 1 1/4 cups or 14 ounces)
- 2 cups dark chocolate
- 2 tablespoons coconut oil
Directions
- Pour the whipping cream into a bowl or stand mixer and whip until just stiff.
- Add 1 teaspoon vanilla extract and the tin of condensed milk. Mix this together until it becomes thick and holds its shape. Put to one side.
- Break up the chocolate and put in a microwave-safe bowl. Add the 2 tablespoons coconut oil, then gently microwave, stopping every 15 to 20 seconds to give the chocolate a stir so it doesn't burn.
- Once the chocolate and coconut oil are melted together, mix. Then, using a spoon, pour a little of the chocolate down the middle of the loaf tin. Put this in the fridge for 10 minutes to harden.
- Using a spatula or a spoon, add some of the cream mixture to the loaf tin, smoothing the top, and then put in the freezer for an hour. In the meantime, make sure to put the cream mixture in the fridge to keep it cool and fresh.
- Once the hour is up, put the chocolate into the microwave briefly to melt it again (though make sure it doesn't get too hot — you don't want it to melt the ice cream!), then spread a layer on top of the ice cream in the loaf tin, making sure to not go right to the edge.
- The chocolate will harden quickly, so straight afterward, take your cream mixture from the fridge and spread another layer on top of the chocolate. Then, once again, put this in the freezer for an hour to harden.
- Continue to alternate layering the chocolate and cream mixture until the tin is full and ingredients are used up. The bottom layer should be a full coating of chocolate. Put in the freezer to chill until ready to eat.
- When ready to serve, take the Vienetta out of the freezer, and place a square of baking paper on the bottom between the Vienetta and the serving dish. Gently remove the loaf tin — this should be fairly easy with a silicone tin as you can peel it back.
- Slice the Vienetta using a warmed knife and eat quickly before it melts!
Nutrition
| Calories per Serving | 592 |
| Total Fat | 40.7 g |
| Saturated Fat | 25.4 g |
| Trans Fat | 0.0 g |
| Cholesterol | 83.5 mg |
| Total Carbohydrates | 49.6 g |
| Dietary Fiber | 4.0 g |
| Total Sugars | 41.6 g |
| Sodium | 99.4 mg |
| Protein | 8.6 g |