The Hot Chocolate Bombs You'll Want All Year Round
Go on Instagram, and you are bound to come across bright, colorful, indulgent-looking images of hot chocolate bombs. As professional chef Maren Epstein, who blogs at Eating Works, told Mashed, even she was inspired to create a hot chocolate bomb recipe after scrolling through Instagram. "I thought they would be tons of fun to make and watch open." The treat is a bit advanced to make but adds "a bit of wow to dessert," according to Epstein, and thus, it's a must-try for your next dinner party, or hey, to treat yourself!
Consider that the recipe calls for just six ingredients and comes together in about 20 minutes — so yes, you too can make a chocolate sphere filled with hot chocolate and, if you wish, marshmallows! You can decorate your bombs as Epstein does, or feel free to come up with your own unique take on the trend sweeping social media and making mouths everywhere very happy.
Gather your ingredients to make these hot chocolate bombs
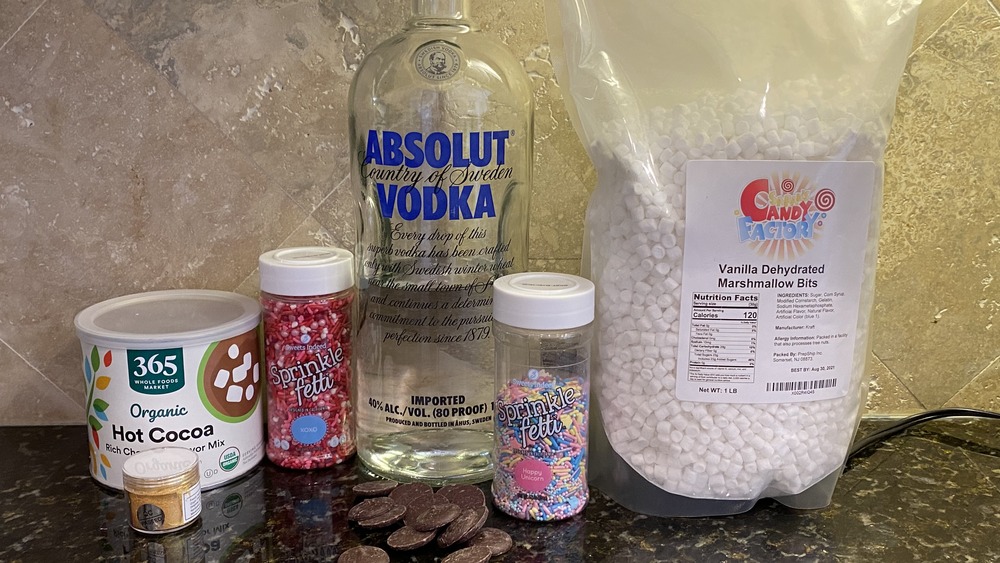
Step one is to simply shop for the ingredients needed to create your hot chocolate bombs. Epstein's recipe requires dark chocolate melting wafers, which, as she explained to Mashed, "are little chocolate discs that are designed to be tempered. They contain vegetable oil, which ensures that your chocolate will be shiny when it comes out of the mold." She cautions home cooks that while, "Chocolate chips are good for baking, they don't contain vegetable oil. Therefore, you shouldn't use chocolate chips." Good to know.
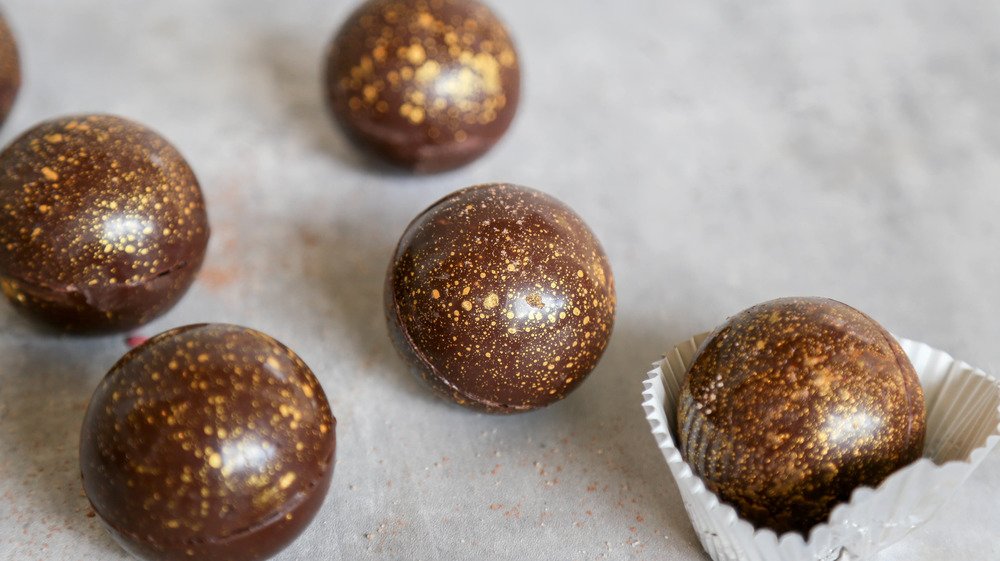
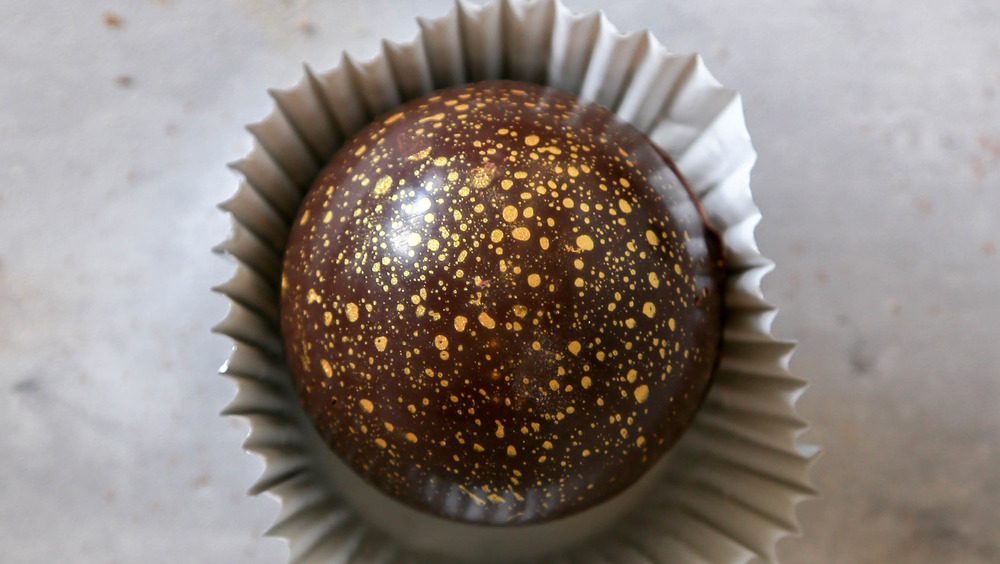
Meanwhile, Epstein's hot chocolate bomb recipe also calls for a touch of vodka — don't worry, this treat is still safe for the entire family — as well as hot chocolate mix (obviously), mini dehydrated marshmallows, and optionally, gold dust, and sprinkles to decorate these treats and show off your skills to your nearest and dearest.
Create your gold dust for these hot chocolate bombs
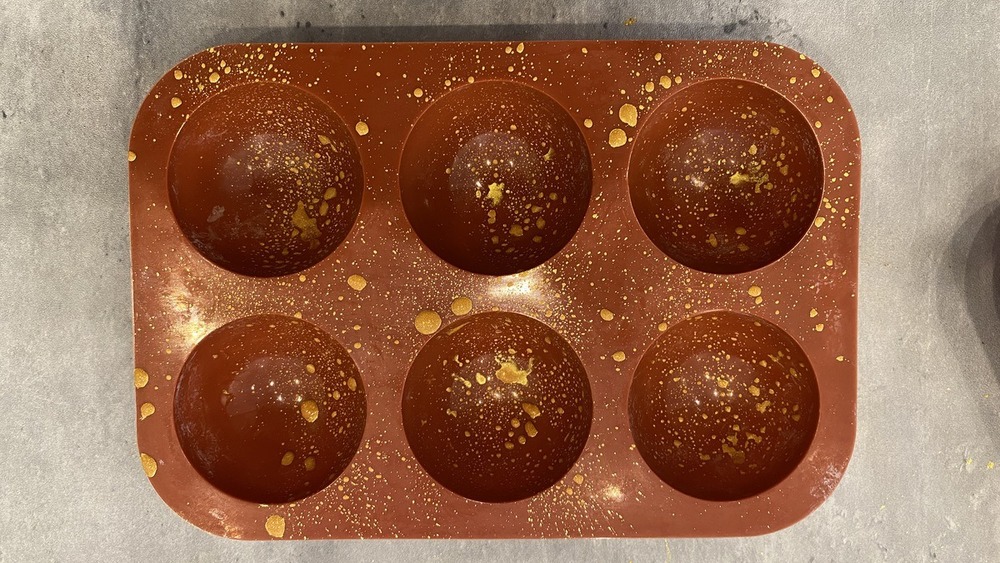
Start by combining a tablespoon of vodka and the gold dust for these hot chocolate bombs. You will use a paint brush to flick specks of gold onto the sphere molds, with Epstein noting, "The vodka is only used to make painting the gold easier." She added, "I use vodka for the high alcohol content." But no one is going to get drunk on this recipe! "The alcohol evaporates quickly, leaving behind nothing but the chocolate. This is completely safe for children," Epstein explained to Mashed.
Once you have adorned your sphere molds, which as Epstein told us, "are the half circle molds made from silicone that you need to make the chocolate bombs" and are available online, you will place the molds in the refrigerator. Why? This is to allow the gold to set and the alcohol to evaporate. After this process occurs, it will leave behind only the glittery gold.
Melt the chocolate for your hot chocolate bombs

As your gold dust sets, go ahead and temper your chocolate for your hot chocolate bombs. What, what? For those not familiar with this cooking term, Epstein explains to Mashed, "Tempering the chocolate means to slowly melt it over heat."
For this step, you'll need a double boiler. Basically, this is a bowl with the chocolate in it, which you place over a pot of simmering water. Epstein advises home cooks to ensure the bottom of the bowl does not touch the water. The process works best over medium-to-low heat.
As the chocolate melts over the heat, just be sure to stir it often, with Epstein noting this will allow the chocolate to melt nice and evenly. Now, once your chocolate is almost completely melted, turn off the heat source. Finally, stir the shiny chocolate until the mixture is completely silky smooth. Um, is it okay if we sneak a taste?
Layer chocolate into the spheres to make these hot chocolate bombs
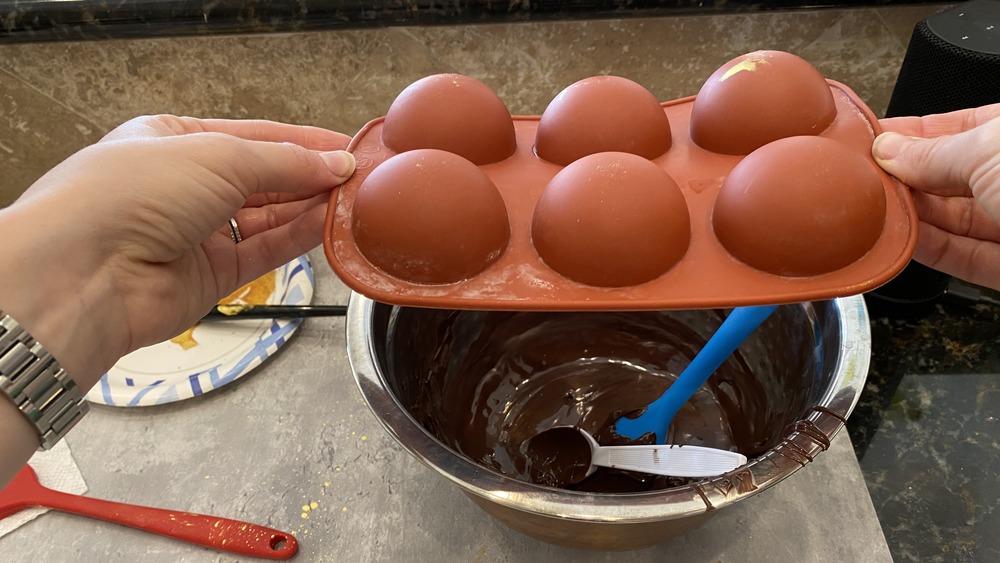
At this stage of this recipe for hot chocolate bombs, you will spoon a tablespoon of your melted chocolate into each sphere. Using the back of a spoon, spread the chocolate gently around the spheres. Once you have filled each sphere, flip the mold over, holding it over the bowl of chocolate so the excess drips down and coats the sides of the spheres.
Now, you will place the molds in the freezer, facing down. Do this for just a few minutes. Epstein explains, "Since the chocolate will tend to pool to the bottom of the sphere, the sides of the spheres can easily become thin and brittle. So, by freezing the molds upside down, you will get a more even thickness throughout the bomb."
Once a few minutes have passed, take the spheres out of the freezer. This is when you will paint on a second layer of chocolate. Epstein recommends using the paint brush, not the spoon here, so your "second layer of chocolate bolsters the sides."
Return the molds to the freezer for another few minutes so the chocolate can harden before moving on to the next step.
Smooth out the chocolate on your hot chocolate bombs
After the second round in the freezer, you will ever-so-delicately remove the chocolate spheres from the molds. Epstein recommends pulling the sides away to get the spheres to come out in one piece.
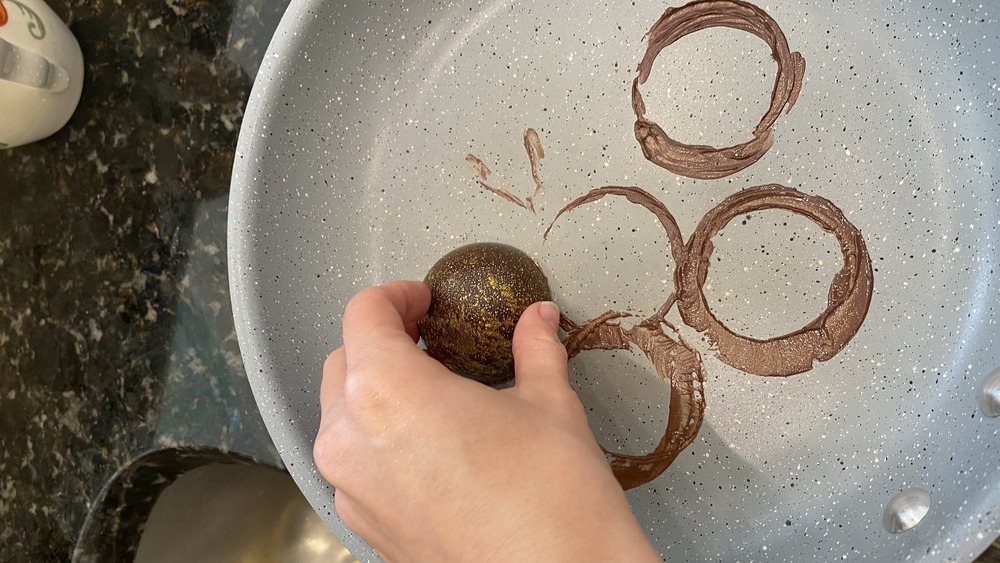
Now, heat a frying pan until it is nice and hot. But that's it — at that point, you can actually remove the pan from the heat. This is when you will use the heat source to smooth out the chocolate, with Epstein directing home cooks to take one sphere at a time, and place it on the hot pan. You will turn the sphere slightly in each direction to smooth out the base, and then, pull it off the heat.
Once this process is complete, place the sphere, cup side up, on the back of the mold to help hold it up. And now, we are going to assemble the hot chocolate bombs. Hooray!
Assemble your hot chocolate bombs
To assemble your scrumptious, tempting, and totally impressive-looking hot chocolate bombs, fill each sphere with hot cocoa and the mini marshmallows. You can add sprinkles if you like, or get creative and fill the treat with candy, chocolate chips, or any kind of sweet indulgence of your desire. Then, take a second sphere, and using the same process as before, smooth it out on the heated frying pan. Gently place the second sphere on top of the first. You have officially created a hot chocolate bomb. Congratulations! Repeat the process until all of your treats are assembled, and ready to eat. Like, now.
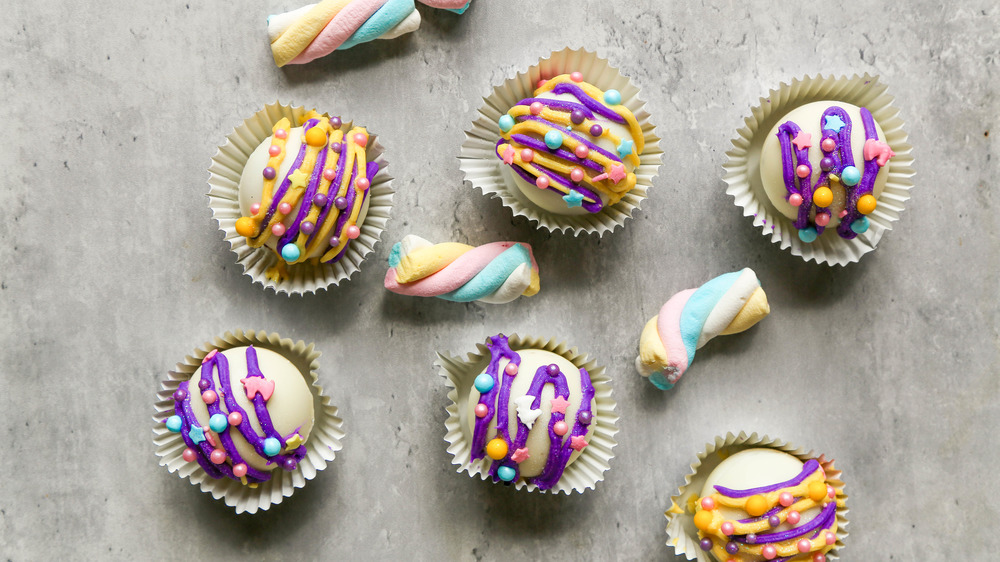
Meanwhile, should you like to try your hand at making white chocolate bombs. Epstein says that this "is the exact same process as the dark. Simply swap out the dark chocolate melting wafers for white ones." In her kitchen, she used "extra white chocolate and gel-based food coloring to create colorful chocolate for decorating." Her beautiful bombs are adorned with purple and yellow chocolate, but the sky's the limit with how you choose to decorate your creation.
Hot chocolate bombs directions
Go on Instagram, and you are bound to come across bright, colorful, indulgent-looking images of hot chocolate bombs. You can make them yourself!
Ingredients
- 2 ¼ cups dark chocolate melting wafers
- 1 tablespoon vodka
- 9 tablespoons hot chocolate mix
- Mini dehydrated marshmallows
- ¼ teaspoon gold dust
Optional Ingredients
- Sprinkles
Directions
- Combine vodka and gold dust. Use a paint brush to flick specks of gold onto the sphere molds. Place the molds into the fridge to set, allowing the alcohol to evaporate and leave the gold.
- Temper the chocolate in a double boiler. Make sure the bottom of the bowl doesn't touch the water, and turn the heat on medium–low. Stir often to ensure that the chocolate melts evenly. Once it's almost completely melted, turn off the heat and stir until the mixture is completely smooth.
- Take the melted chocolate and place about 1 tablespoon into each sphere. Use the back of a spoon to spread it around the sphere gently. Flip the mold over and hold it over the bowl of chocolate, allowing the extra chocolate to drip down the sides and out.
- Place the molds in the freezer facing down for a few minutes. Take them out and paint a second layer of chocolate on. Make sure they make the sides of the spheres thick. Return the molds to the freezer for another few minutes to harden.
- Gently remove the spheres from the mold by pulling the sides away.
- Heat a frying pan until it's hot. Remove from the heat.
- To assemble the bombs, take one sphere and place it on the hot pan. Turn it slightly in each direction to smooth it out and pull it off. Place it cup-side up on the back of the mold (to hold it up). Fill the sphere with hot cocoa, sprinkles, and marshmallows. Take a second sphere and smooth it out on the frying pan. Gently place the second sphere on top of the first.