Easy Caramel Filling Recipe
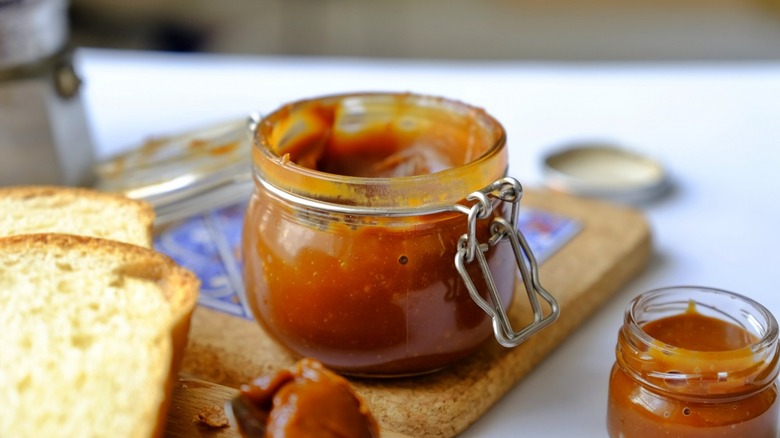
It's always exciting when professional chef and recipe developer, Eric Ngo, who's known on Instagram as Frenchie The Toast, brings us a recipe for treats that we never thought we might actually be able to make at home. Ngo's recipe for easy caramel filling is no different. First, it has only four ingredients, all of which might be described as kitchen or pantry staples. In other words: if you have to make a trip to the grocery store at all for this one, that trip should be a quick one involving only items with which you're already familiar. That being said, Ngo classifies this caramel filling recipe as "easy" for the "intermediate-level" cook, as opposed to the new beginner. It's not because you're doing anything that you haven't done before (i.e. stirring a mixture in a saucepan), but because what you'll be doing requires your undivided attention (for both quality control and kitchen safety purposes). And you'll find that it's definitely worth the effort because the lovely caramel filling this recipe produces is incredibly versatile.
For example, Ngo will explain how to make the filling either more or less pourable. That way you can use it "to fill macarons, to flavor your coffee drink, eat it with ice cream, or just eat it by the spoon," Ngo tells us. Drooling yet? Let's get to it and make this delicious caramel filling!
Gather your ingredients
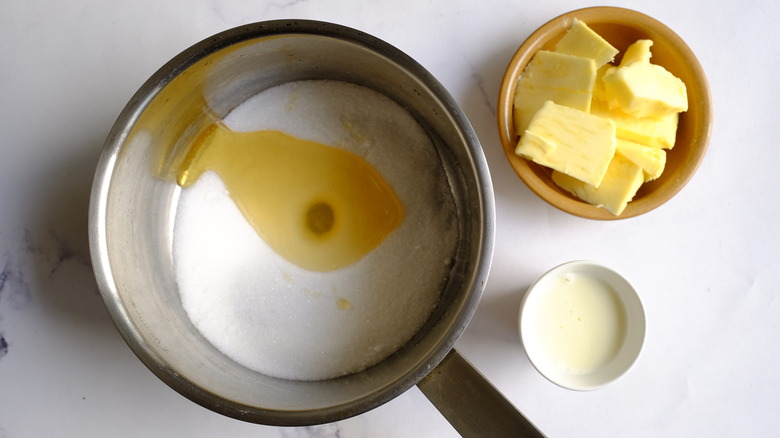
To make this recipe for easy caramel filling, you'll need just four ingredients, most of which you probably have in your kitchen already. First, you'll need ⅔ of a cup of granulated white sugar. In addition, you will need 2 tablespoons of honey. If you don't have honey on hand, you can use corn syrup instead. The purpose of the liquid sweetener is to help keep the caramel from crystallizing and becoming grainy, Ngo explains, and if you choose honey, as opposed to corn syrup, it adds another layer of flavor to the caramel.
Your third ingredient is 4 tablespoons of heavy whipping cream. Be sure to take the cream out of the refrigerator before you start cooking because it's better if it's allowed to warm up at least to room temperature. The fourth ingredient is one stick of salted butter, which you'll want to cut into smaller pieces (you might as well take this out of the fridge when you take out the cream).
In addition, it couldn't hurt to have a digital kitchen timer by your side and at the ready.
Heating the sugar and honey: this will take a bit of focus
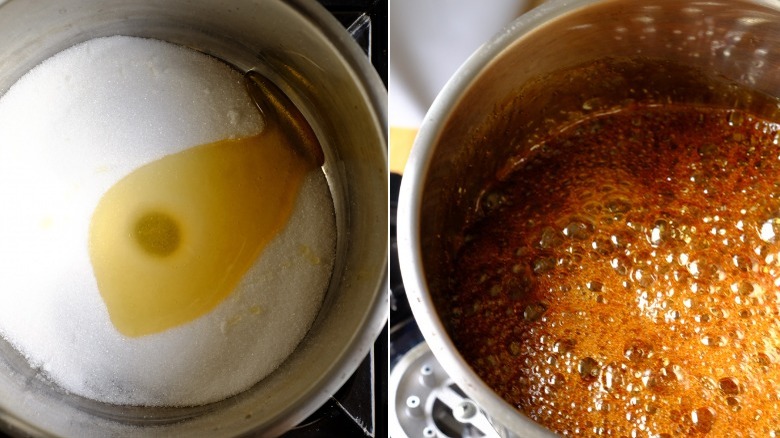
Place the sugar and the honey or corn syrup (whichever you're using) into a large saucepan, and turn the heat to medium. Allow the sugar to melt, stirring the mixture "every minute" as Ngo says, and making sure to scrape any sugar off the sides of the saucepan to prevent the formation of sugar crystals. When the mixture has turned a medium-brown color (after about 4 to 6 minutes), turn off the heat, and move the saucepan off the burner.
Please note: Ngo advises that you pay attention and "be extremely careful when making caramel" because "it gets really hot" and could cause painful burns if it spatters onto your skin.
Now add the whipping cream to the mixture
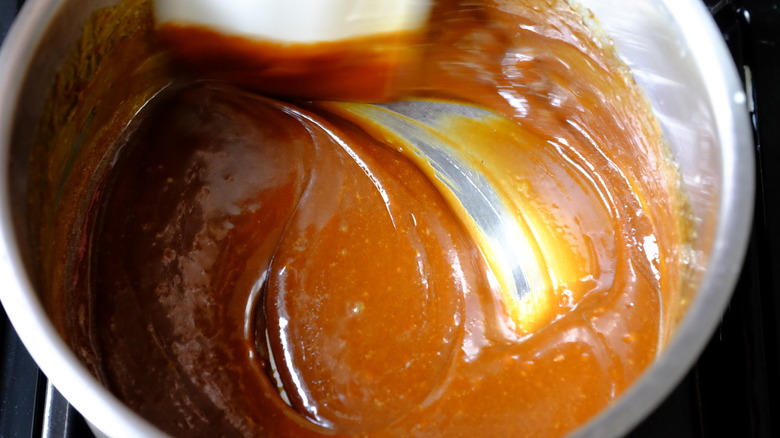
Hopefully your heavy cream has come up to at least room temperature by now. Assuming that it has, add it to the sugar mixture a little bit at a time, being careful to avoid any steam that rises from the mixture as you stir. As Ngo explains, "the sugar [mixture] is close to 400 F," and so even at room temperature, the cream will still be "cold" compared to the sugar mixture. And mixing a cold substance into a hot one can produce considerable steam.
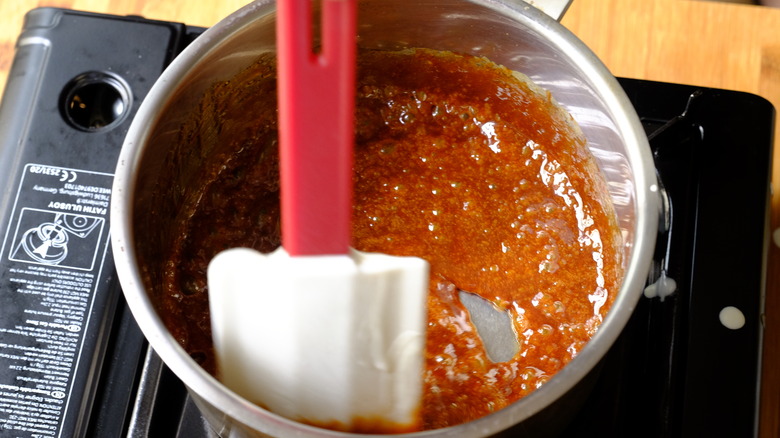
After stirring in all the cream, bring the mixture — which is now caramel — to a boil over medium heat. And here is where your digital kitchen timer will come in handy. The length of time you allow the caramel to boil will depend upon the consistency you're looking for. If you are looking for a more liquid caramel, then you'll want to take the saucepan off the heat after no more than 30 seconds to one minute. For a firmer caramel, keep it boiling for two to three minutes.
Stir in the butter to complete your easy caramel filling
As soon as your caramel has cooked long enough, per the previous instruction, you'll want to immediately turn off the heat and move the saucepan to cold burner (because assuming you've followed all the instructions up until now, the caramel should be cooked perfectly to your desired consistency). Stir in the butter, a little at a time, until the butter has been fully incorporated into the caramel.
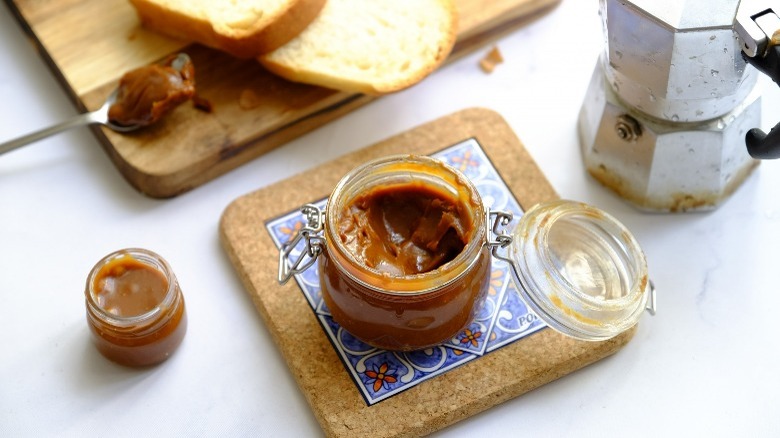
Serve warm in your coffee, over your favorite treat, or swirled into ice cream, or store in an airtight jar until you're ready to use it.
Easy Caramel Filling Recipe
This versatile, delicious caramel filling only requires four pantry staples -- give it a whirl and add it to your coffee, ice cream, or other sweet treat!
Ingredients
- 2/3 cup sugar
- 2 tablespoons honey (or corn syrup)
- 4 tablespoons heavy whipping cream, room temperature
- 1 stick salted butter, cut into pieces
Directions
- Place the sugar and honey in a large saucepan on a burner set to medium heat.
- Stir constantly and thoroughly until the mixture reaches a medium dark-brown color (around 4 to 6 minutes). Remove from heat.
- Add the cream a little bit at a time, stirring constantly and being careful to avoid any steam that rises.
- Turn the heat back to medium, and bring the caramel back to a boil for 30 to 60 seconds, stirring constantly. For firmer caramel, allow to boil for 2 to 3 minutes.
- Turn off the heat and remove the saucepan from the burner.
- Add the butter a little bit at a time, and stir until it is fully incorporated.
- Serve warm, or store in jar until ready to use.
Nutrition
| Calories per Serving | 277 |
| Total Fat | 19.0 g |
| Saturated Fat | 12.0 g |
| Trans Fat | 0.6 g |
| Cholesterol | 54.2 mg |
| Total Carbohydrates | 28.3 g |
| Dietary Fiber | 0.0 g |
| Total Sugars | 28.2 g |
| Sodium | 125.4 mg |
| Protein | 0.4 g |